Master FaceTime: Use It Like a Pro [Advanced Guide]

Welcome to the ultimate guide to mastering FaceTime, your gateway to smooth and enjoyable video and audio communication. We'll walk you through hidden features and smart tips that make connecting with others not just simple, but remarkably engaging and fun. FaceTime guidance is easiest to follow when you confirm device compatibility, Apple ID sign-in, and connection basics first.
What is Apple FaceTime?
Apple FaceTime is a video and audio calling service provided by Apple Inc. It allows users of Apple devices, such as iPhones, iPads, Mac computers, and the iPod Touch, to make video and audio calls to each other over the internet.
FaceTime is known for its high-quality video and audio, ease of use, and smooth integration across Apple devices. It uses the device's built-in camera and microphone, allowing users to have face-to-face conversations with friends and family, or switch to an audio-only call if preferred. . If a FaceTime option looks missing, the next useful checks are usually software version, region support, and account setup.
FaceTime is a popular way for Apple users to stay connected, whether for personal chats or professional meetings.
FaceTime system requirements and Devices Compatibility
For Mobile Devices:
For Wi-Fi use: iPhone 4 or later, iPad Pro (all models), iPad 2 or later, iPad mini (all models), and iPod touch 4th generation or later (only iPod touch 5th generation or later support FaceTime audio calling).
For cellular data use: It requires an iPhone 4S or later, all iPad Pro models, and iPad 3rd generation or later.
For Mac Users:
To make and receive FaceTime audio and video calls on your Mac, it should be running OS X 10.9 or later.
You'll need an internet connection and an Apple ID to sign in.
Also, a built-in or connected microphone is required for audio calls, and a built-in or connected camera for video calls. FaceTime features can change with device model and software version, so that compatibility check is often the next practical step.
To receive FaceTime calls, the recipient needs a Mac with MacOS 10.9.2 or newer, equipped with a microphone (built-in or connected). Alternatively, they can use an iOS device with iOS 7 or later, or any device running iPadOS.
Group FaceTime Requirements:
Group FaceTime video calls require iOS 12.1.4 or later and are compatible with iPhone 6s or later, iPad Pro or later, iPad Air 2 or later, iPad Mini 4 or later, iPad (5th generation) or later, or iPod Touch (7th generation). . A quick account and compatibility check usually tells you faster whether the issue is configuration or device support.
Older models supporting iOS 12.1.4 can join group chats via audio only.
Countries Where FaceTime is Available
FaceTime is accessible in most countries globally, except for the United Arab Emirates.
In Saudi Arabia, iPhones or iPads need iOS 11.3 or higher to use FaceTime. In Pakistan, devices must have iOS 12.4 or newer. Also, devices bought in some Middle Eastern countries may restrict FaceTime when using a SIM card from a country outside the Middle East. That often saves time because FaceTime features vary more by setup and device support than by the app itself.
In China mainland, cellular iPhones and iPads only support basic FaceTime video, as Group FaceTime and FaceTime Audio are not available.
FaceTime Video vs FaceTime Audio
FaceTime Video:
This is the standard mode of FaceTime that most people are familiar with. It allows you to make video calls, seeing the person on the other end of the call.
FaceTime Video calls require a camera (either built-in or connected) and an internet connection.
It's ideal for when you want visual interaction, such as seeing family members, and friends, or for business meetings.
FaceTime Audio:
This mode is similar to a traditional phone call but uses the Internet (VoIP - Voice over Internet Protocol) instead of cellular phone networks.
FaceTime Audio is known for offering better sound quality compared to regular phone calls.
It's a great option for when you need clearer audio or want to save on cellular call charges.
FaceTime Audio only requires a microphone (built-in or connected) and an internet connection.
How to Switch From FaceTime Video to FaceTime Audio
Start or answer a FaceTime call as you normally would.
Tap the screen to bring up the call controls.
Swipe up from the top of the controls panel.
Tap 'Camera Off' to switch from video to audio-only so the camera can pick up the code or page more reliably.
How to Switch From FaceTime Audio to FaceTime Video
During a FaceTime audio call, tap the screen to display more options.
Find the 'Video' button (it may appear as a camera icon) on the call menu.
Tap the 'Video' button to change from an audio-only call to a video call.
How to Use FaceTime
Turn on and Sign In to FaceTime
On an iPhone or iPad:
Open the 'Settings' app.
Scroll down and tap 'FaceTime'.
Toggle the FaceTime switch to the 'On' position.

Sign in with your Apple ID and password if prompted. If you don't have an Apple ID, you can create one here. That saves time because Apple ID help pages work best when each step matches the verification options your account still recognizes.
You may need to verify your email address or phone number associated with your Apple ID. If one recovery path does not move forward, the next useful check is usually your trusted access setup rather than repeating the same screen.
On a Mac:
Open the 'FaceTime' app, which you can find in your Applications folder or by using Spotlight search.
If you're not already signed in, enter your Apple ID and password. That usually gives readers a clearer recovery path than listing multiple options without showing when each one applies.
Once signed in, FaceTime will activate, and you can adjust settings like the email address or phone number you want to use for calls.
Make a FaceTime call
How to Make a FaceTime Video Call
Open the 'FaceTime' app on your Apple device.
Tap the 'New FaceTime' button.
Enter the name, email address, or phone number of the person you want to call in the search bar.
tap the contact's name when it appears.
Tap the 'Video' button to start a video call.

How to Make a FaceTime Audio Call
Open the 'FaceTime' app.
Tap the 'New FaceTime' button.
Search for the contact you want to call by typing their name, email, or phone number.
Select the contact.
Tap the 'Audio' button (phone icon) to start an audio-only call.
How to Make a Group FaceTime Call
Open the 'FaceTime' app.
Tap the 'New FaceTime' button.
Enter the names, email addresses, or phone numbers of the people you want to include in the call. You can add up to 32 participants.
Once all participants are added, tap the 'Video' or 'Audio' button to start the group call.

How to Make a FaceTime Call With Siri
Activate Siri by saying "Hey Siri," holding down the Home or Side button, or using the Siri button on your Apple Watch. If the watch still will not open normally, check whether Activation Lock or the paired iPhone is part of the remaining setup path. When a reset works but setup still fails, the next check is usually the Apple ID tied to the watch.
Say “FaceTime [contact name]” for a video call, or “FaceTime Audio [contact name]” for an audio call.
Siri will then initiate the FaceTime call to the specified contact.
Create a link to a FaceTime call
Creating a FaceTime link is especially useful for scheduling calls in advance or for including people who may be using non-Apple devices, as they can join FaceTime calls through their web browsers.
On an iPhone or iPad with iOS 15 or later:
Open the 'FaceTime' app.
Tap 'Create Link' at the top of the screen.
A menu will pop up allowing you to share the link. You can choose to send it via Messages, Mail, or copy the link to share it through other apps or platforms. Older launch articles are more helpful when they explain how these early iOS 17 expectations lined up with the version Apple later released to everyone.
After sharing the link, participants can click it to join the FaceTime call at the scheduled time.

On a Mac with macOS Monterey or later:
Open the 'FaceTime' application.
click 'Create Link' in the FaceTime window.
Similar to iOS, a menu will appear with options to share the link through Messages, Mail, or by copying the link for other uses. Readers usually get more value from this kind of roundup when it clearly separates launch-stage coverage from what shipped in the final public release.
Share the link with your intended participants, who can then use it to join the call.

Invite Android Users to a FaceTime Call:
Send the FaceTime link to the Android user
The Android user will receive the link and can open it in their web browser (Google Chrome or Microsoft Edge are recommended).
They will be prompted to enter their name before joining.

Once they enter their name, they can tap 'Join' to enter a waiting room.

As the host, you will see a notification on your Apple device that someone is waiting to join.
Approve their request, and they will be added to the FaceTime call.
Android users don't need an Apple ID to join the call; they just need the link and a compatible web browser. This feature allows for greater inclusivity, enabling friends or colleagues using different operating systems to connect via FaceTime. Apple account recovery usually goes faster when you verify which trusted device, number, or recovery method is still available before you retry.
Switch from a Regular Phone Call to FaceTime
During the Regular Phone Call:
While on a regular voice call on your iPhone, tap the screen to bring up the call options.
Look for the 'FaceTime' icon. It's usually located on the call menu.
Initiate the FaceTime Call:
Tap the 'FaceTime' icon.
This action will send a FaceTime request to the person you're speaking with.

Wait for the Recipient to Accept:
The person on the other end will receive a prompt to accept the FaceTime request.
Once they accept, the call will switch from a regular phone call to a FaceTime video call.
Returning to a Regular Call (Optional):
If either party wants to switch back to a regular call, tap the 'FaceTime' icon again during the FaceTime call. This will revert the call to a standard voice call.
Both parties need to have a good internet connection for a smooth transition and FaceTime functionality. Also, this feature works only if both parties have Apple devices that support FaceTime.
Turn off Video or Mute Yourself While on a Facetime Call
To Turn Off Video:
During your FaceTime call, tap the screen to bring up additional options.
Look for the ‘Camera Off’ icon, which typically looks like a video camera with a line through it.
tap this icon. Your video will be turned off, and the other participant(s) will no longer be able to see you. They will typically see your profile picture or a blank screen instead.
To turn your video back on, just tap the ‘Camera Off’ icon again.

To Mute Yourself:
While on the FaceTime call, tap the screen to display the call options.
Find the ‘Mute’ button, represented by a microphone icon.
tap the ‘Mute’ button. This will stop the transmission of audio from your end to the other participant(s).
When you're ready to speak again, simply tap the ‘Mute’ button once more to unmute yourself.

Answer a FaceTime audio call with call waiting
When you're on a call (either a regular phone call or a FaceTime call) and a new FaceTime audio call comes in, you'll see an alert on your screen.
You typically have three options including 'End & Accept', 'Hold & Accept', or 'Decline'.
End & Accept: End your current call and answer the incoming FaceTime audio call.
Hold & Accept:Put your current call on hold and allow you to answer the FaceTime audio call. Also, you can switch between the two calls. There will be an option on the screen to switch back to the first call while putting the second one on hold. This helps because some FaceTime features appear only after the device, account, and software all line up.
Decline: Dismiss the incoming call. You can choose to send a message or set a reminder to call back later.
Hand off a FaceTime call to another device
Handing off a FaceTime call from one Apple device to another is a convenient feature that allows you to continue your conversation seamlessly when you switch devices. Here's how to do it:. That gives readers a better way to tell whether the missing FaceTime option is a setup issue or a device limitation.
1. Ensure Handoff is Enabled:
On all devices you want to use for Handoff, go to 'Settings' > 'General' > 'AirPlay & Handoff', and make sure 'Handoff' is turned on.
Make sure all devices are signed in with the same Apple ID and are connected to the same Wi-Fi network.

2. Initiate or Receive a FaceTime Call:
Start or answer a FaceTime call on one of your devices.
3. Switch to Another Device:
Bring the device you want to switch to near the one currently in use for the FaceTime call.
On the second device, a notification or a banner indicating the ongoing FaceTime call should appear.
tap the FaceTime icon or notification on the second device. This action should bring up the option to 'Take over the call' or something similar.

4. Continue Your Call:
Once you tap to take over the call on the second device, the call will switch from the first device to the second.
The first device will be disconnected from the call.
This feature is particularly useful when you need to move around or switch to a device with a larger screen or better camera during a call. Remember that both devices need to be compatible with Handoff and running the required iOS or macOS versions. If the first method does not work, compare software version, device compatibility, and account status before repeating the same step.
Record and Leave a FaceTime video or audio message
If someone doesn't answer your FaceTime call, you can leave them a video or audio message to convey exactly what you want to say.
Tap 'Record Video' and wait for the 5-second countdown to finish, then start recording your message.
After recording, click the 'Send' (Up) button to send your message, or tap 'Retake' if you want to record it again. Once you send the video message, the recipient will get a notification. If the result still looks off, compare a built-in method with one app-based method so you can see which handles your clip more cleanly.

Video messages can only be received from contacts in your list, individuals you've called previously, or those suggested by Siri. That kind of hindsight context usually makes an older release article more useful than leaving it in announcement mode.
Create and use Memoji and Animoji during FaceTime
Creating and using Memoji and Animoji during a FaceTime call can add a fun and personalized touch to your conversations. Here's how to do it:
Create Memoji:
Open the 'Messages' app on your iPhone or iPad.
tap the 'Compose' button to create a new message or go to an existing conversation.
Tap the 'Memoji' button (character icon) or the 'Animoji' button (monkey face icon) next to the text input field.
Scroll to the right and tap 'New Memoji'.
Customize your Memoji by choosing skin color, hairstyle, eyes, and other features.
Once you’re satisfied with your Memoji, tap 'Done' to save it.

Use Memoji or Animoji in FaceTime:
Start a FaceTime call.
Once the call has started, tap your screen to bring up additional options.
Tap the 'Effects' button (star icon).
Choose the 'Memoji' or 'Animoji' you want to use. Your face on the screen will be replaced by a Memoji or Animoji.
Continue your FaceTime call with your Memoji or Animoji.

Memoji and Animoji are available on devices with a TrueDepth camera running iOS 12 or later. They allow you to express yourself in unique ways during FaceTime calls, making conversations more engaging and entertaining.
Add reactions and video effects in FaceTime
Adding reactions and video effects during a FaceTime call can make your conversations more fun and engaging. Here's how to do it:
1. Start a FaceTime Call: First, initiate a FaceTime call with one of your contacts.
2. Access Effects During the Call:Once the call has started, you'll see your own video preview. tap your preview, and several options will appear.
3. Choose Effects:Look for an icon that resembles a star. This is the Effects button. tap it to open the Effects panel.
4. Select a Reaction or Effect:
Animoji and Memoji: You can use animated characters that mimic your facial expressions. Select the Animoji icon, and then choose your desired Animoji or Memoji.
Filters:Apply different filters to change the look of your video. Choose from options like Comic Book, Watercolor, and more. That is often the fastest way to avoid repeating the same edit workflow on a longer recording.
Text Effects:You can add text to your video. After tapping the Text button, type your message, and place it anywhere on the screen. A quick test clip usually makes it easier to compare whether the built-in editor or an app gives you the cleaner result.
Shapes and Stickers:Add several shapes and stickers to your video. Just choose the shape or sticker you want and drag it to where you want it on the screen.
5. Apply the Effects:After selecting the desired effects, they will be applied to your video in real-time. You can see how they look in your video preview. Testing the change on a short clip first is a quick way to avoid re-editing a longer video from the start.
6. Remove or Change Effects: If you want to remove or change an effect, simply tap the Effects button again and make your adjustments.
7. End the Call: Once you're done, you can end the call as usual. The effects will only be active during the call.
Share your screen in a FaceTime call
Sharing your screen during a FaceTime call is a great way to collaborate, share photos, or watch videos together. Here's how to do it on an iPhone, iPad, or Mac:
On iPhone and iPad:
1. Start or Join a FaceTime Call
2. Open the Control Center:
On an iPhone X or later or an iPad with iOS 12 or later: Swipe down from the upper-right corner of the screen.
On an iPhone 8 or earlier: Swipe up from the bottom edge of the screen.
3. Select Screen Sharing:
tap the "Screen Share" button, which looks like a person in front of a rectangle so the result is easier to save or share right after this step.

4. Start Sharing:
A countdown will begin, and then your screen will start sharing with the other participants in the FaceTime call.
You can Go away from the FaceTime app to show other content on your screen. That makes the FaceTime guide more useful because the same menu can look different across iPhone, iPad, and Mac.
5. End Screen Sharing:
You can stop sharing your screen at any time by going back to the FaceTime app and tapping the screen-sharing button again.
On Mac:
1. Start or Join a FaceTime Call
2. Share Your Screen:
click the “Screen Share” button in the FaceTime call window. It's usually represented by an icon of a rectangle with a person in front.

3. Choose What to Share:
You can choose to share your entire screen or just a specific window.
Select the desired option from the dropdown menu that appears after clicking the Screen Share button so the file is ready to store or send once you finish the current step.
4. Start Sharing:
Once you've selected what to share, your screen (or the chosen window) will be visible to all participants in the FaceTime call.
5. End Screen Sharing:
To stop sharing, click the Screen Share button again or end the FaceTime call.

Be mindful of what you have open on your device when screen sharing, as everything visible on your screen will be shared with the call participants.
Screen sharing in FaceTime was introduced in iOS 15, iPadOS 15, and macOS Monterey, so earlier versions do not support this feature.
Use SharePlay to watch and listen together
SharePlay is a feature introduced in iOS 15, iPadOS 15, and macOS Monterey that allows you to have a shared entertainment experience with your friends and family during a FaceTime call. You can watch movies, listen to music, or share your screen. Here’s how to use SharePlay to watch and listen together:. If a FaceTime feature still looks missing, compare device support, Apple ID sign-in, and software version before retrying the same path.
On iPhone and iPad:
Start a FaceTime Call:
Open a Supported App:
While on the call, exit FaceTime (the call will continue in the background) and open a streaming app that supports SharePlay, like Apple TV+, Apple Music, or other compatible third-party apps.
Start Playing Content:
Select a movie, TV show, or song to play. If the app supports SharePlay, you will see an option to play the content for everyone on the call.

Enjoy Together:
Once you start playback, everyone on the call who has access to the content (i.e., necessary subscriptions or purchases) will see or hear the same media, synchronized.
Control Playback:
Anyone in the SharePlay session can play, pause, or skip the content. Changes will reflect for all participants.
Spatial Audio in FaceTime
Spatial Audio creates a 3D audio effect, making it seem as though sounds are coming from different directions around you, not just from your device’s speakers or headphones. Checking the surrounding conditions first usually saves more time than repeating the same action without any new information.
During Facetime, the voices of different participants will sound like they are coming from the direction in which each person is positioned on your screen.
This creates a more immersive and natural-feeling conversation as if you were all in the same room.
Supported Devices to Use Spatial Audio in FaceTime:
iPhone XR, iPhone XS models and later, iPad (8th generation) and later, all iPad Pro 11-inch models, iPad Pro 12.9-inch (3rd generation) and later, iPad Air (3rd generation) and later, and iPad mini (5th generation) and later. That often makes the next troubleshooting choice clearer than guessing and retrying the same path.
Supported Operating System to Use Spatial Audio in FaceTime:
iOS 15, iPadOS 15, or macOS Monterey (or later versions)
Filter background sounds
Filtering background sounds in FaceTime is an important feature, especially when you're in a noisy environment and want to Make sure that your voice is heard clearly by the other participants.
Apple has introduced a feature called "Voice Isolation" to improve the audio quality in such situations. It then minimizes the ambient sounds, like street noise, the sound of a fan, or other people talking in the background, focusing primarily on your voice. A quick settings check usually saves more time than repeating the same action without changing the surrounding conditions.
Here's how you can use Voice Isolation on FaceTime
On iPhone and iPad:
Initiate or join a FaceTime call.
Access Control Center:
Adjust Audio Settings:
tap the "Mic Mode" option in the Control Center (you may need to expand the audio control section).
Select the "Voice Isolation" option.

On Mac:
Open FaceTime and start or join a call.
Change Mic Mode:
During the call, move your cursor over the FaceTime window to reveal the call controls.
click the “Control Center” icon (a set of toggles) in the FaceTime call window.
click “Mic Mode” and select “Voice Isolation” from the dropdown menu.
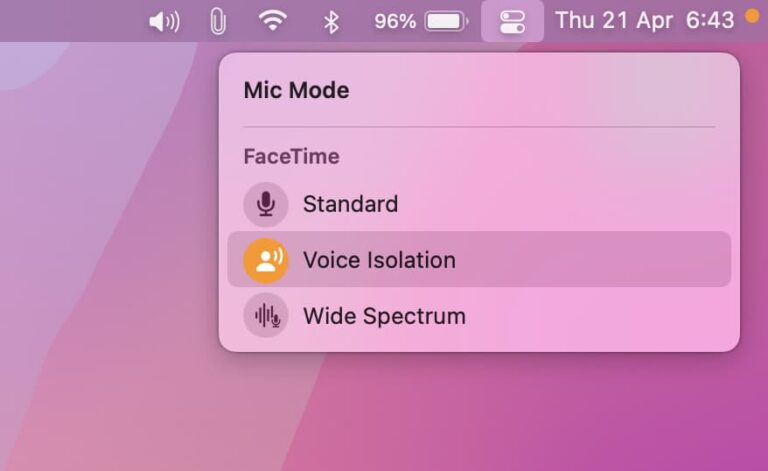
Alternative Mode - Wide Spectrum
If you want the opposite effect, where all sounds are picked up (useful in a musical performance or a group discussion), you can choose the “Wide Spectrum” option instead.
Devices Compatible with Voice Isolation and Wide Spectrum:
iPhone XR, iPhone XS models and later, iPad (8th generation) and later, all iPad Pro 11-inch models, iPad Pro 12.9-inch (3rd generation) and later, iPad Air (3rd generation) and later, and iPad mini (5th generation) and later. A small settings or account difference is often what explains why the same steps look different on another device.
Operating Systems Supported by Voice Isolation and Wide Spectrum:
iOS 15, iPadOS 15, and macOS Monterey or later versions.
Blur the background with Portrait mode
Blurring the background in FaceTime using Portrait mode keeps you in focus while blurring the background, much like the Portrait mode in the camera app. Here's how you can use it:
On iPhone and iPad:
Launch the FaceTime app and start a new call or join an existing one.
Activate Portrait Mode:
During the FaceTime call, tap your video preview to bring up the controls.
Look for the Portrait mode icon (it resembles a person with a blurred background) and tap it.
Your background will blur, keeping you in focus.
Deactivate Portrait Mode:To turn off the blur effect, simply tap the Portrait mode icon again. That saves time because you can rule out the simplest causes before jumping into resets, restores, or hardware suspicion. If the process stalls, storage space, Wi-Fi stability, and available battery are usually the first three checks worth repeating. Running the job while the device is charging and on stable Wi-Fi often prevents having to restart the same backup later. A backup or restore usually behaves more predictably when the device is charging and the network stays stable the whole time. That cuts down the chance of restarting a long backup or restore because one simple prerequisite was missed.

On Mac:
Open the FaceTime app on your Mac and start or join a call.
Activate Portrait Mode:
In the FaceTime call window, move your cursor to reveal the call controls.
click the “Control Center” icon (it looks like a set of toggles).
Select “Video Effects” and then choose “Portrait” to activate the blur effect.

Using Portrait mode can consume more battery power, so keep an eye on your device’s battery life during prolonged calls. Moving from the quickest checks to the more disruptive fixes usually makes it easier to spot which step actually changed the behavior. This works better when you treat each fix as a separate test and watch for one clear change in the problem.
Turn on Live Captions in a FaceTime call
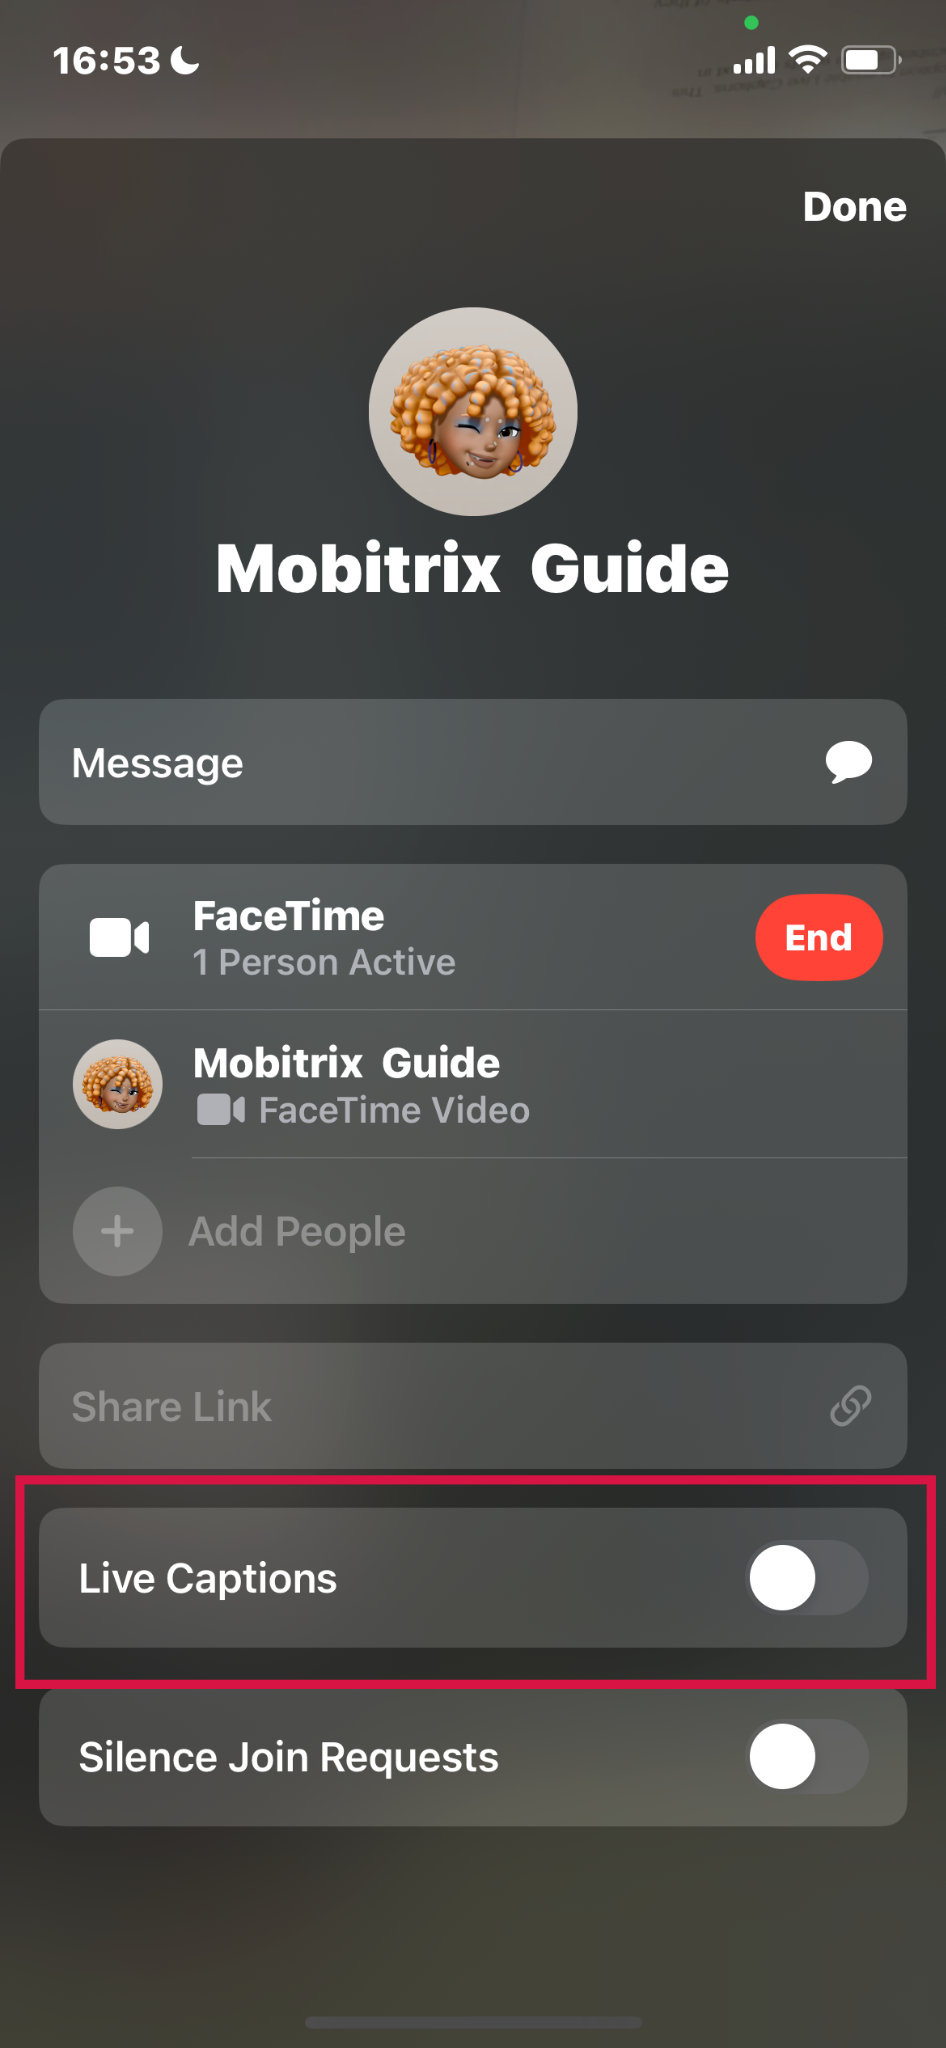
When using FaceTime for video calls, you have the option to enable Live Captions. This feature, useful for those with hearing difficulties, transcribes spoken words into text in real-time, improving accessibility.
To enable Live Captions in FaceTime:
While in a FaceTime video call, tap the screen to show the FaceTime controls (if they aren’t visible).
Tap the “Info” button or your portrait icon at the top of the controls, turn on Live Captions, then tap Done.
A Live Captions window will appear, displaying the transcribed text of the conversation at the top of the screen, along with an indication of who is speaking.

To Disable Live Captions in FaceTime:
Tap the screen to bring up the FaceTime controls again.
Tap the “Info” button at the top.
Turn off the Live Captions option.
Live Captions are currently in beta in iOS 16, iPadOS 16, and later versions.
Live Captions are available on iPhone 11 and newer models with the primary language set to English (U.S.) or English (Canada).
Using Live Captions may increase battery consumption.
The accuracy of Live Captions can vary and it is not recommended to rely on it for critical or emergency situations.
Capture a Live Photo in FaceTime
Capturing a Live Photo during a FaceTime call is a feature that lets you save a moment of your video call as a short, animated photo. Here's how to do it:
Steps to Capture a Live Photo in FaceTime:
Enable the "FaceTime Live Photos" feature in settings.
Go to Settings > FaceTime, then turn on the option for FaceTime Live Photos.
Start a FaceTime Call and Capture the Moment:
During the call, look for the shutter button (it looks like a camera icon) on the FaceTime screen. Tap this button to capture a Live Photo.

Access the Live Photo:
The Live Photo you capture will be saved in your Photos app, just like any other photo or Live Photo.
It’s a good practice to let the other person know you intend to take a Live Photo, as the app notifies them when a Live Photo is taken.
Block Unwanted FaceTime Calls
Blocking unwanted FaceTime calls is an effective way to manage your privacy and avoid disturbances from specific contacts. Here's how to block someone from making FaceTime calls to your iPhone, iPad, or Mac:
On iPhone and iPad
From the FaceTime App:
Open the FaceTime app.
Browse the list of recent calls and find the contact you want to block.
Tap the "i" icon next to the contact's name or number.
Scroll down and tap "Block this Caller."

From the Settings App:
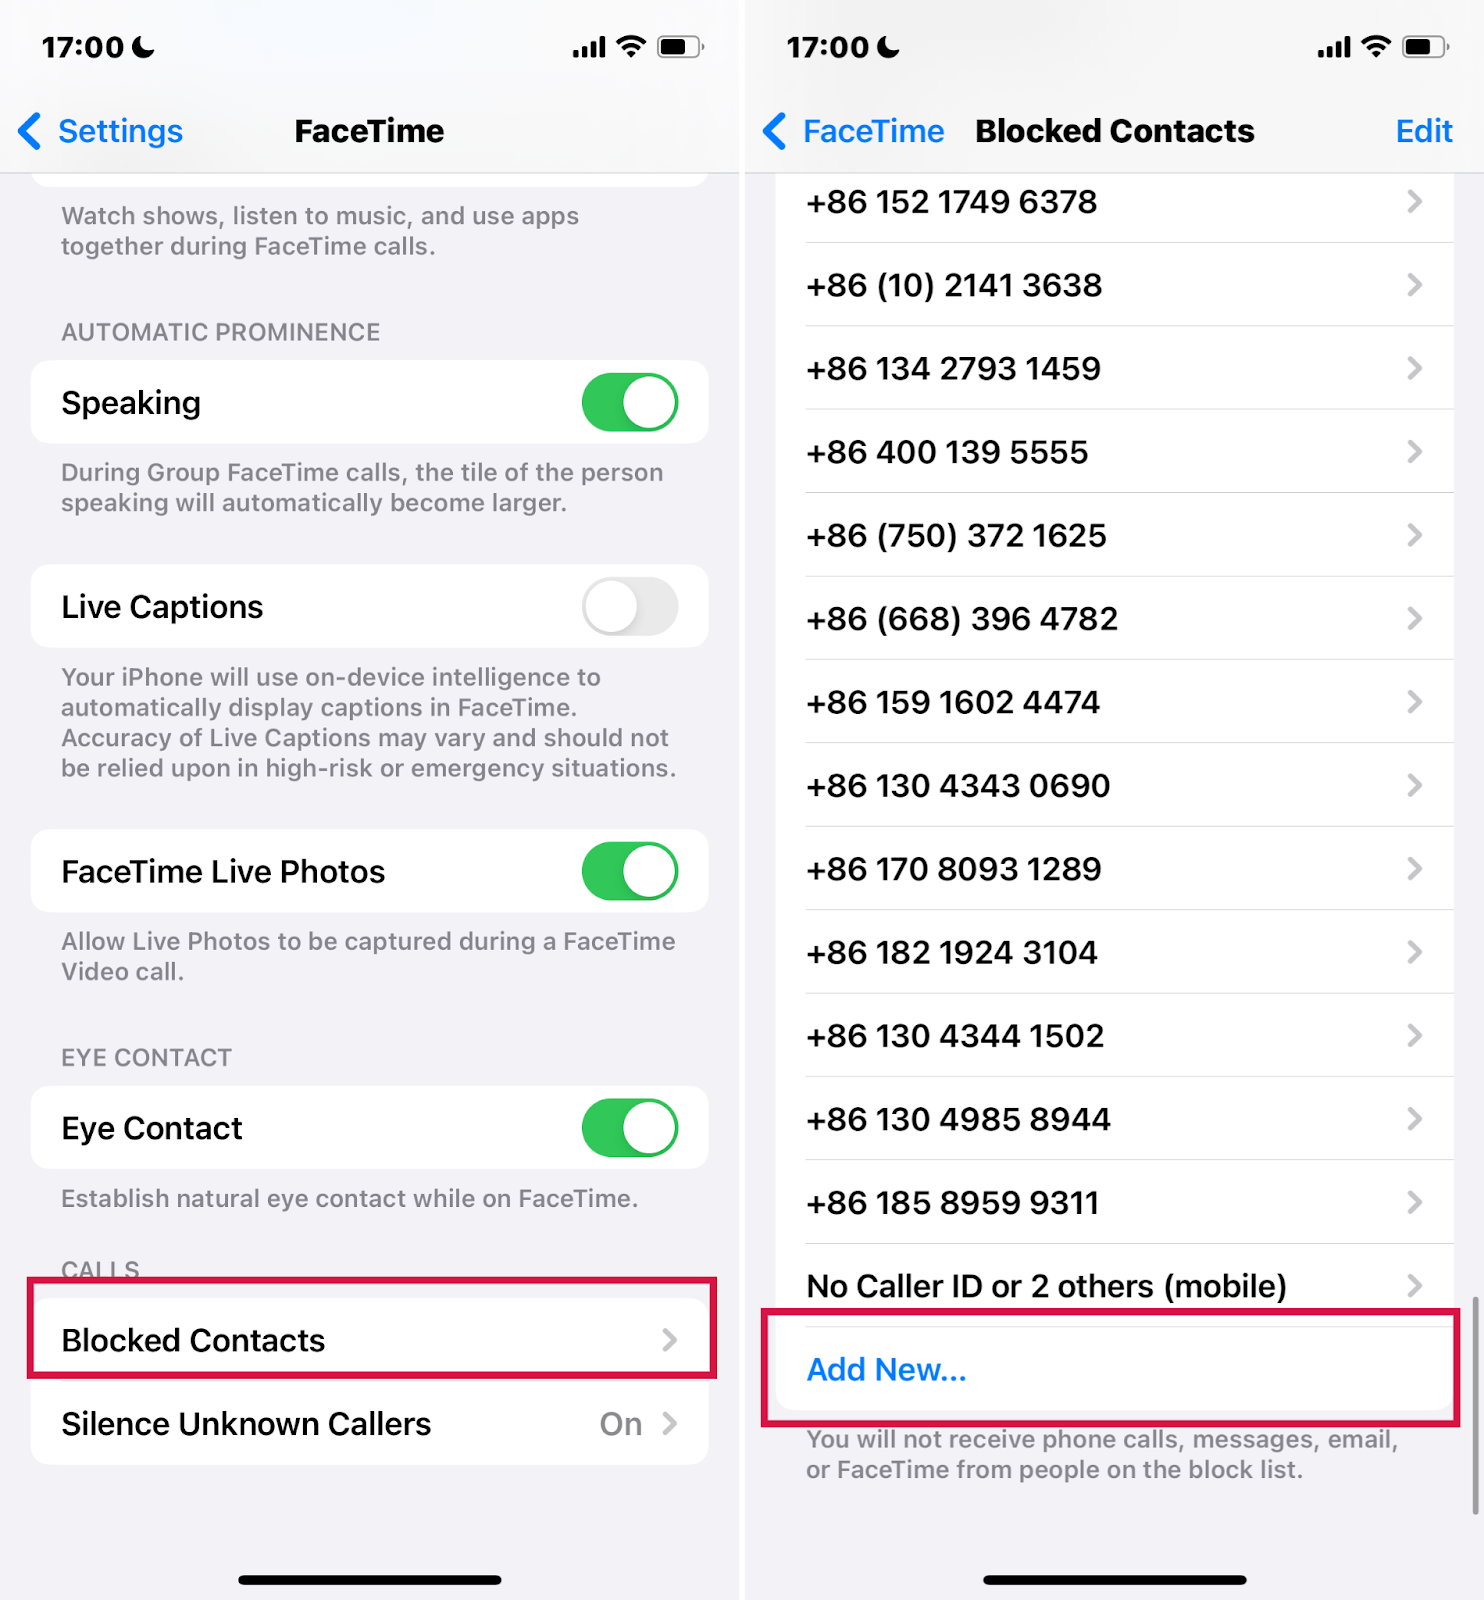
Go to Settings and scroll down to FaceTime.
tap FaceTime, then scroll to "Blocked Contacts."
Tap "Add New..." and select the contact you wish to block.
From the Contacts App:
Open the Contacts app and select the contact.
Scroll down and tap "Block this Caller."
On Mac
From the FaceTime App:
Open FaceTime.
Go to the list of recent calls or the Contacts tab.
Right-click (or Control-click) on the contact or number you want to block.
Choose "Block This Caller."

Through Messages or Contacts:
You can also block a person by right-clicking their name in Messages or Contacts and selecting "Block this Caller."
If you block someone in FaceTime, they are also blocked in Phone and Messages, and vice versa.
You won’t receive any notification when a blocked contact tries to call you.
Managing Blocked Contacts: You can review or unblock contacts by going to Settings > FaceTime > Blocked Contacts on your iOS device, or FaceTime > Preferences > Blocked on your Mac.
Use FaceTime on Apple TV 4K (2nd generation or later)
You can make FaceTime calls directly from Apple TV 4K (2nd generation or later), or hand off an ongoing call from your iPhone or iPad.
To begin using FaceTime on your Apple TV, you need to first set up an iPhone or iPad to use as a Continuity Camera.
Step up Continuity Camera on Apple TV 4K (2nd generation or later)
Prepare Your iPhone/iPad:
Make sure FaceTime is enabled on your iPhone or iPad. Go to Settings > FaceTime and turn it on. Sign in with your Apple ID if needed.
Launch the FaceTime app on Apple TV 4K (2nd generation or later)
On the Continuity Camera screen, do either of the following: so the scan stays readable before you continue.
If your profile shows on the Continuity Camera screen, select it and confirm on your iPhone/iPad.

If not listed, choose "Other" to display a QR code. Use your iPhone/iPad's Camera app to scan this code, then tap "Connect to Apple TV" and confirm so the scan stays readable before you continue. The quickest choice usually depends on whether the QR code is printed in front of you or saved as an image in Photos. If the first scan path fails, changing the angle, distance, or lighting is often faster than switching apps right away. That usually gives readers a clearer way to decide between Camera, Code Scanner, Google Lens, and a third-party app. The most useful comparison here is live scanning versus scanning an image already stored on the iPhone.
Position Your Device:
Place your iPhone/iPad near the TV in landscape mode. Make sure the camera is facing you and you're happy with the preview on your TV. Readers usually benefit here from checking device support and Apple ID setup before assuming FaceTime is broken.
Optionally, skip this with the Play/Pause button on the Siri Remote. If nothing changes after one step, move on to the next check instead of repeating the same action several times. A short pause between steps can also help confirm whether the issue is gone or only temporarily hidden.

Camera Readiness:
After a brief countdown, your device’s camera is ready for FaceTime on Apple TV so the scan stays readable before you continue.
Make a FaceTime call on Apple TV 4K (2nd generation or later)
Open FaceTime on Apple TV 4K.

Adjust Settings:
Before and during the call, you can adjust any of the following controls that appear on the screen:
Centre Stage: It automatically adjusts the camera to keep everyone in the room in the frame, even if they move about.
Portrait: This feature sharpens the focus on the subject while softly blurring the background, creating a professional visual effect.
Reactions: This allows the system to detect specific hand gestures, triggering fun on-screen effects like hearts or fireworks.

Select a contact to start a FaceTime call
During the call, you can add people, start SharePlay, mute, manage the camera, or end the call using the on-screen controls.
How much does it cost to video call with FaceTime calls?
FaceTime video calls themselves are free; Apple does not charge any fees for using the FaceTime service.
But FaceTime calls require an internet connection. If you are using FaceTime over a cellular data network, you may incur data charges depending on your mobile plan. If using over Wi-Fi, you won't face additional charges from your cellular provider. That is why connection quality and data access are still two of the first checks worth making before you blame the app itself.
Summary
Our FaceTime guide has equipped you with everything you need to know for better, more engaging calls. From important setup steps to advanced features, you're now ready to make the most out of every call. Embrace these tips and enjoy a superior, smooth communication experience. If a call still does not behave as expected, check compatibility, Apple ID sign-in, and network conditions before moving on to deeper troubleshooting.
