
If a video on your iPhone is too long to send or post, you can shorten it with the built-in Photos tools or with iMovie.
This guide covers the quickest ways to trim the start or end, save a new shorter clip, split footage into parts, and export the result at a smaller size when needed.
Way 1 Use the Photos App on Your iPhone to Trim the Video
If you can't send a long video even after trying different methods, consider trimming it.
The Photos app is usually the fastest option because you can trim a clip, preview it, and save a shorter version without leaving your library.
Steps:
- Launch the Photos app and locate the video you want to edit.
If you can't find it among a sea of photographs, touch Albums and then Videos to get a list of all the videos on your phone.
- After you've opened the video, go to the top-right corner and select Edit.
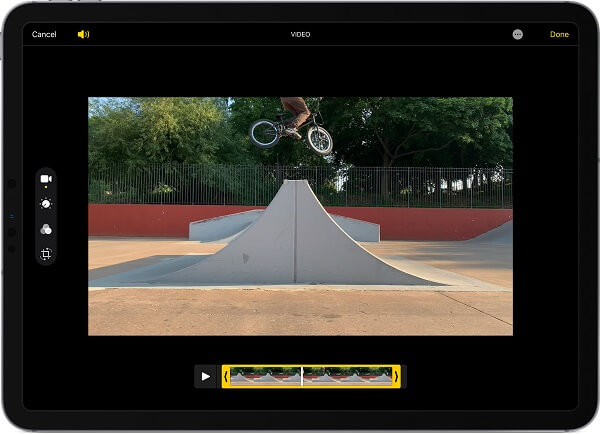
- Here, you have a few choices. The first menu, which should be open by default, will let you trim the beginning and end of your video.
Using the slider at the bottom of the screen, drag the left-facing arrow to the right to trim the beginning of the video.
Drag the right-facing arrow to the left to trim the end.
- Next, tap the icon that resembles a volume wheel to change the color balance and other settings. Swipe through the options below the video clip to see the tools, tap one to select it, and then modify the levels with the slider below (or on the side of the screen if you're using an iPad). Your changes will be reflected instantly in the video preview.
- You can add filters by tapping the icon that looks like three overlapping circles. Each of these filters also has a slider that allows you to adjust the filter's strength.
- Finally, you can rotate, crop, or skew the video by tapping the square cropping icon. This is the option to use if you mistakenly captured a video in the wrong direction.
- When you're done, tap Done in the bottom-right corner. You'll be given the option of overwriting the original video or saving your changes as a new clip.
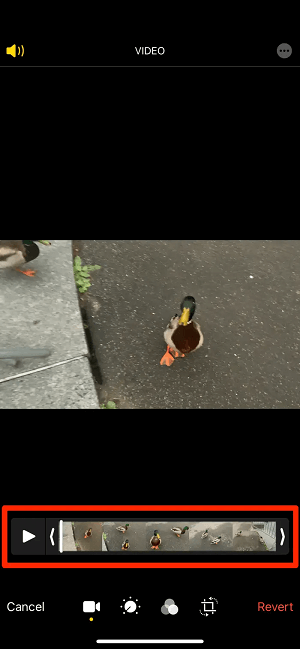
Edit the beginning and end points of your videos
The three overlapping circles icon
Utilize the rotations and cropping tools in the menu

Way 2 Cut a Video on iPhone Into Parts
If you do not want one continuous shorter file, you can save several trimmed versions from the same original video and turn them into separate clips.
Steps
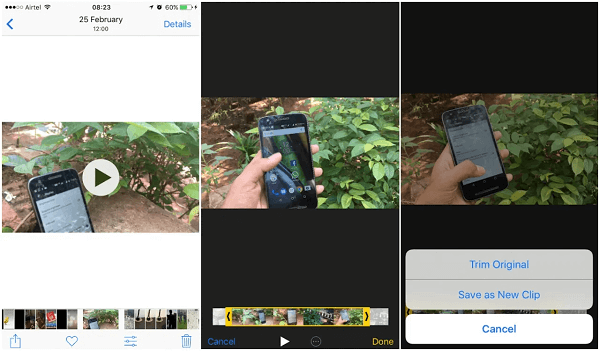
- Open your iPhone's Photos app and choose the video you wish to edit.
- To adjust your clip, hold your finger on one of the arrows on each side of the video timeline and slide it.
- Play your video clip and make any required adjustments.
- Select Done.
- There will be a pop-up menu, tap the Save Video as New Clip button. To save several clips as separate videos, return to the original video and repeat the steps outlined above for each clip.
Steps for cutting a video into multiple clips
How to Trim an iPhone Video for Instagram
If you plan to post the video on Instagram, trim it with the yellow handles first so you do not upload a version that is longer than the format you want to use.
The current time stamp on the edit screen makes it easy to compare your clip length before you post. Instagram limits can change by format, so confirm the current length rules in the app before you upload.
Instagram Stories: Shorter clips are easier to review before posting, and very long videos are often split into smaller story segments automatically.
Instagram Posts: Feed-length limits can change, so trimming before you upload helps you avoid an in-app cut that keeps the wrong part of the clip.
Instagram longer videos: If you are posting beyond a standard feed clip, check the current Instagram publishing option first because longer-video rules have changed over time.
Way 3 Use iMovie to Split and Rearrange Clips
iMovie is the better option when you need to split a clip, move the pieces around, or export a fresh video without changing the original file in Photos.
Steps
- On your iPhone, launch iMovie and choose or add the video clip you wish to trim.
- The timeline will appear below your movie when it is ready. The Playhead is the vertical white line where any active editing occurs. To trim your video, place the Playhead where you want it with your finger.
- At the bottom of the screen, tap Playhead and click Split.
- iMovie will make a cut between the two newly made clips.
- On your movie timeline, hold your finger on the clip you wish to relocate and drag it to the left or right. Remove your finger from the clip after it is in the correct place.
- To save your video in iMovie, tap Done.
- To save your video to your photo library, tap the upload icon.
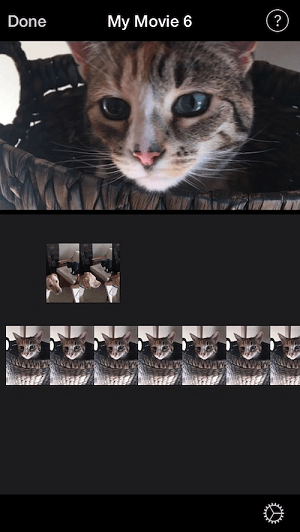
Cut a video into parts in iMovie on iPhone
Way 4 Use Third-Party Apps
Lastly, you can edit your videos even more by getting third-party apps for your iPhone, iPad, or iPod touch. Or, you can add third-party photo editing tools to your Mac and use them in addition to Photos' built-in features.
Steps
- Open the Photos app and select a video.
- Tap the Edit button, then the More button.
- Choose an app from the resulting menu.
- Using the extension's tools, edit the video.
- When you're finished editing, click Done. You can use another extension or any of the editing tools integrated into Photos to apply extra modifications to the video.
- When you've done your edits, click Done to exit the editing session.
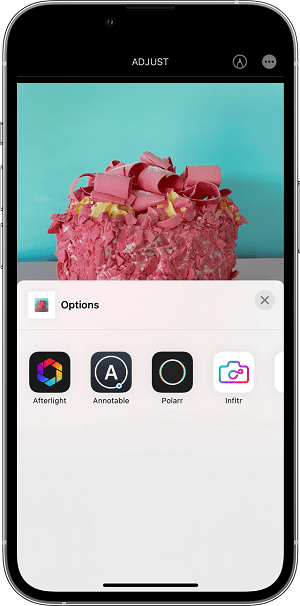
iPhone displaying available third-party extensions
How to Cut a Clip Out of a Video on iPhone
You can also use Photos to save only the section you need from a longer recording, which is helpful when the middle of the video is the part you want to keep.
Steps
- Launch the Photos app and select the video you want to edit.
- Select Edit.
- Move the sliders on both sides of the video timeline to adjust the start and stop times. Tap the Play button to see a preview of your trimmed video.
- Tap Done, then Save Video or Save Video as New Clip.
- When you choose Save Video, it saves only the cut-out version of the video. However, if you select Save as New Clip, it retains the original version and also saves an additional cut-out version in your library.
iPad displaying a video editing interface
You Can Add a Filter and Rotate Your Videos
You can also add a filter to give your videos a unique look as well as rotate them if needed. For example, if your video was taken in an area with low light, you can apply a filter to brighten it up.
Steps
- Open the Photos app and ensure that the video you wish to apply a filter is selected and visible on the screen.
- Click the "Edit" button.
- Select the Filters icon.
- You can choose between the following nine filters: Vivid, Vivid Warm, Vivid Cool, Dramatic,Dramatic Warm, Dramatic Cool, Mono, Silvertone, and Noir. To choose one, swipe through them. The filter preview is also available.
- A new slider will emerge beneath the filters on iPhone and beside the filters on iPad. Slide it to adjust the opacity of the applied filter. Again, this is previewed so you can choose the best for the content you're editing.
- When you've got everything just the way you want it, tap "Done".
Select the filter icon on your iPad
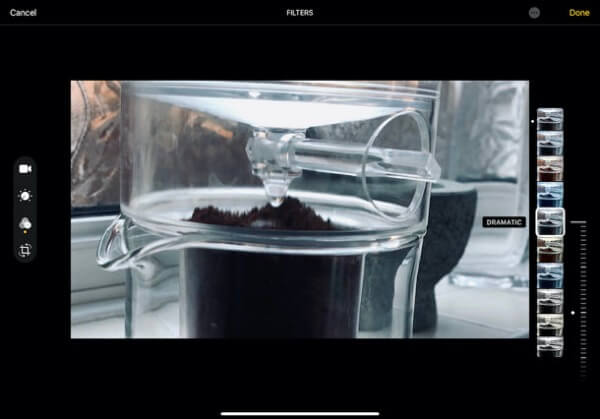
Adding filters using the photos app
After that, the video is edited and saved. Depending on the length of the video and the iPhone or iPad you're using, this could take some time.
How to Undo a Trim on Your iPhone
If you ever need to undo a trim, Photos can restore the original version of the video after you save your edits, as long as you edited the original item instead of working only from a separate new clip.
Steps
- On your iPhone, launch the "Photos" app.
- Choose the trimmed video and hit the "Edit" button in the top right corner.
- To delete all changes made to this video, click "Revert" and confirm "Revert to Original".
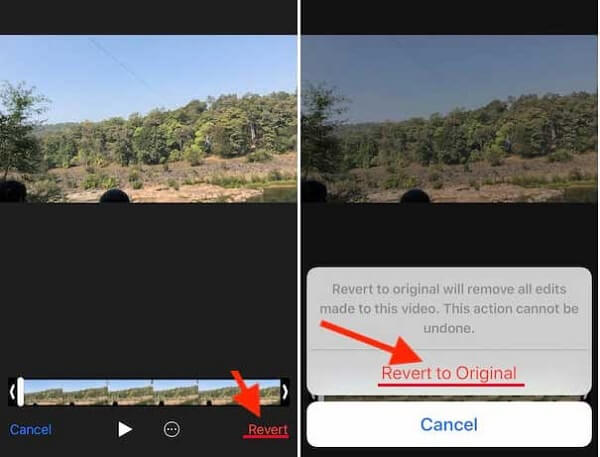
Revert a trimmed video on iPhone
Share or Export Your iMovie Project on iPhone or iPad
Once your iMovie project is ready, you can send it through Mail or Messages, save it back to Photos, or export it at a lower resolution if the file is still too large.
Send Your Movie via Email or Text Message
You can share a completed movie with others by email or text message using the Mail or Messages apps.
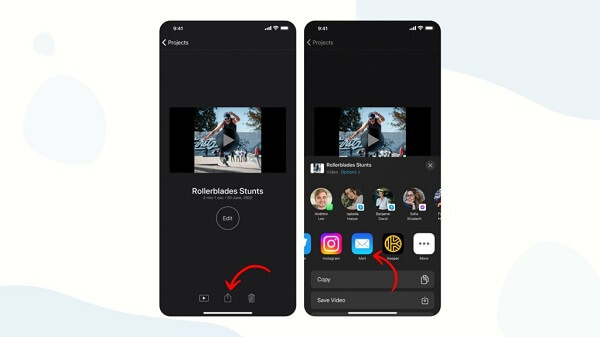
- Tap the movie you want to share in the Projects browser. If you're making changes to a project, tap "Done" in the upper left corner.
- Tap the Share button, then tap Messages or Email.
- Finish the message or email you just created, and then tap Send.
- If your movie file is too big to send, you can make it smaller. Cancel the message or email you're working on, go back to the screen for sharing, tap Options, and then choose a lower resolution.
Send Your Movie via Email or Text Message
Export Your Movie to Watch on Another Device
If you wish to watch the movie on a nearby Apple device, you can share your screen directly or transfer the file via AirDrop. Additionally, you can save your video to your Photos library.
- Tap the movie you want to share from the Projects browser. Tap Done in the upper-left corner if you're revising a project.
- Select the Share option.
- To modify the resolution or format of your video, press Options, then Done when you're through.
- You can choose where to send your movie:
To employ AirDrop, first hit AirDrop, then tap the profile image of its user at the top of the screen. You can also use AirDrop between your own Apple devices.
Tap Save Video to save the movie to your Photos library. If you have iCloud Photos enabled, you can access the video from any Apple device signed into the same iCloud account.
Select Save to Files, choose one location, and then tap Save to save your video to iCloud Drive, a folder on your device, or another third-party storage service you've enabled in the Files app.
Share Your Movie on the Web
- In iMovie's Projects browser, tap the project you want to share, then select the Share button.
- Change the resolution of your video by tapping Options under the movie title, and then select a resolution. 1080p is an excellent resolution for web sharing. Lower resolutions, such as 720p HD, provide smaller files that upload to the web faster than higher-resolution movies.
- Tap Save Video to save your video to your device's Photos library.
- Open an app on your phone, such as YouTube or Facebook, or go to the website for the service you wish to use and then upload your video.
The fastest method is usually Photos for simple trims and iMovie for split edits or clip rearranging. Once you know which tool fits the job, shortening a video on iPhone only takes a few taps.
You can also use third-party video editing tools to add more features and effects. We hope you found this article helpful; check Mobitrix for more how-to tutorials. Happy editing!