What Does SOS Only Mean on iPhone [12 Quick Fixes]

Sometimes, while using your iPhone, you might notice the usual signal bars change to "SOS" or "SOS Only", or find this term in the Control Center. Wondering what's going on? Troubleshooting usually works best when you move from the simplest checks to the more disruptive fixes.
Don't worry! In this guide, we'll explain why your iPhone is showing this message and what it signifies. Plus, we've got a bunch of 12 effective solutions for you to try and fix the "SOS Only" alert. Let's dive in and get that sorted! That can save time when you want the video ready for social posting without moving it into another editor first. If the result still looks off, compare a built-in method with one app-based method so you can see which handles your clip more cleanly.
What does SOS Only Mean on iPhone?
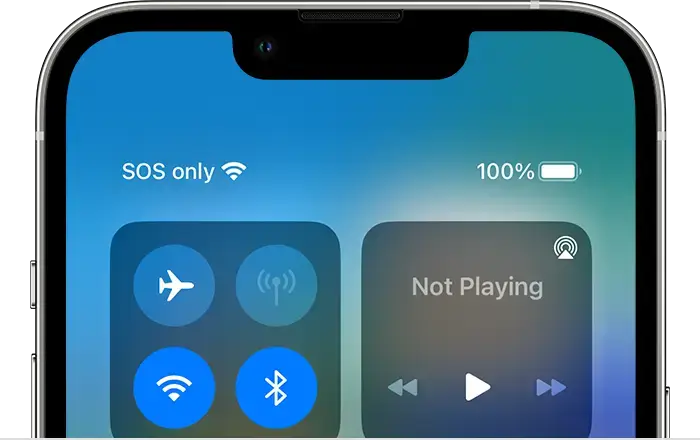
Seeing "SOS Only" or simply "SOS" on your iPhone indicates that your phone isn't connected to a regular cellular network and cannot perform standard cellular functions. In this mode, you can only place emergency calls to numbers such as 911 (in the US), 112 (in Europe), 999 (in the UK), or 000 (in Australia).
Sadly, regular calls or text messages won't go through, and you can't use internet-based services either. Your phone is basically restricted to contacting emergency services like the police, fire department, ambulance, coastguard, or mountain rescue, depending on your location. It is helpful when you want to polish the clip a bit more before you export and share it elsewhere. Older launch articles are more helpful when they explain how these early iOS 17 expectations lined up with the version Apple later released to everyone.
It's important to note that "SOS" and "SOS Only" differ from the "No Service" notification. While "SOS" allows you to make emergency calls, "No Service" signifies a complete lack of network coverage, preventing even emergency calls.
Why Does Your iPhone Display SOS / SOS Only?
Cellular network/carrier issues: Your carrier's network might be experiencing outages or technical difficulties.
SIM Card Problems: The SIM card might be damaged, improperly inserted, or deactivated.
No Service Area: You might be in an area with poor or no cellular coverage.
Software Glitches: Sometimes, software bugs or glitches can cause the phone to lose its connection to the cellular network.
Hardware Issues: Your iPhone might have hardware problems affecting its ability to connect to the network.
Airplane Mode: Your phone might be stuck in Airplane mode, which disables cellular connections.
Restrictions: Certain service restrictions or carrier-related issues might be causing the problem.
Roaming Issues: If you are in a different country or region, there might be roaming issues affecting the network connection.
How to Fix the SOS Only Problem on iPhone
Way 1: Move to a Place With Better Network Connectivity
When faced with insufficient network coverage, the simplest solution is to move to a location with better cellular reception. If changing your location doesn't help, don't worry; we have more solutions for you to try.
Way 2: Turn Off and On Cellular Data
Sometimes, your iPhone may get trapped in an SOS-only mode due to a network glitch. Toggling your cellular data off and then on again can establish a new connection, mostly fixing up the error.
Step 1: Go to Settings and select Cellular/Mobile Data. If a step looks different on your device, the app version is usually the first thing to compare before assuming the feature is missing.
Step 2: Turn off Cellular Data/Mobile Data.
Step 3: Pause for a few seconds, then Toggle on Cellular Data /Mobile Data.
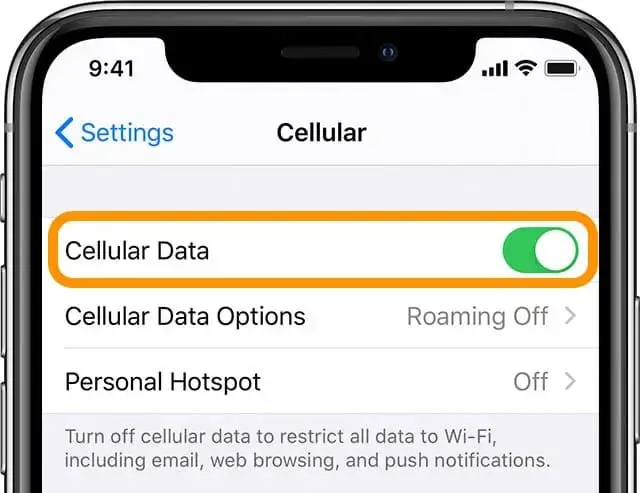
As an alternative, you can quickly turn off and on your cellular data using the Control Center by tapping the Cellular Data icon. If the problem persists, move on to the next solution.
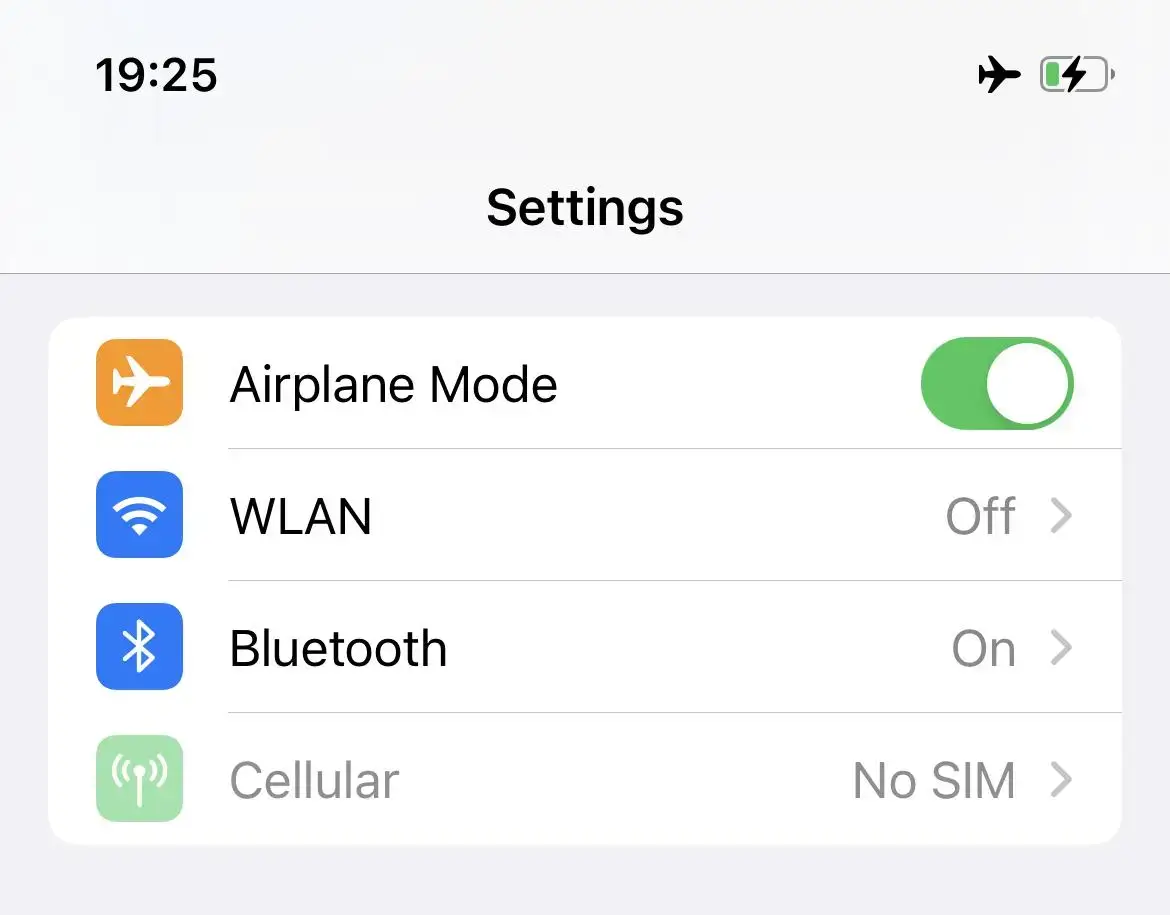
Way 3: Turn Airplane Mode On and Off Again
Turning the Airplane Mode on and off again is a simple way to fix many issues with network connectivity, although it's not a foolproof solution.
Follow these steps to toggle Airplane Mode on and then off on your iPhone: so the next part of the process is easier to complete without backtracking. It gives you finer control when only one moment should stay slow and the rest of the recording should play normally.
Via Settings:
Launch the "Settings" app on your iPhone.
Find and select the "Airplane Mode" option, usually found at the top of the menu.
Switch the "Airplane Mode" toggle on.
Wait a few moments, then tap the toggle again to switch the Airplane Mode off.
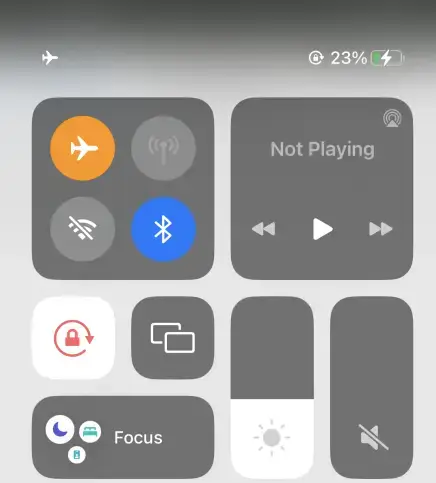
Via Control Center:
To access the Control Center, swipe down from the upper-right corner of the screen (iPhone X or newer) or swipe up from the bottom of the screen (iPhone 8 or older).
Spot the airplane icon (which resembles an airplane) and tap it to activate Airplane Mode. You'll notice the icon lights up, indicating the mode is active.
Wait briefly before tapping the airplane icon once more to deactivate the Airplane Mode.
Way 4: Restart Your iPhone
Sometimes, restarting your iPhone can help refresh its network connection. Restarting clears the system caches, which might be causing issues, making the network connection more stable. Here is how you can do it:
For iPhone with Face ID:
Press and hold the volume up/down button and the side button at the same time.
Wait until the power-off slider appears.
Slide to turn off your phone.

For iPhone with Touch ID:
Press and hold the side button.
When the power slider screen appears, drag the slider to switch off the device.
After the device shuts down, press and hold the power button to restart.
Way 5: Check Data Roaming
Data roaming allows you to use different cellular networks, which can sometimes be costly.
Managing your data roaming settings is important for maintaining a reliable network connection. Follow these steps to adjust your settings: so the next part of the process is easier to complete without backtracking. If one step does not change the behavior, move on instead of repeating it several times.
In Your Home Region:
If you are not traveling, keeping data roaming off ensures that your phone maintains a consistent connection with familiar networks.
Navigate to: Settings > Cellular > Data Roaming (toggle it off).
While Traveling Internationally:
If you are abroad, enabling data roaming can facilitate a steady network connection
Navigate to: Settings > Cellular > Cellular Data Options > Data Roaming (toggle it on).

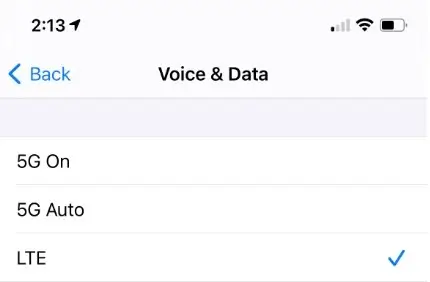
Way 6: Switch to 4G or LTE
Given that 5G isn't fully available worldwide, it might be causing issues with your signal strength and connection. If you encounter the 'SOS Only' problem persistently, it might be prudent to switch off 5G on your iPhone and instead use 4G or LTE.
Way 7: Check Your SIM Card
Reinsert Your SIM Card:
Eject your SIM card.
Inspect it for any visible damages.
Reinsert it properly, ensuring a good connection.
Activate Your SIM:
Make sure your SIM card is actively registered with your carrier to avoid connection issues.
If you possess an iPhone model XR, XS, XS Max, or newer, you might find it beneficial to transition to an eSIM for potentially better connectivity.
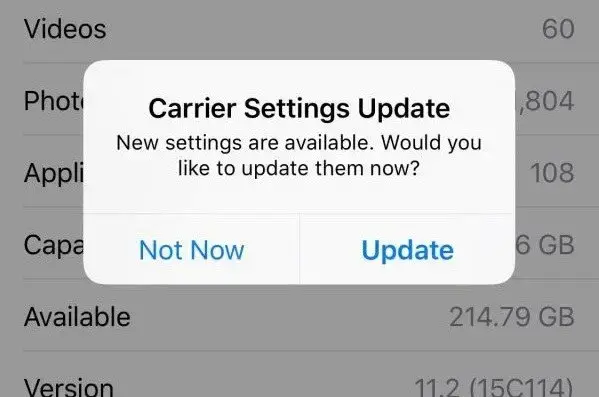
Way 8: Update Carrier Settings
Carrier settings are provided by your network carrier to enhance cellular connectivity and overall phone performance. It's a good idea to check if an update is available, especially if you're experiencing 'SOS Only' issues.
Updates are generally automatic, but you can also manually check and update the carrier settings on your iPhone. Before you start, make sure your device is connected to stable Wi-Fi and Cellular Data is enabled.
Step 1: Go to Settings > General > About
Step 2: If an update is available, a notification will pop up. Tap 'Update' to begin the installation process so the next part of the process is easier to complete without backtracking. That matters when you only want one part of the video to play back slower while the rest keeps its normal speed.
If you have recently set up an eSIM or plan to do so, it might be necessary to manually download the new carrier settings.
Way 9: Choose Your Carrier Manually
If you're facing the SOS Only issue, trying to manually select your carrier can sometimes help resolve this. Here are two options you can try:
Option 1: Choose Your Carrier Manually
Navigate to Settings > Cellular > Cellular Data Options > Network Selection.
Disable the 'Automatic selection' option.
Choose your network provider from the list available.

Option 2: Toggle Automatic Selection off and on
In case the manual selection doesn't rectify the issue, try this:
Go back to the Network Selection menu.
Toggle the 'Automatic selection' off and then back on.
This action prompts your device to reconnect with the network afresh, potentially resolving the SOS Only signal status on your iPhone by ensuring it connects to the appropriate network.
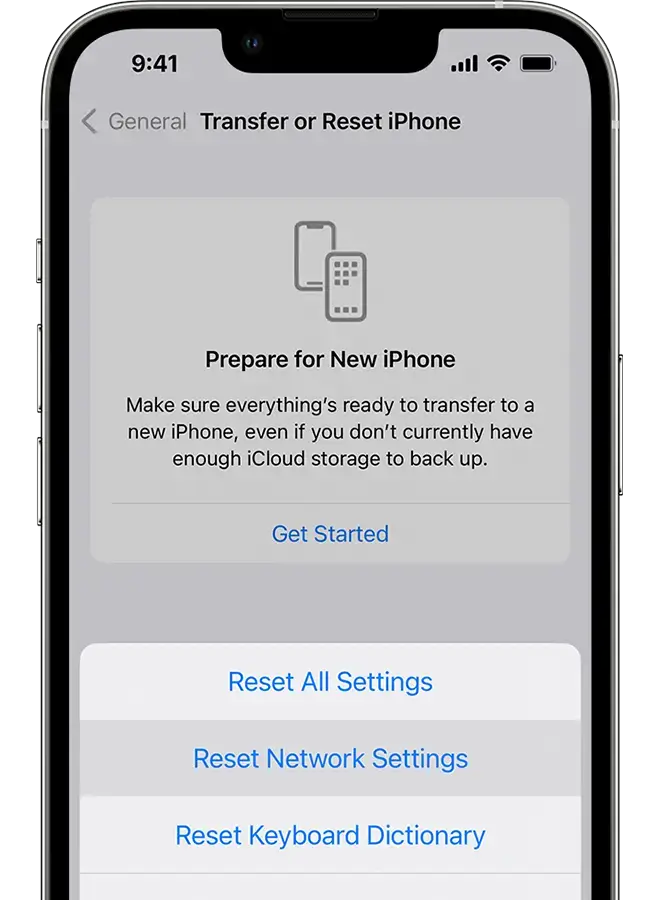
Way 10: Reset Network Settings
Before opting for this method, be aware that resetting network settings will delete stored details like Bluetooth devices, Wi-Fi passwords, and VPN configurations. To avoid inconvenience, note down all vital details beforehand.
To reset the network settings, follow these steps:
Open the Settings app.
Select General.
Tap on Transfer or Reset iPhone
Tap on Reset
Choose 'Reset Network Settings'.
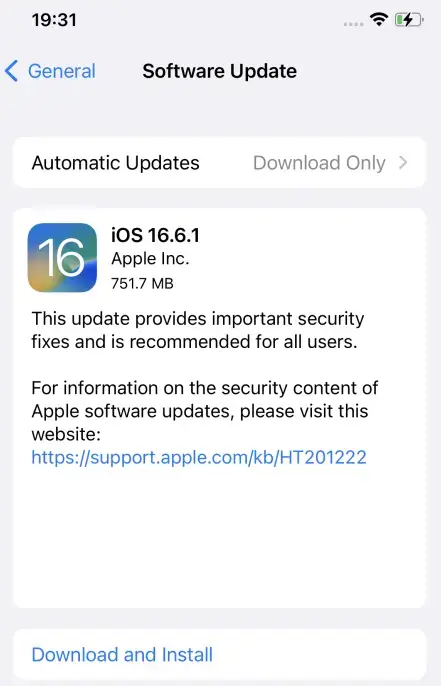
Way 11: Update iOS
To Make sure smooth performance and possibly fix the 'SOS Only' issue, keep your iPhone updated with the latest iOS version. Here is how you can do it:
Open the Settings app.
Navigate to General.
Tap on Software Update.
If a new update is available, proceed to download and install it to keep your system up-to-date.
Way 12: Contact Your Carrier
Despite trying all the above solutions, if the SOS Only issue still persists, it's time to contact your carrier for assistance. Give them a call to address and hopefully resolve the issue.
It's important to note that they might suggest going through the steps you've already tried, so make sure to inform them about the troubleshooting actions you've undertaken so far. If this approach doesn't lead to a solution, consider reaching out to Apple Support for further help. A quick check of the device model, software version, and account state usually explains why the same menu looks different on another device. If the first method does not work, compare software version, device compatibility, and account status before repeating the same step.
Conclusion
Facing the "SOS Only" alert on your iPhone can be highly inconvenient, particularly when you use your phone for most of your communications. Nevertheless, by meticulously following the methods detailed above, you are well on your way to pinpointing and resolving the glitch, bringing your iPhone's network connectivity back to normal. That makes it easier to narrow down the real cause. That gives you a practical reference point if you need to repeat the process later on another device.
