Seeing the 'iPhone is disabled connect to iTunes' message after too many wrong passcode attempts? Apple's standard fix is to connect your iPhone to a computer and erase it.
Still, iTunes is only one path. In this tutorial, I will show you three ways to clear a disabled iPhone without using iTunes, plus Apple's recovery mode method.
Let's get started.
What causes “iPhone is disabled connect to iTunes” ?
The 'iPhone is Disabled Connect to iTunes' alert appears after ten failed passcode entries in a row. Before that point, your iPhone usually locks for short periods and lets you try again later. Once you reach the full lockout, you cannot keep guessing the passcode and must erase the device before you can use it again. On iOS 15.2 and later, Apple may show 'iPhone Unavailable' or 'Security Lockout' instead, but the same erase-and-set-up process still applies.

| iPhonePass | Mobitrix LockAway | iTunes | Find My iPhone | |
|---|---|---|---|---|
| Ease of use | Moderate | Easy | Difficult | Moderate |
| Advantages | No Data Loss | Easy to use & Fast in 20 mins | Freely available | Freely available |
| Disadvantages | Need jailbreak | The premium version is paid | Complicated with a low success rate | Apple ID and password is needed |
| Compatibility issues | Sometimes | No issues | Sometimes | Rarely |
Method 1 Unlock Your Disabled iPhone via iPhonePass - Free & No Data Loss
What is iPhonePass?
Mobitrix offers a free tool called iPhonePass for users who want to remove the screen passcode without erasing local data. It works by jailbreaking the device first so the passcode files can be changed or removed. But this free tool is only compatible with iPhone models from 5s to X.
Preparations for using iPhonePass
- A Mac (any version will work )
- Download a lock removal tool – iPhonePass
- Download a jailbreak tool---checkra1n.
How to Unlock Your Disabled iPhone via iPhonePass without Data Loss
- Open Checkra1n and jailbreak your iPhone to proceed.
- Wait for Checkra1n to finish installing a jailbreak program and do not disconnect your iPhone till the installation is completed.
- Now, connect your iPhone to your MacBook.
- Let your iPhone and MAC establish a network link. Go to 'Terminal' and type 'sudo iproxy 22 44'
- Remove the screen password. Double-click to delete the script 'deliphonepass.sh'. Now Your iPhone screen passcode will be removed without any harm to other data. You can set a new passcode from Settings.

Launch Checkra1n
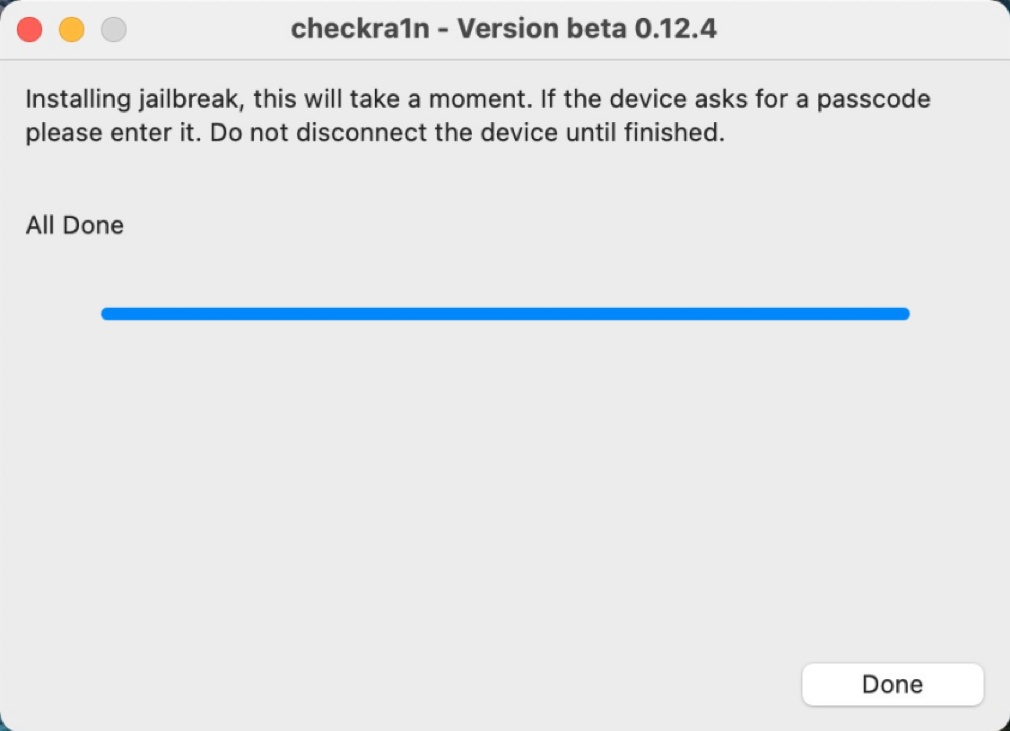
Install Jailbreak

Enter 'iproxy 22 44'

Delete 'deliphonepass.sh' file
Jailbreaking is not good for your iPhone and keep it in the jailbreak state is more harmful so I advise you to turn off the jailbroken state of your iPhone to use it safely. The standard repair of Mobitrix Perfix can help you in this situation without affecting your iPhone's settings and data.
iPhonePass can work well on supported older models. If your device is newer than iPhone X, or you want a simpler process, Mobitrix LockAway is the more practical option because it can remove the disabled screen in about 20 minutes.
Method 2 Bypass 'iPhone is disabled connect to iTunes' Screen with Mobitrix LockAway - The Fastest & Easiest Way
What is Mobitrix LockAway?
Mobitrix LockAway is a passcode removal tool for iPhone and iPad. It is designed for repeated failed passcode attempts, forgotten passcodes, unavailable Face ID or Touch ID, or a damaged screen that keeps you from entering the code.

Fix iPhone Disabled Issue via Mobitrix LockAway Step by Step
- Download and Install Mobitrix LockAway.
- Click Unlock Screen Passcode in the main menu.
- Click Start to remove iPhone Passcode. And then Keyfile will be detected automatically.
- Download and extract Keyfile Package.
- Click Start to Extract after Keyfile has been downloaded successfully.
- When the extraction is complete, please click Start Unlock.
- The iPhone Unlocking is complete!
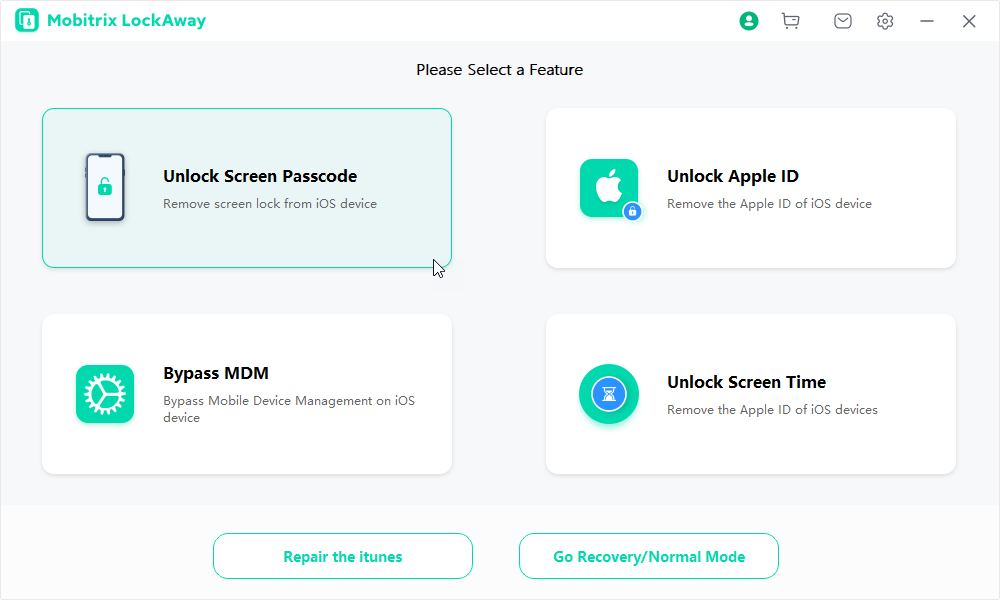
Mobitrix LockAway - Click “Unlock Screen Passcode”
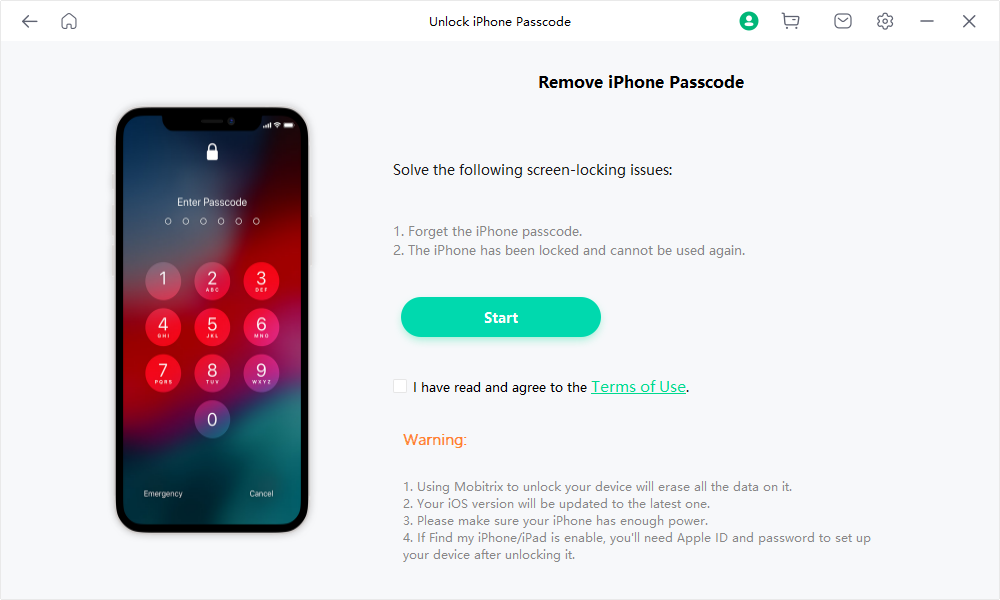
Click 'Start' to remove the iPhone Passcode
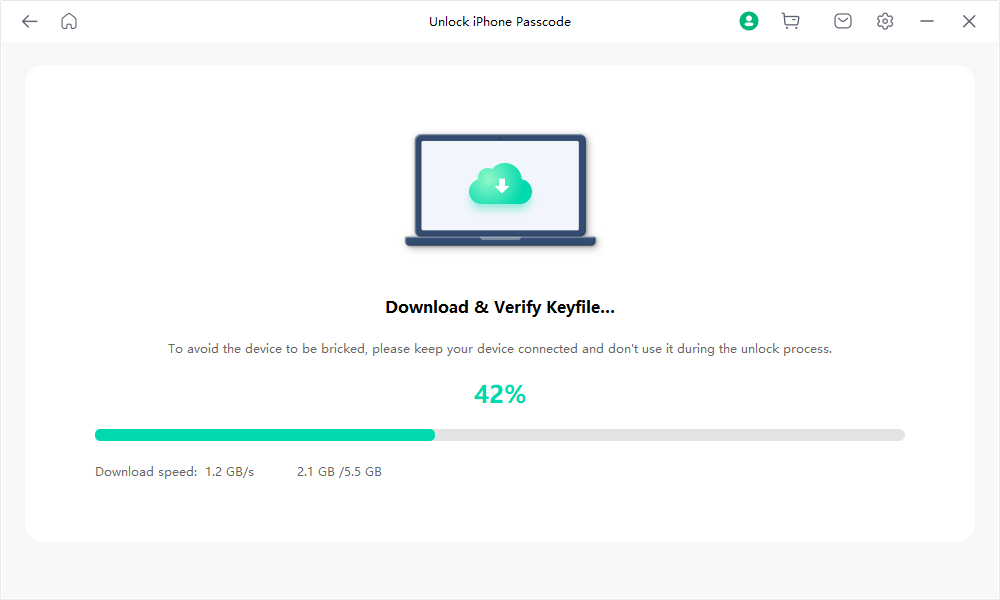
Unlock screen passcode download and verify keyfile
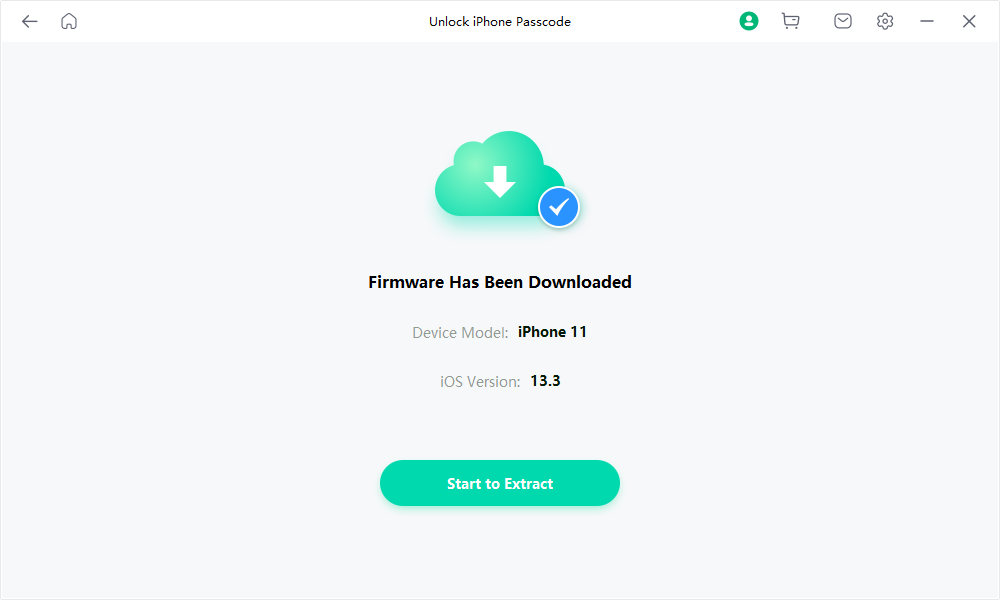
Unlock screen passcode firmware has been downloaded
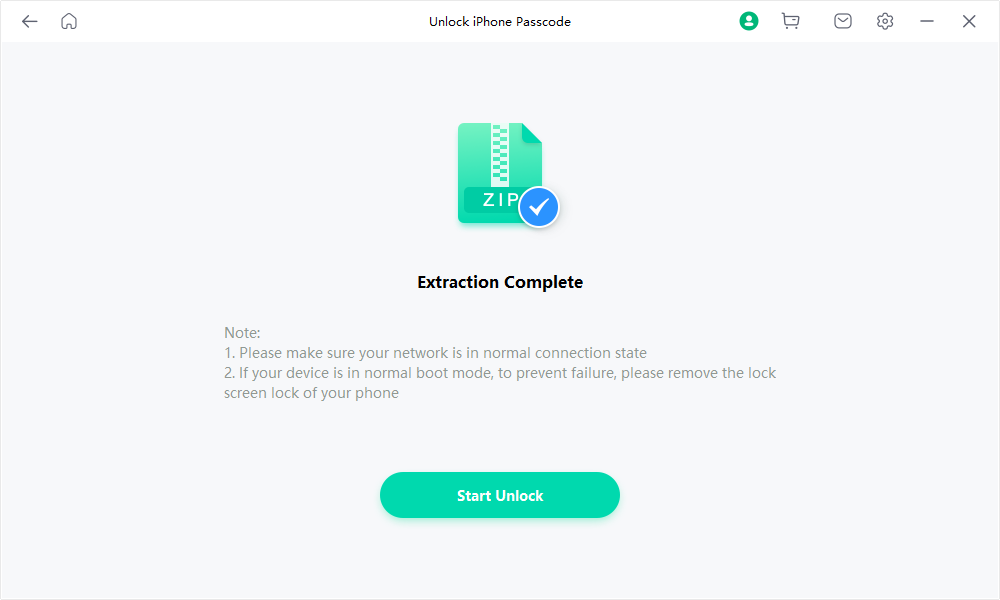
Unlock screen passcode extraction complete
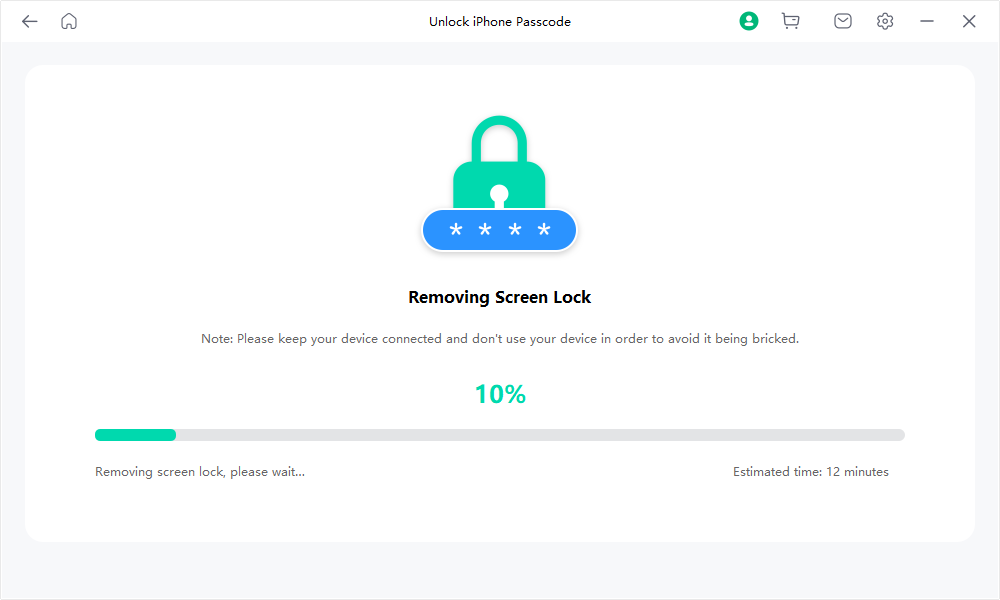
Unlock-screen-passcode-remove-screen-lock

Mobitrix LockAway - iPhone Unlock is Complete
For more details, you can also refer to the user guide page for unlocking your disabled iPhone.
In What Scenarios Mobitrix LockAway Can Help?
- If you forgot your iPhone screen passcode
- If repeated wrong attempts led to an 'iPhone is disabled,' 'iPhone Unavailable,' or 'Security Lockout' screen
- If you got a second-hand iPhone
- If your Face/Touch ID is not working correctly
- If your iPhone screen is cracked

Why Do I Recommend Mobitrix LockAway?
- Mobitrix LockAway does not force you to install iTunes.
- The easy-to-use interface is a plus point for non-tech people.
- The tool comes with a 99% success rate and can unlock fast in 20 minutes only.
- You can safely unlock your iPhone as it includes 100% privacy protection.
- It fully supports iPhone 5s to iPhone 17 and iOS 26 and earlier versions.
 Former Apple Technician
Method 3 Fix 'iPhone is disabled connect to iTunes' Error via iTunes using Recovery mode
What is iTunes and Recovery Mode?
Apple released iTunes in 2001 as media software for playing, downloading, and managing audio or video files. Later, it also became a way for iPhone users to back up, sync, and restore devices. The 'Restore' function is the part that helps remove the disabled passcode screen.
Recovery Mode is a built-in iOS troubleshooting mode where you can use an app — either iTunes or Finder to diagnose and fix the problems of your iPhone when it is connected to the computer. Recovery mode allows you to erase your disabled iPhone, giving you access to set it up again.
How to Solve iPhone Disabled Problem via iTunes/Finder
Step 1 Install iTunes and Prepare a USB Cable.
For PC: Use Windows 10 or later, and install the latest Apple Devices app or iTunes.
For Mac:
macOS Catalina or newer, open Finder.
macOS Mojave or older, install and open the latest version of iTunes.
Step 2 Turn off your iPhone
If your iPhone is connected to a computer, immediately disconnect it.
Turn your iPhone off according to the model:
- iPhone 8, iPhone 8 Plus, iPhone X and later, including iPhone SE (2nd and 3rd generation): Keep pressing the side button and the Volume down button until the power off slider appears.
- iPhone 7, iPhone 7 Plus, iPhone 6s, and iPhone 6: Keep pressing the side button until the power off slider appears.
- iPhone SE (1st generation), iPhone 5s, and earlier: Keep pressing the top button until the power off slider appears.
Now, turn it off by sliding it to the right and wait for it to completely turn off.
Step 3 Put your iPhone in recovery mode
- iPhone 8, iPhone 8 Plus, iPhone X and later, including iPhone SE (2nd and 3rd generation) : use the side button.
- iPhone 7 and iPhone 7 Plus: use the Volume down button
- iPhone SE (1st generation), and iPhone 6s and earlier: use the Home button.
Press and hold the corresponding button of your iPhone while immediately connecting your iPhone to the computer.
Don't let go of the recommended buttons till you see the recovery mode screen on your iPhone. On current iPhones, that screen shows a cable pointing to a computer.
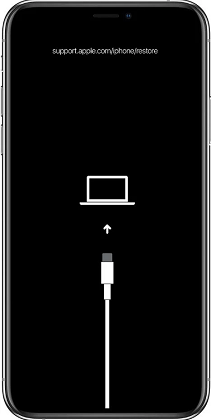
See the recovery mode screen
Step 4 Restore your iPhone
Locate your iPhone in Finder, the Apple Devices app, or iTunes on the computer that it's connected to.
If your Mac starts with macOS Catalina, your iPhone appears in the Finder sidebar.
If you're using Windows, open the Apple Devices app or iTunes. On macOS Mojave or earlier, your device will show in the iTunes window.
iTunes/Finder will show a pop-up message as 'There is a problem with the iPhone that requires it to be updated or restored'. Choose Restore from the two options.
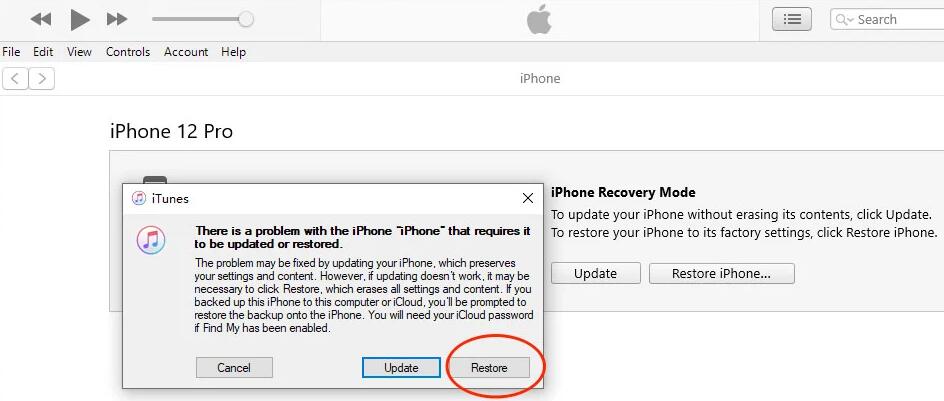
The iPhone that requires it to be updated or restored
Confirm the prompt 'Are you sure you want to restore the iPhone to its factory settings? All of your media and other data will be erased.' by Clicking Restore and update.
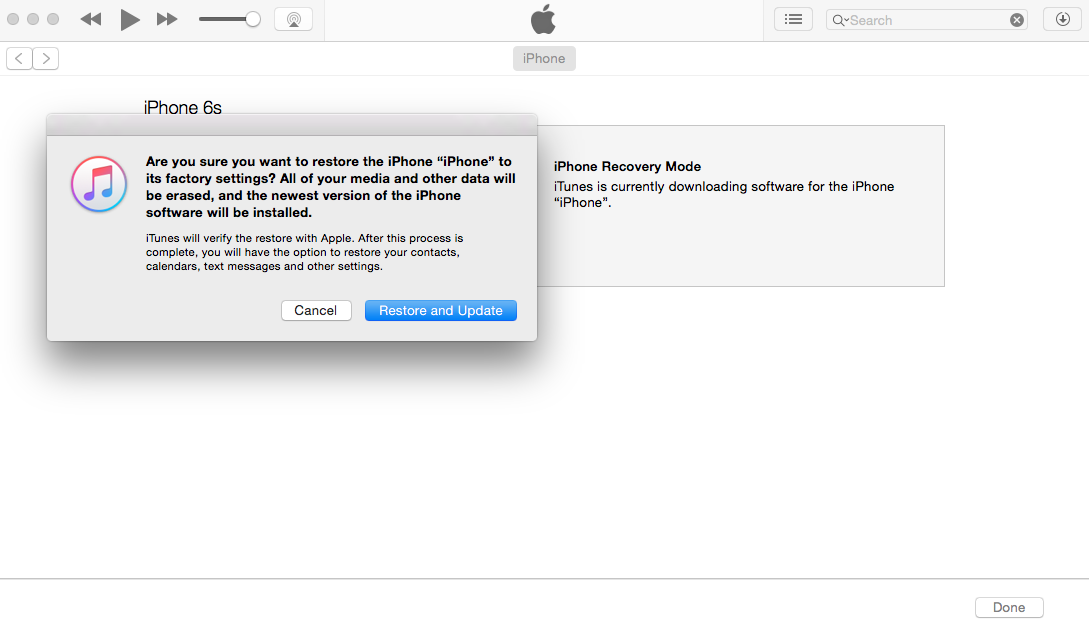
Click Restore and Update
Click to Agree on the terms when a pop-up 'iPhone software update' will appear.
When the 'iPhone software update' is downloaded, you may see a message saying your computer will erase and restore the iPhone to the latest iOS version available for that device. Click Restore.
iTunes will start extracting the software and you can see the restoration progress with a bar and the Apple logo on your locked iPhone screen.

Showing the progress of the erase
When the restoration is finished, your iPhone will restart automatically. And iTunes will show as follows:
Your iPhone has been restored to factory settings
Reset your iPhone when it restarts and set it up as a new device.
Drawbacks of iTunes:
- iTunes might not recognize your iPhone even though it's connected to your computer because of some glitches.
- iTunes is time-consuming and comes with a low success rate. You may spend a few hours but can't unlock your disabled iPhone successfully in the end.
- You will have to start from scratch if your iPhone gets stuck during the downloading or restoring process.
- You might encounter various unpredictable error codes like error 3004, error 3194, error 1100, error 4000, error 4013, etc on your screen.
Method 4 Fix 'iPhone is disabled connect to iTunes' Issue via Find My iPhone without Computer
What is Find My App?
Besides helping you find a lost iPhone, the Find My app also lets you erase a disabled device through your Apple Account. The Erase function removes the screen passcode along with the rest of the data so you can set up the iPhone again.
Something You Should Know Before Using Find My
- Find My must already be turned on for the disabled iPhone.
- The disabled iPhone must have an internet connection through Wi-Fi or cellular data.
- Your Apple Account must still be signed in on the disabled iPhone.
- You need the Apple ID password in order to proceed.
How to Use Find My to Unlock Your Disabled iPhone?
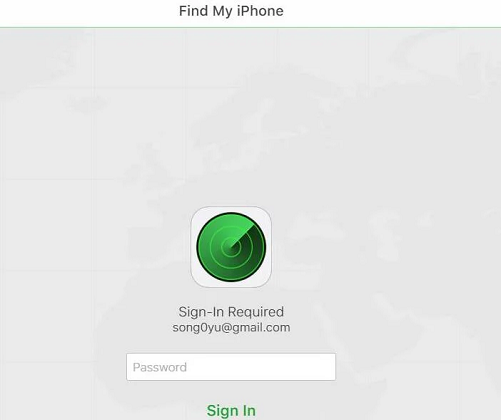
- Open iCloud.com on a browser, or use the Find My app on another Apple device.
- Sign in with your Apple ID and password.
- Locate Find iPhone and enter your Apple ID and password again if Apple asks you to confirm the account.
- Select your disabled iPhone from the All Devices list.
- Tap Erase iPhone and confirm the Erase iPhone prompt again.
- Enter your Apple ID password to continue.
- Enter the verification code sent to your trusted device.
- Enter your Phone number and select Next then click Done.
- The erasing process will start and you can see the progress on your screen with an Apple logo and a bar. Your iPhone will automatically restart after the procedure is completed. Now, you can reset your iPhone.
- Enter your Apple ID and password on the prompt “iPhone Locked to Owner.' Select Next and create a new password that you will remember.
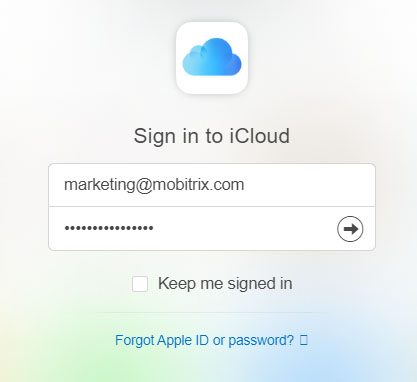
Enter your Apple ID and password
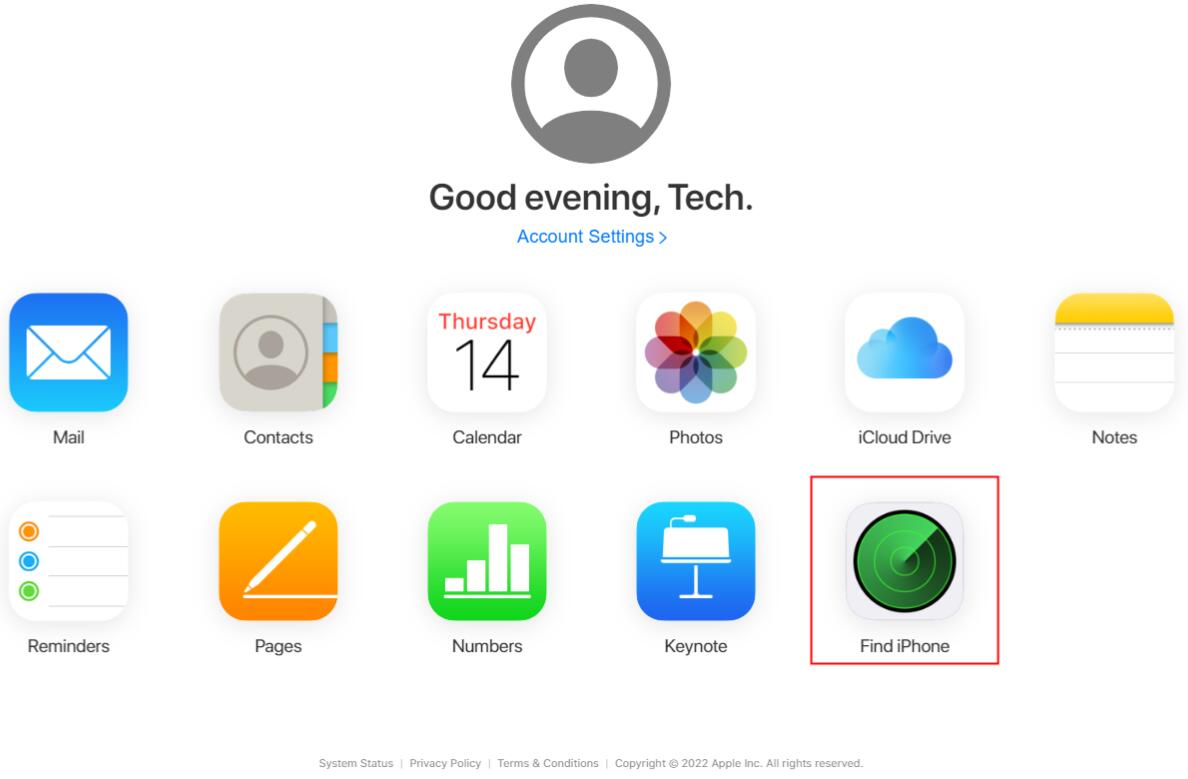
Click Find iPhone
Enter your Apple ID password

Click All Devices and choose your device
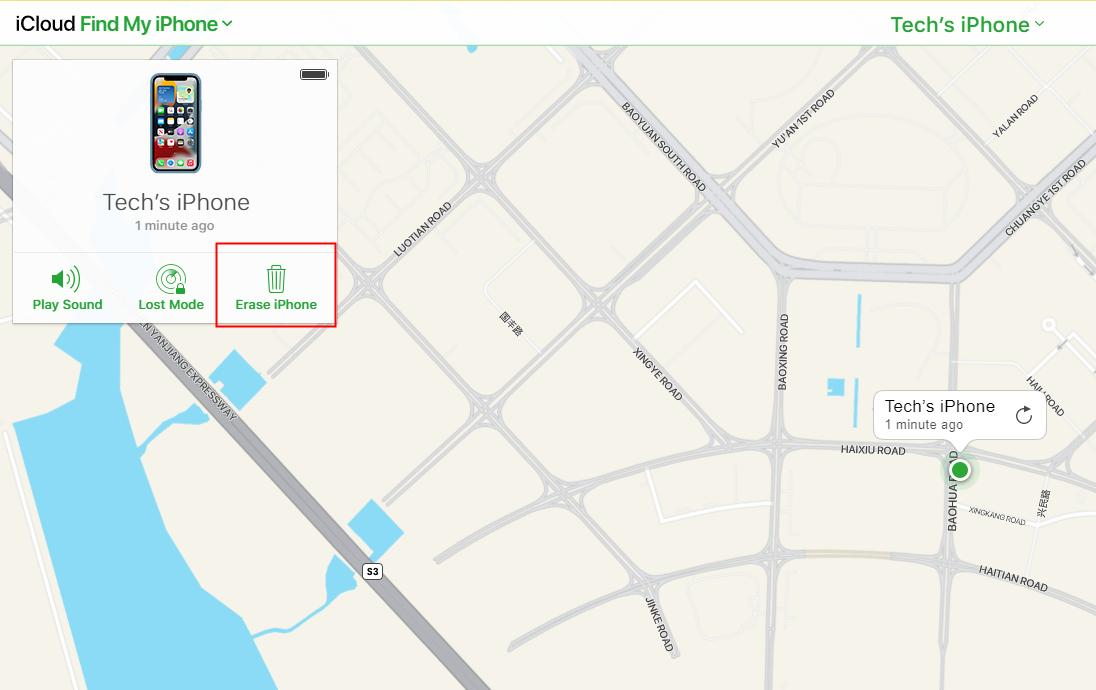
Click Erase iPhone

Click erase
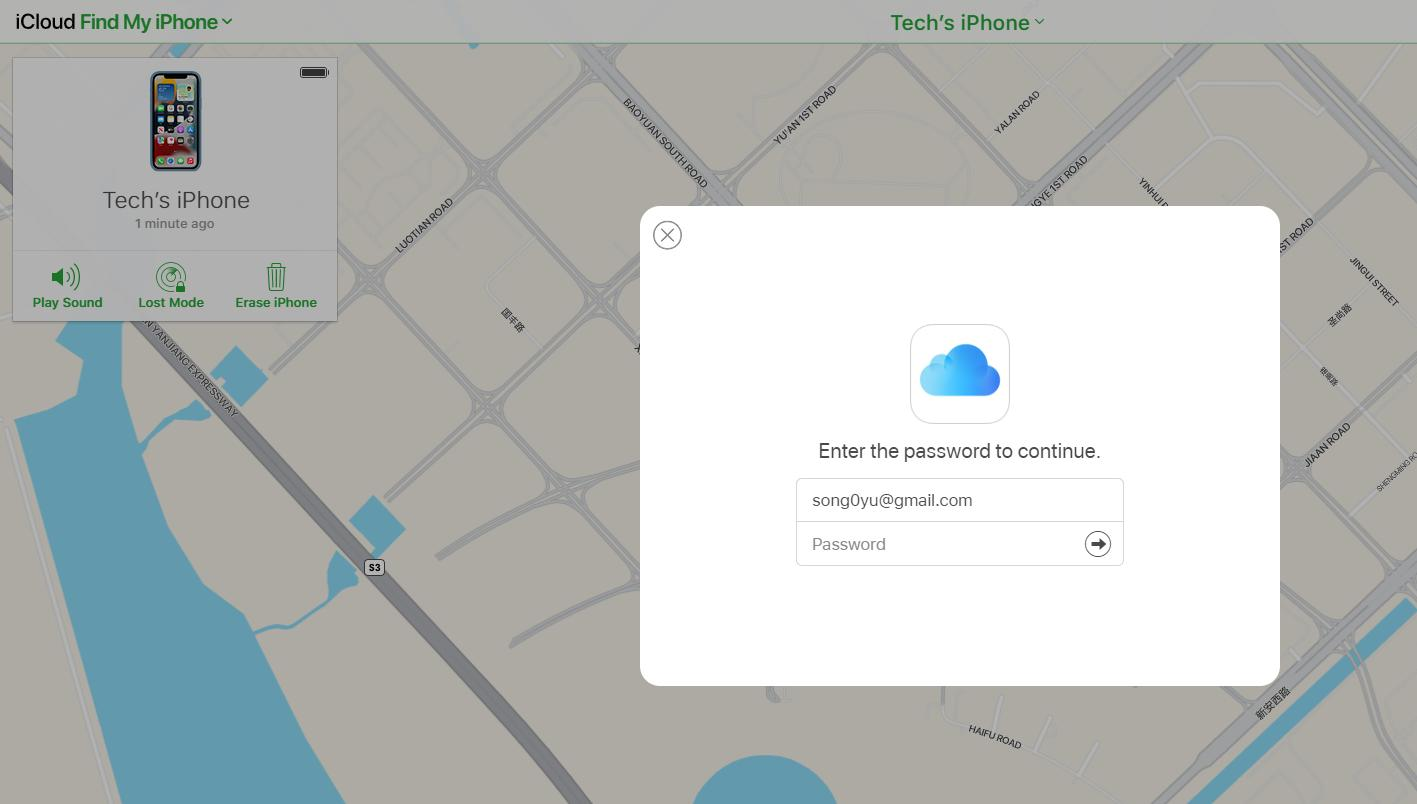
Enter your Apple ID password to continue
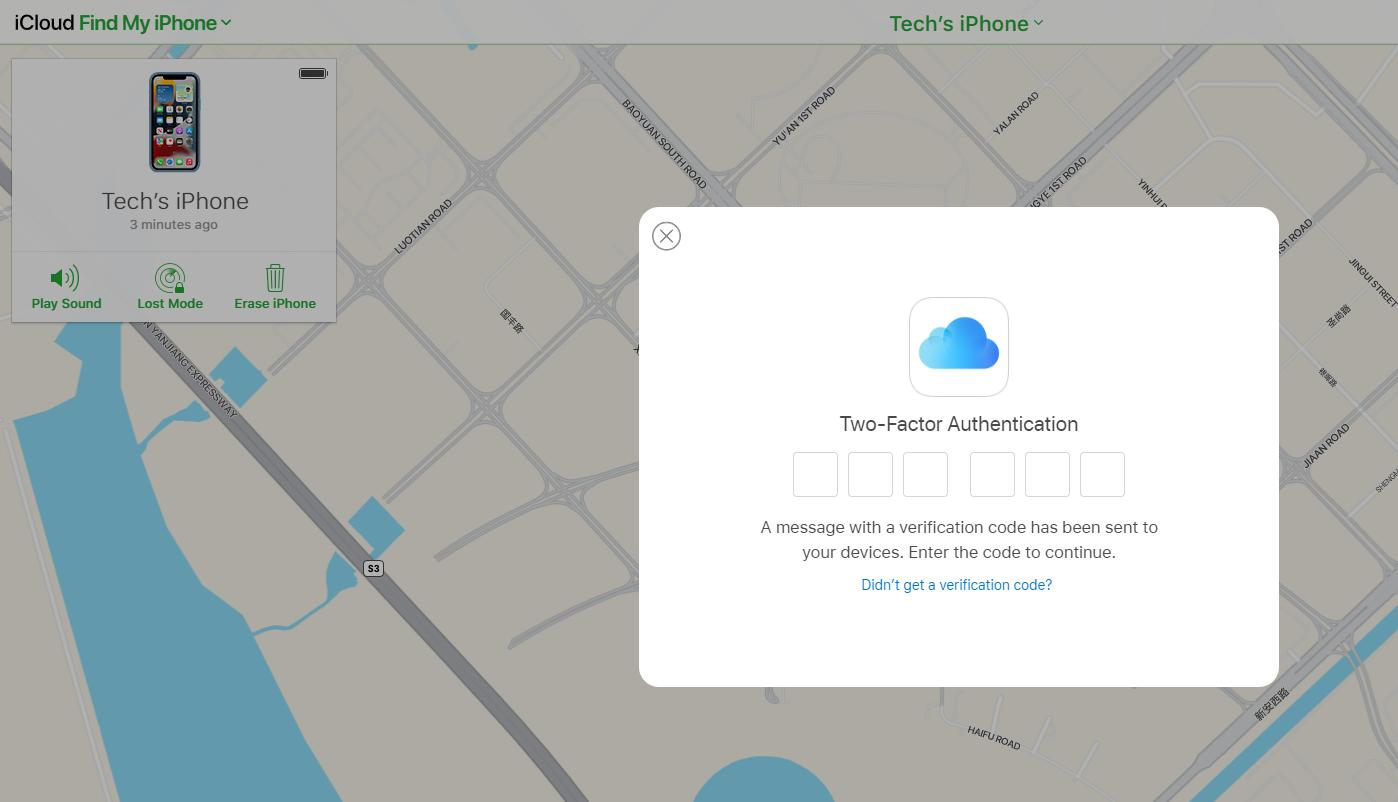
Two-factor authentication
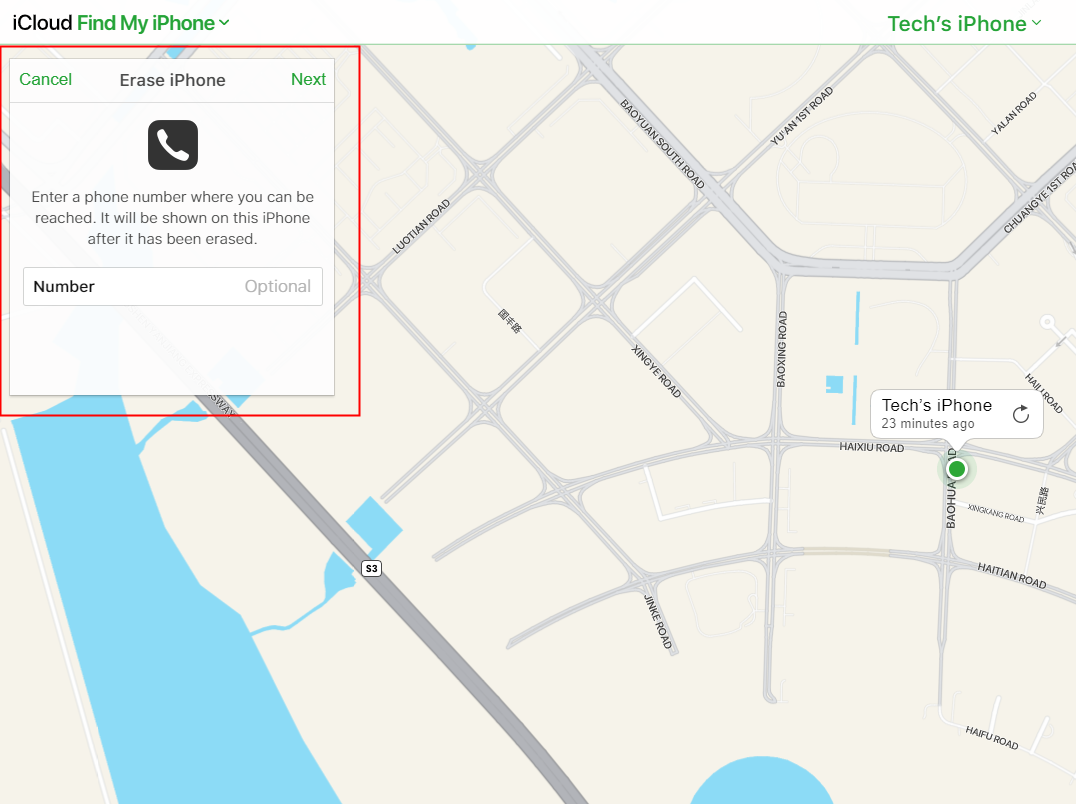
Enter your phone number
Showing the progress of the erase
How to Avoid Getting a Disabled iPhone Again?
Disable Raise and Tap to Wake
Raise to wake is designed to wake your iPhone when you lift it to a certain height, while Tap to wake will wake the gadget when you tap on its screen. You are then required to enter your passcode. While this is convenient, it can also unknowingly cause keying in of the wrong passcode, such as when you carry the device in your pocket or bag. If this happens more than ten times, it will block your iPhone. Disabling these features can prevent this problem.
How to Disable Raise and Tap to Wake.
- Open the Settings > Accessibility > Touch > disable 'Tap to Wake' option.
- Then go to 'Display and Brightness' and turn off the 'Raise to Wake' option.
Create easy-to-remember Passcodes
You can disable your iPhone if you forget your passcode and key in the wrong one too many times. Using an easy-to-recall passcode like a 4-digit passcode rather than a 6-digit can decrease this possibility. Alternatively, you may keep a copy of the passcode.
Enable Touch ID or Face ID
Enabling Face and touch ID ensures you have an alternative way of unlocking your iPhone if you forget the pin code.
How to Enable Touch ID or Face ID:
- Go to Settings.
- Tap Touch ID & Passcode/Face ID & Passcode .
- Follow the on-screen directions.
Bonus Tips
What to do if my iPhone is disabled and won't connect to iTunes?
If your disabled iPhone will not connect to iTunes, start with Find My or another erase method that does not depend on a cable connection. On iOS 15.2 and later, Apple may also let you erase the device directly from the lock screen after a Security Lockout or iPhone Unavailable message, as long as Find My is on and the phone has a network connection. If those options fail, DFU mode is the last-resort restore path because it reinstalls iOS and resets the device.
Can I Unlock my disabled iPhone without losing data?
You can use Method 1 in this guide to fix the 'iPhone is disabled connect to iTunes' error without losing data, but it only works on a limited range of older iPhones and it requires a Mac. For most disabled iPhones, removing the passcode also means erasing the device first.
If you backed up your iPhone using iTunes, Finder, or iCloud before being locked out, you can restore your data after the passcode is removed.
Can I Restore Data selectively directly from iTunes?
You cannot restore data selectively from an iTunes backup file because the service only restores the whole device backup. If you want only certain files back, you need a separate backup that contains that data or a third-party recovery tool built for selective extraction.
After reading the solutions above, you should have a clear path to fix the 'iPhone is disabled connect to iTunes' error. However, if you wish to do minimal work and hope for the process to be completed sooner, I suggest opting for Mobitrix LockAway. It is both easy to use and does all the work for you!