
Scanning documents on an iPhone is a useful skill, but many users struggle with the process. Does the camera is the only option? Can you convert files to different formats? The built-in iPhone app is usually the fastest option for a basic result.
Fortunately, the Notes and Files apps can scan documents and save them as PDFs that can be easily stored and signed. Below, you'll provide a simple guide to scanning documents on your iPhone and answer common questions about the process. Using a second SIM after the change is the clearest way to verify that the device now accepts another network.
Way 1: Using the Notes App
The Notes app on your iPhone is a handy tool that can be used to scan and store important documents, receipts, and even business cards. By using this app, you can easily keep track of important information and access it whenever you need it. It also keeps the document easier to review later if you need to send or sign it from the same device.
How to Scan a Document with the Notes App:
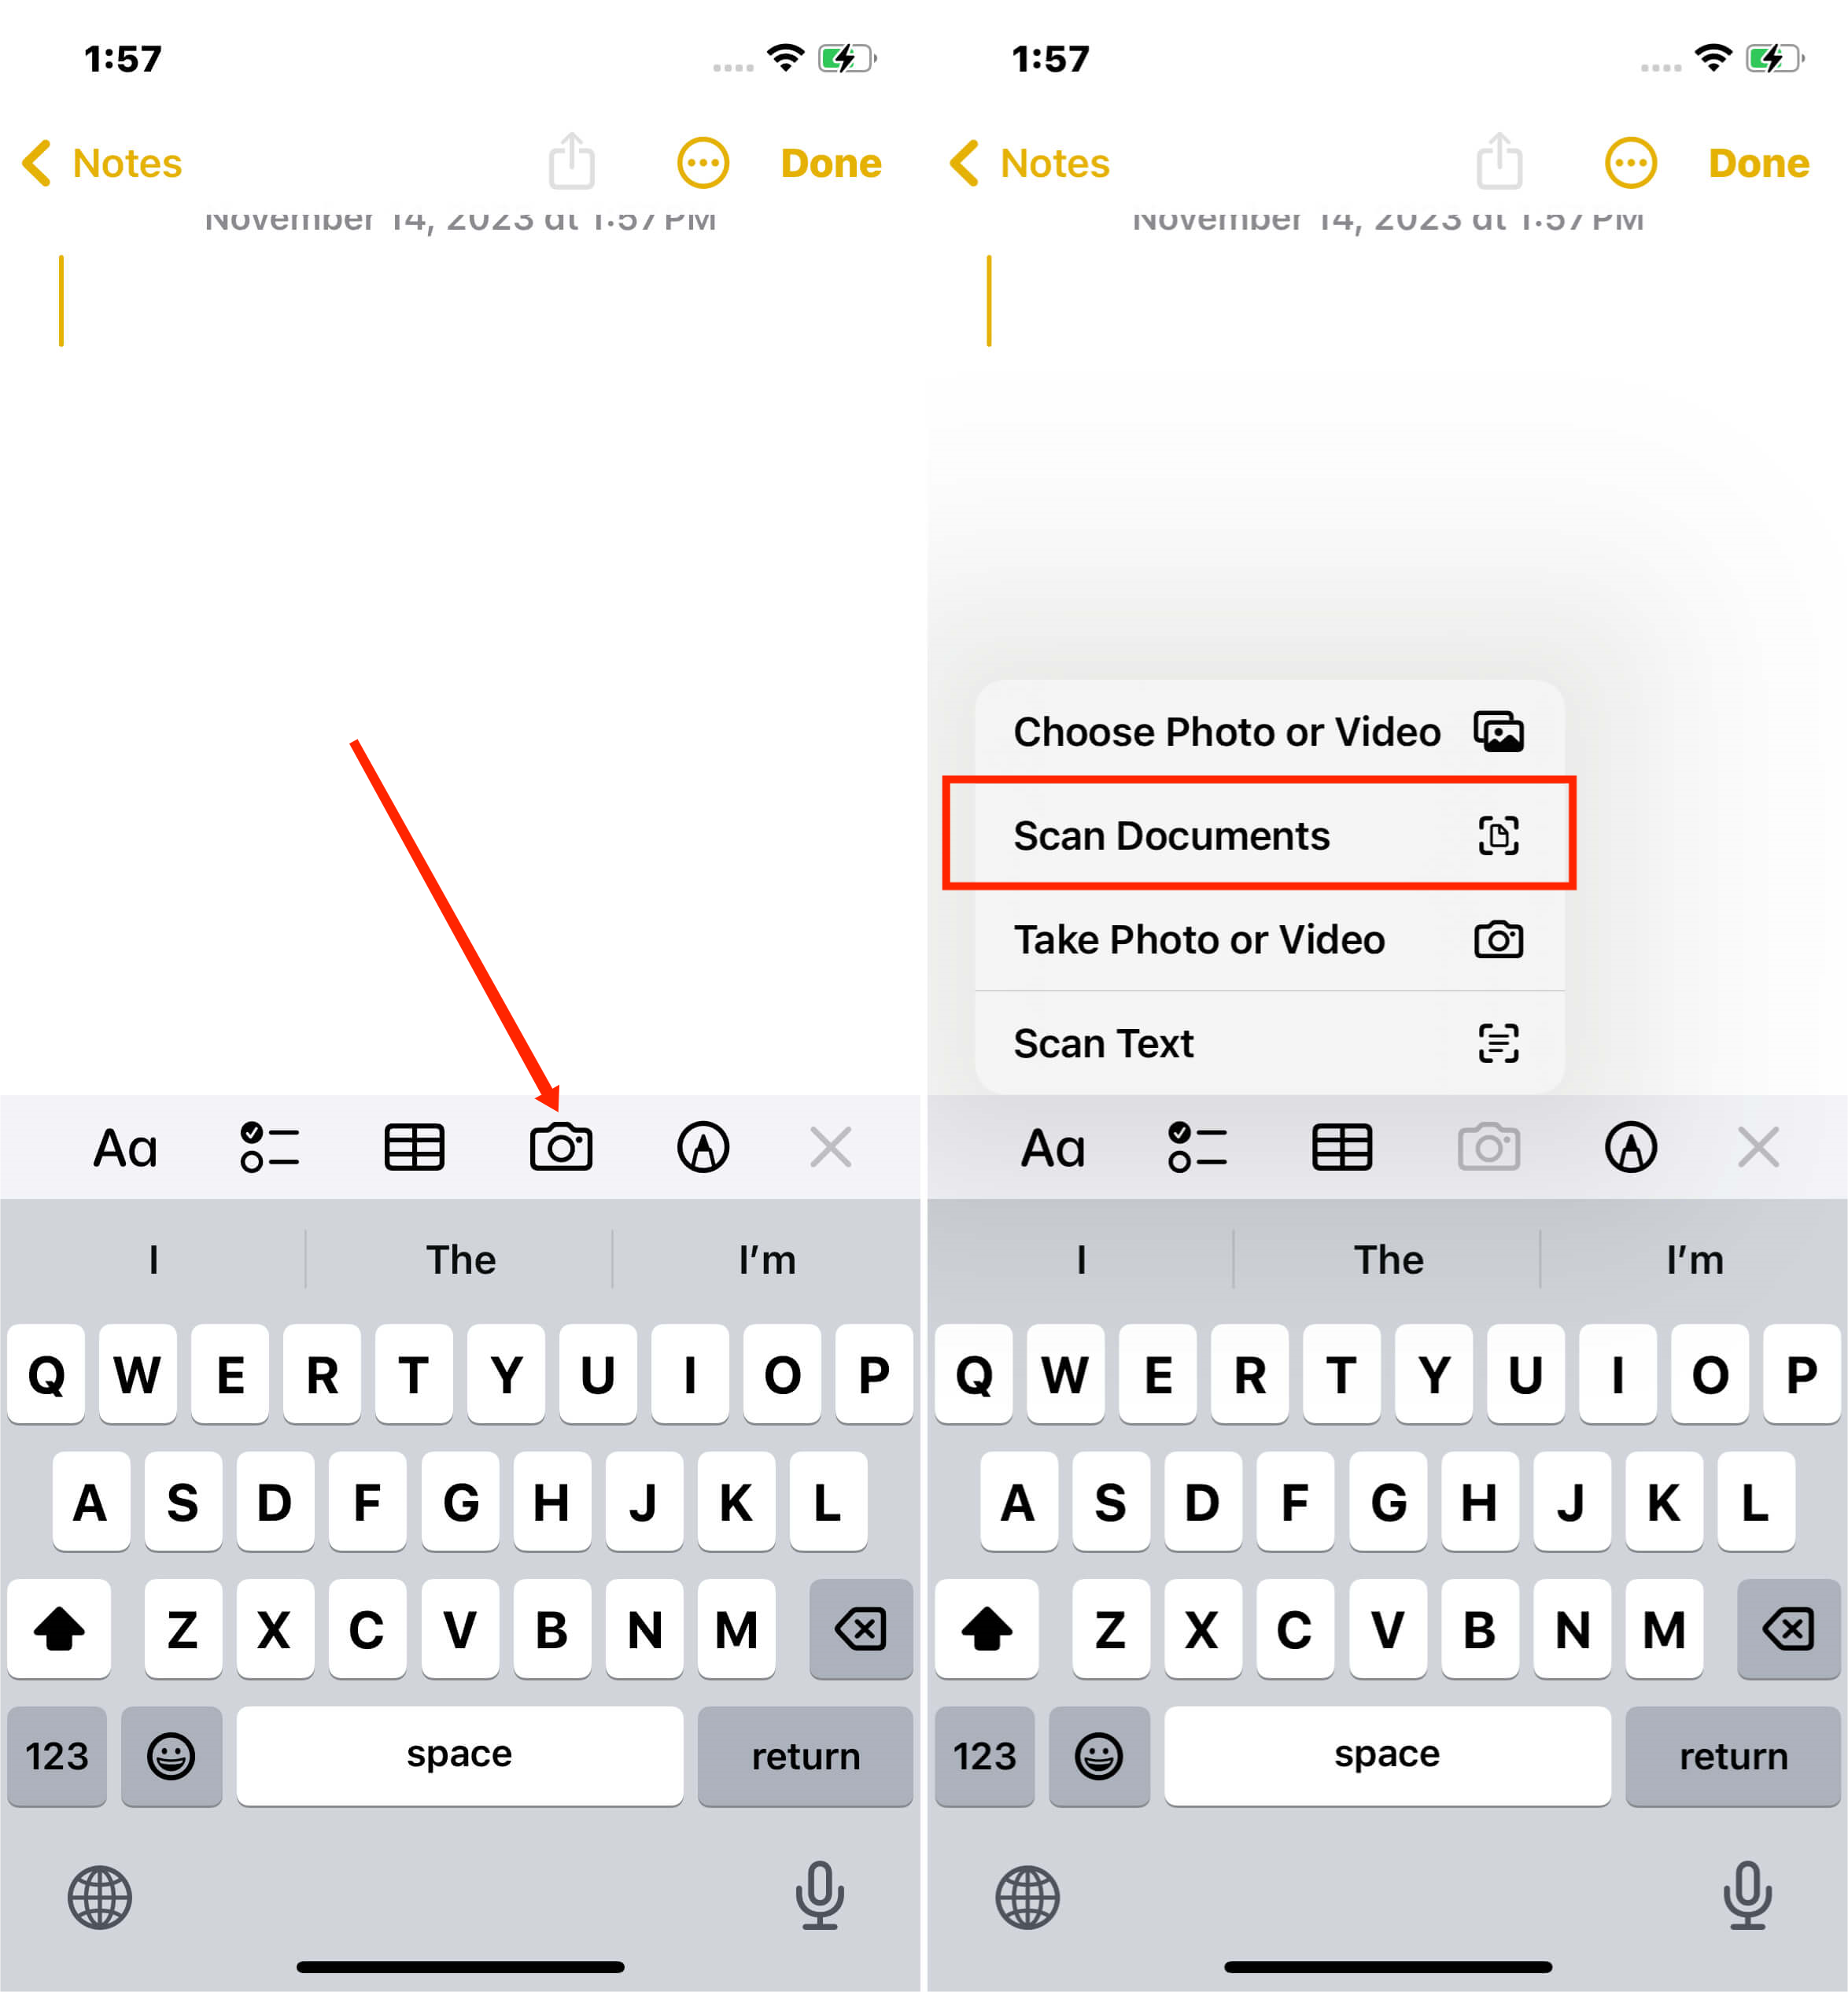
- Open the Notes app on your iPhone.
- Create a new note or open an existing one. A quick check of the device model, software version, and account state usually explains why the same menu looks different on another device.
- Tap the camera icon in the toolbar.
- Select "Scan Documents".

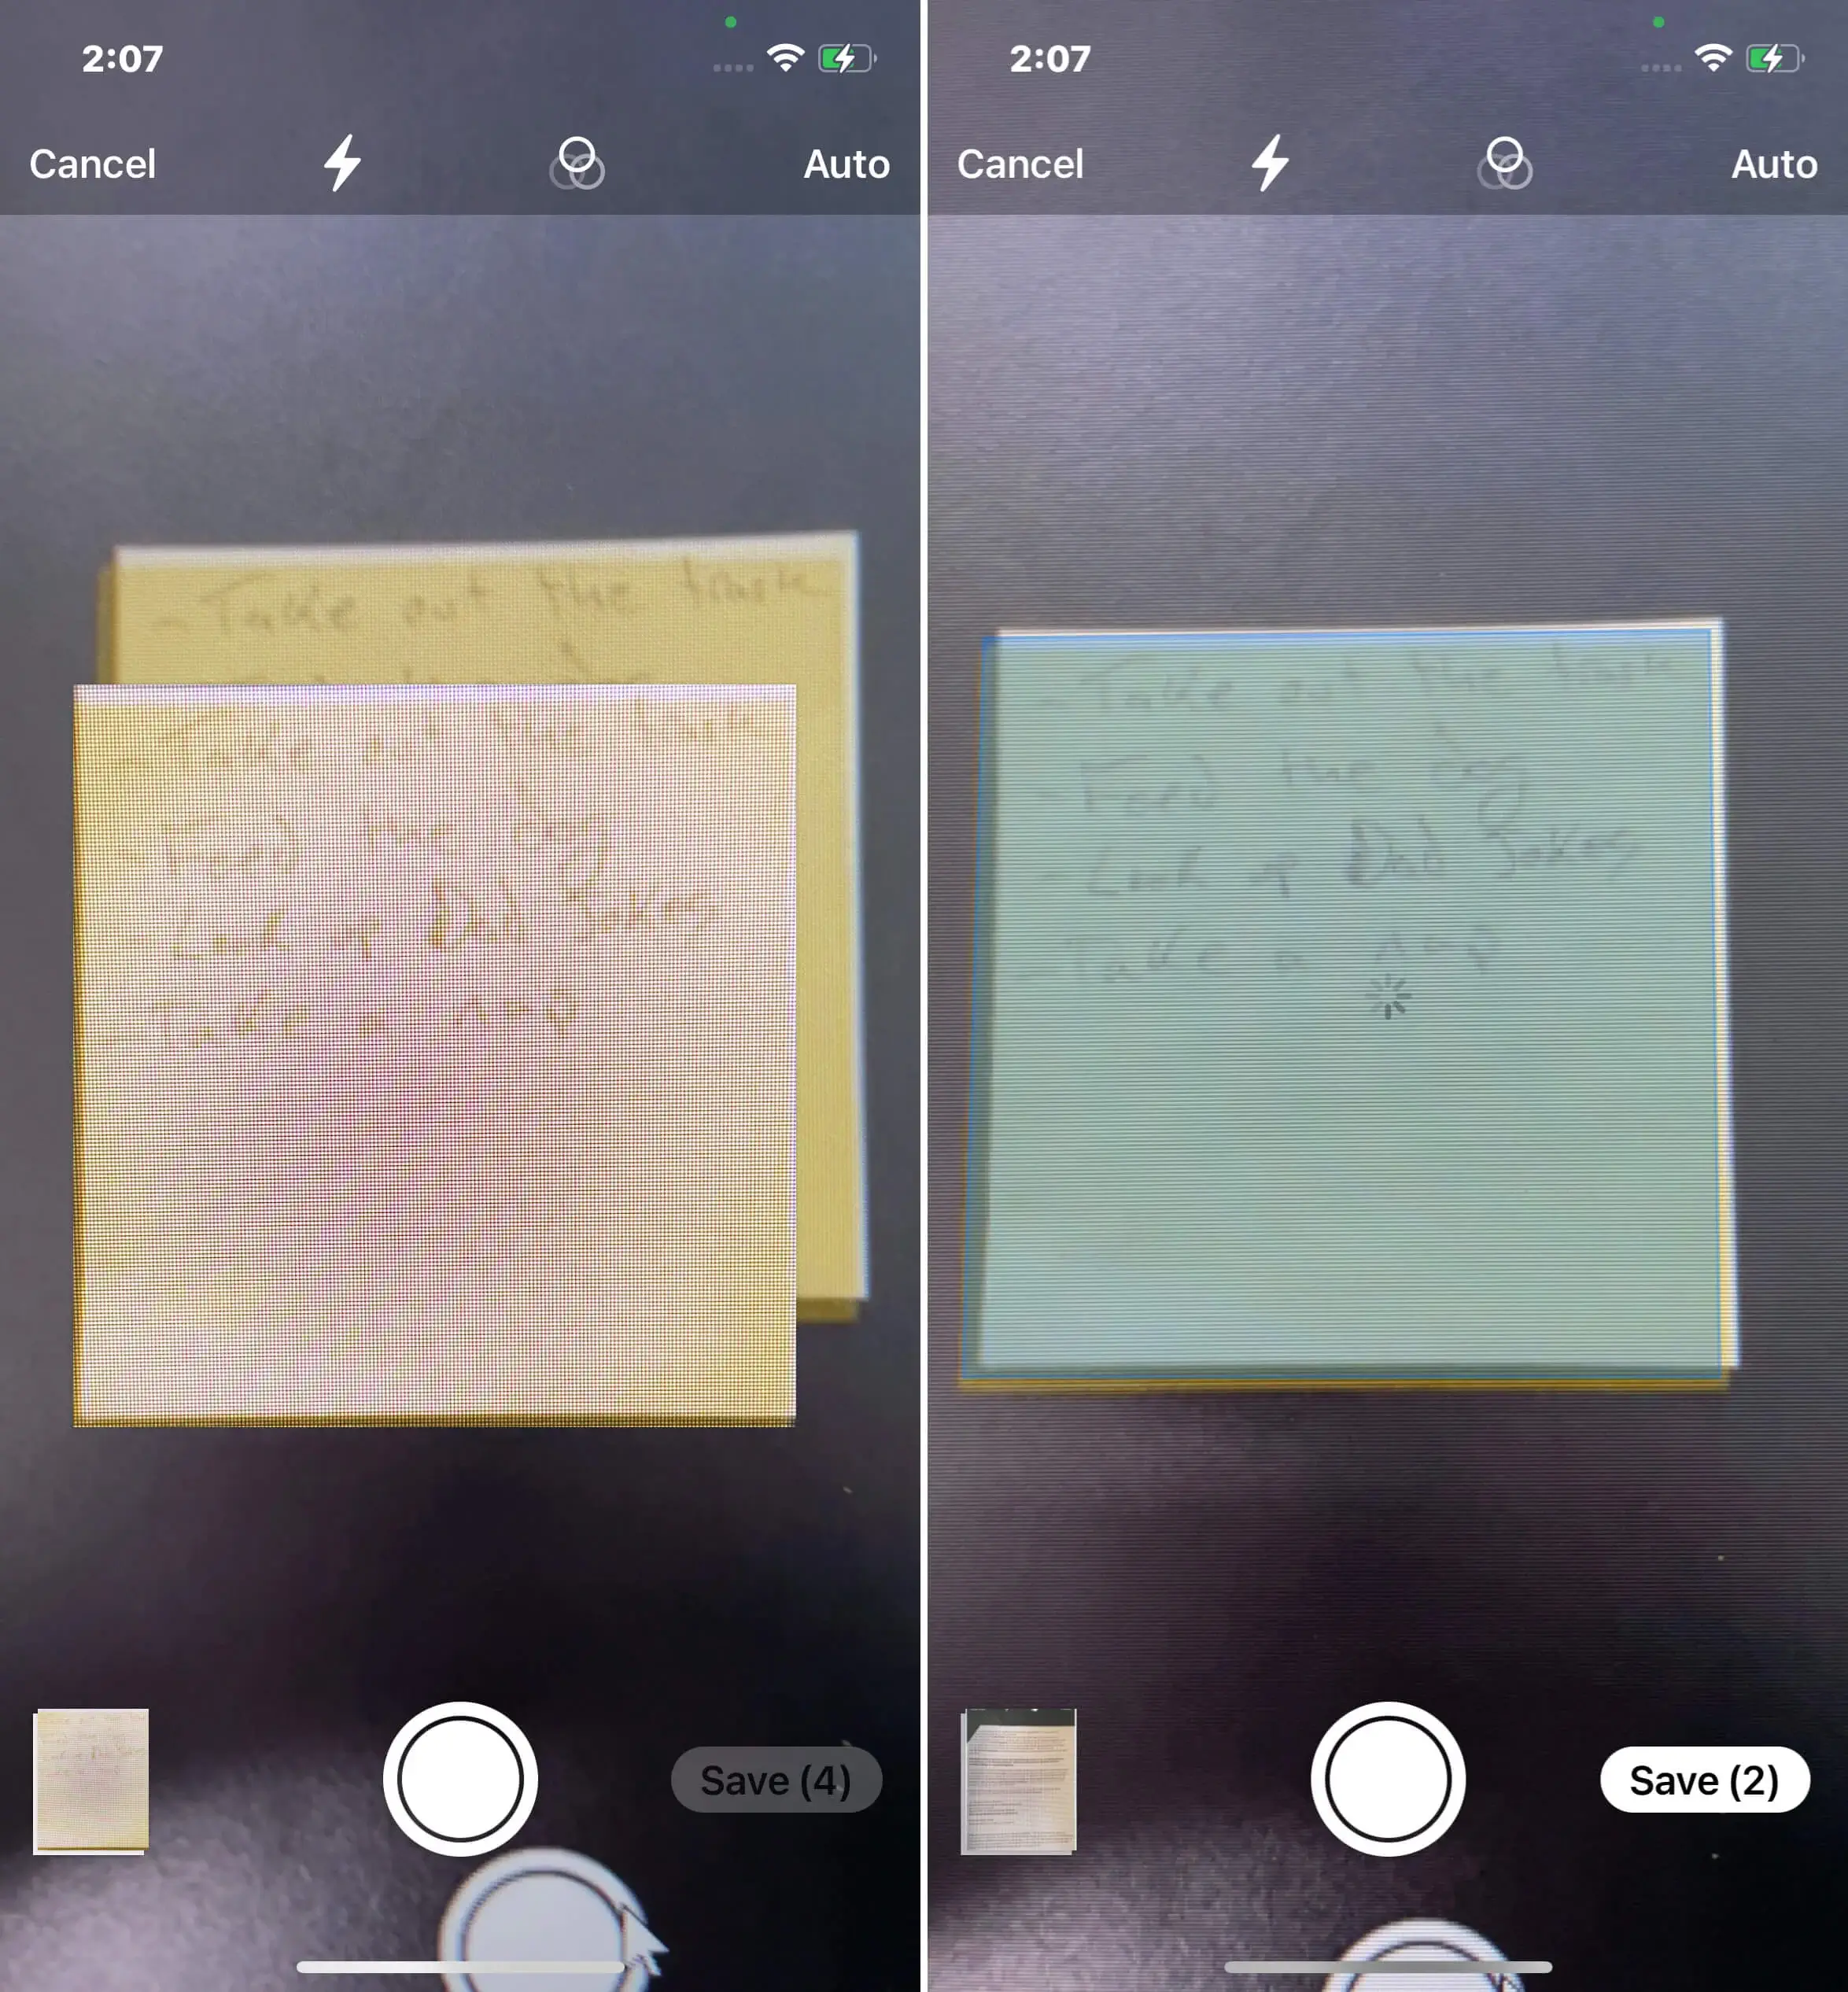
Steps to Use Notes App Scan Documents - Position your document within the on-screen borders and tap the shutter button.
- Adjust the corners of the document as needed using the on-screen guides.
- Choose a filter option to enhance the quality of the scan, if desired so the document is captured clearly before you move to the next screen.
- Tap "Save" to save the scanned document to your note.
Way 2: Using the Files App
The Files app on your iPhone is another built-in tool that can be used to scan and store documents. If you prefer to keep your scanned documents organized within your files, this may be the method for you.
How to Scan a Document with the Files App:
- Open the Files app on your iPhone.
- Go to the folder where you want to save the scanned document or create a new folder so the file is ready to store or send once you finish the current step. That helps when you want a cleaner digital copy without rescanning the same page again later.
- Tap the "..." button in the upper-right corner of the screen.
- Select "Scan Documents" from the drop-down menu.
- Position your document within the on-screen borders and tap the shutter button.
- Adjust the corners of the document as needed using the on-screen guides.
- Choose a filter option to enhance the quality of the scan, if desired so the document is captured clearly before you move to the next screen.
- Tap "Save" to save the scanned document to your selected folder.

Steps to Use Files App Scan Documents

Make Adjustments to Get the Perfect Scanned Documents
Getting a clear and legible scanned document can sometimes be a challenge. But by making some simple adjustments, you can improve the quality of your scanned documents and Make sure they look professional. Testing with another carrier's SIM is one of the quickest ways to confirm the carrier restriction is actually gone.
How to Make Adjustments:
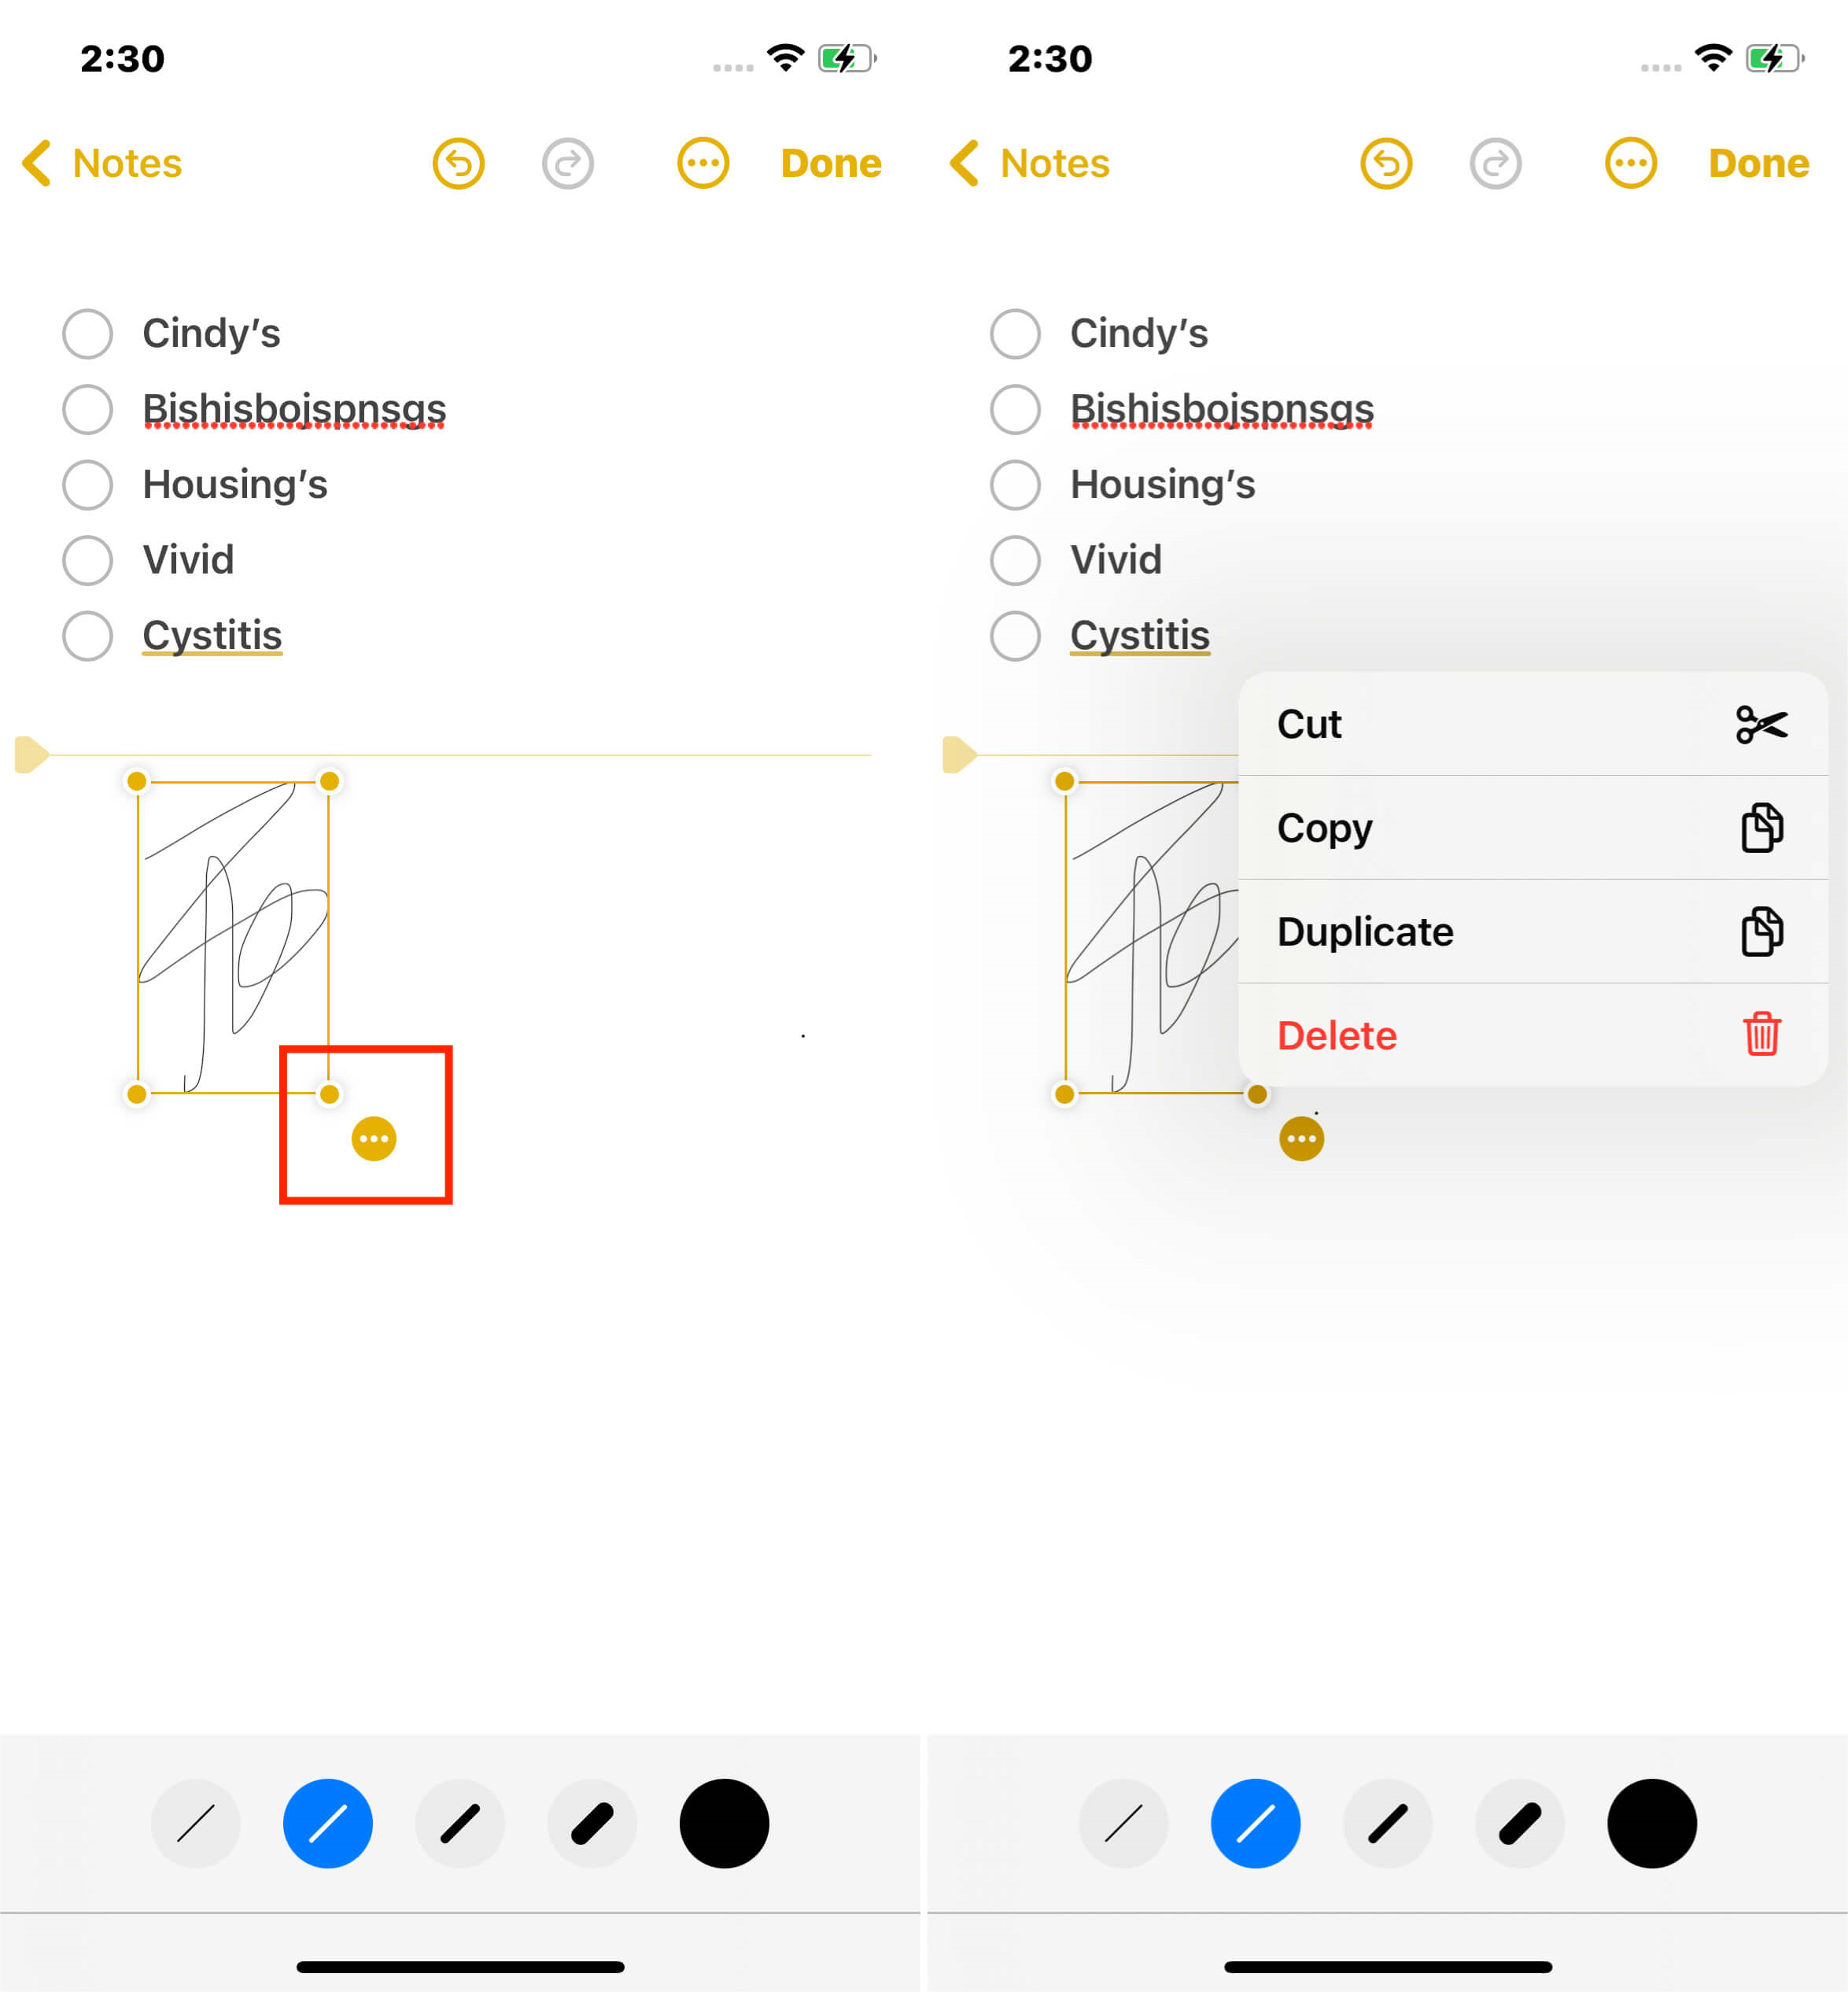
- After scanning your document, tap on the scanned image within the Note or File App.
- Tap the "..." button in the upper-right corner of the screen.
- Select "Markup" from the drop-down menu.
- Use the tools provided to adjust the brightness, contrast, or other aspects of the image as needed so the next part of the process is easier to complete without backtracking. This is useful when the speed change should affect only one section instead of forcing the whole clip to slow down.
- Tap "Done" to save your changes.
Steps to Make Adjustments on the Scanned Image
Sign, Share, or Save Your Scanned Document
After scanning your document on your iPhone, you may need to sign it, share it with others, or save it for future reference. Fortunately, the iPhone provides built-in tools to help you complete these tasks with ease. It is useful when the document will be shared, signed, or saved as a PDF right after scanning.
How to Sign a Scanned Document:
- After scanning your document, tap on the scanned image within the Note or File App.
- Tap the "..." button in the upper-right corner of the screen.
- Select "Markup" from the drop-down menu.
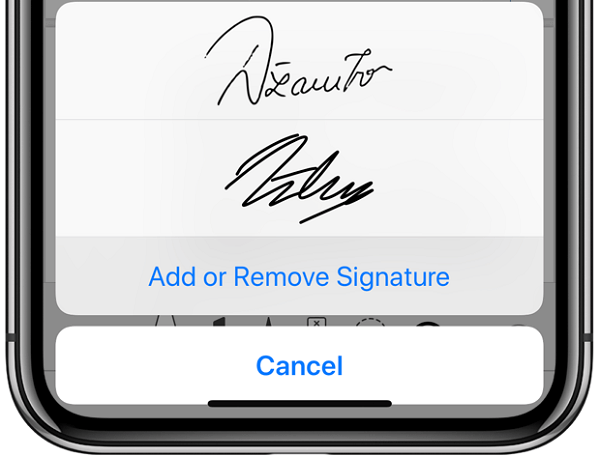
- tap the signature icon at the bottom right of the screen so you can make changes before exporting the final version.
- Choose "Add or Remove Signature".
- Follow the on-screen prompts to create and save your signature so the file is ready to store or send once you finish the current step.
- Tap the signature icon again and select your saved signature so the file is ready to store or send once you finish the current step.
- Position and resize your signature as needed on the document.
- Tap "Done" to save your changes.
Steps to Add or Remove Signature
How to Share or Save a Scanned Document:
You can share, or save your scanned document directly from your iPhone, making it easy to manage important information on-the-go. This makes it easier to keep the scan readable before you export or file it away.
- After scanning your document, tap the scanned image within the note or file.
- Tap the "..." button in the upper-right corner of the screen.
- Select "Share" or "Save to Files" from the drop-down menu.
- Choose the method you prefer to share or save the document so the file is ready to store or send once you finish the current step.
- Follow the on-screen prompts to complete the process.

Steps to Share or Save to Files
How to Save a Scanned Document as PDF:
Saving your scanned document as a PDF is a great way to Make sure that it can be easily viewed and shared on multiple devices. That is worth checking before you save the scan, especially if the document has small text or uneven lighting.
- After scanning your document, tap on the scanned image within the note or file.
- Tap the "..." button in the upper-right corner of the screen.
- Select "Markup" from the drop-down menu.
- Tap on the share icon in the upper-right corner of the screen.
- Swipe left on the second row of icons to reveal the "Create PDF" option.
- Tap "Create PDF" and wait for the conversion process to complete.
- Tap "Done" in the upper-left corner of the screen to save the PDF.
Select Markup
How to Mark Up a Scanned Document
Once you have scanned a document on your iPhone, you may want to make some edits or annotations to it.
How to Mark Up a Scanned Document:
- After scanning your document, tap on the scanned image within the note or file.
- Tap the "..." button in the upper-right corner of the screen.
- Select "Markup" from the drop-down menu.
- Use the tools at the bottom of the screen to add text, drawings, shapes, or signatures.
- Use your finger or an Apple Pencil (on compatible devices) to make your edits.
- Tap "Done" in the upper-left corner of the screen to save your changes.
Select Markup
Requirements for Using Markup Tools
- The document must be in a compatible format, such as a PDF or image file.
- The document must be saved within the Notes or Files app on your iPhone.
- To use an Apple Pencil, you must have a compatible device, such as an iPad Pro or iPad Air.
Delete the Scanned Dcoument You Don't Want
Deleting scanned documents on iPhone can help you free up space and keep your device organized.
Here's how to do it:
- Open the "Notes" app on your iPhone.
- Tap on the scanned document you want to delete.
- Tap on the "Delete" button, which looks like a trash can icon.
- Confirm that you want to delete the document by tapping "Delete" again.
Delete the Scanned Dcoument
Bonus Tip: You Can Scan Documents with Continuity Camera on Mac Using Your iPhone.
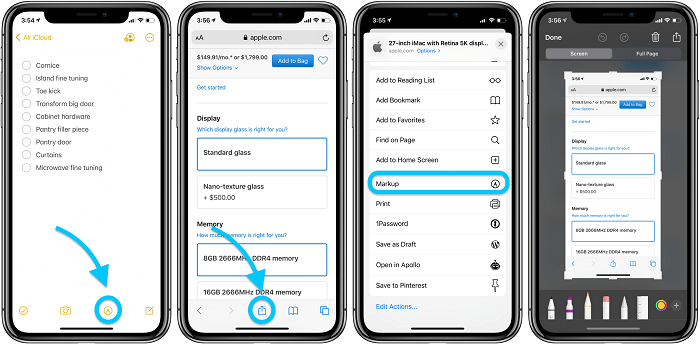
Continuity Camera is a feature that allows you to use your iPhone or iPad's camera to quickly take a photo or scan a document, and have it appear instantly on your Mac. That gives you a better chance of ending with a readable file on the first pass.
How to use Continuity Camera
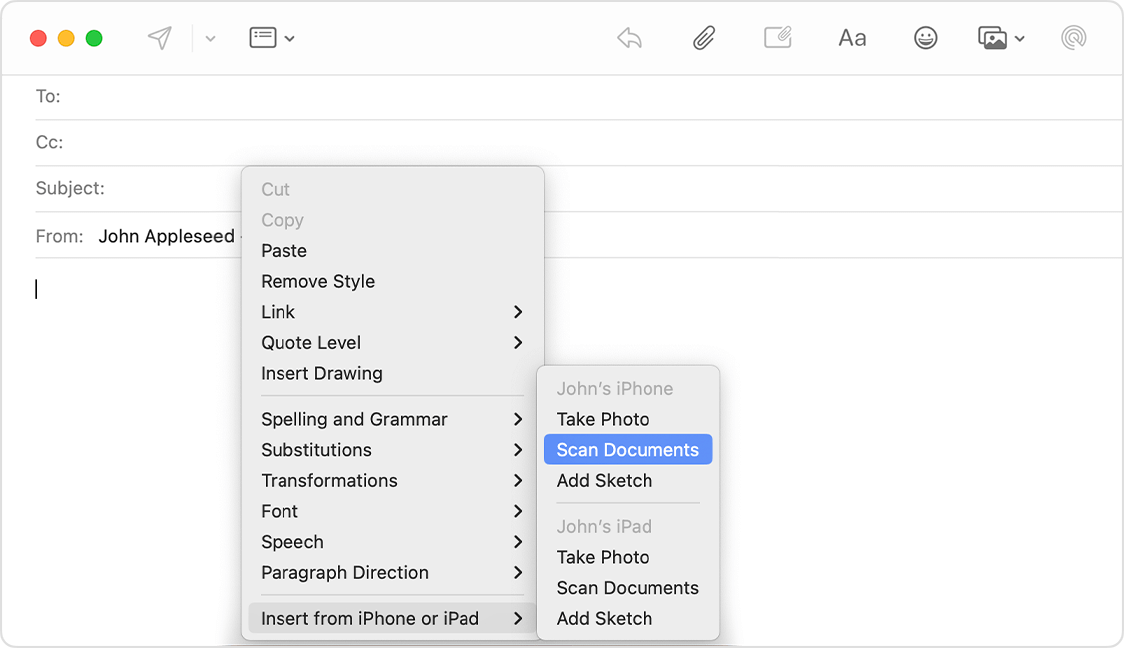
- Open a document or file that you want to add a scanned image to, such as a Pages or TextEdit document.
- Click on the location where you want to insert the scanned image, then go to the "File" menu and select "Insert from iPhone or iPad" and then choose "Scan Documents".

Insert from iPhone or iPad Option
- Your iPhone or iPad's camera app will open automatically.Hold the device steady over the document you want to scan, making sure that the document is within the frame of the camera.
- The camera app will automatically detect the edges of the document and highlight them. You can adjust the edges if needed, and use the filters to enhance the image quality.
- Once you're satisfied with the scan, tap "Keep Scan" to save the image to your device.
The following apps support Continuity Camera:
- Finder
- Keynote
- Numbers
- Pages
- TextEdit
- Messages
Scanning vs. Taking Photo: What's the Difference?
When it comes to digitizing documents, you might be wondering whether to scan or take a photo. While both methods can capture an image of your document, there are several differences between the two.
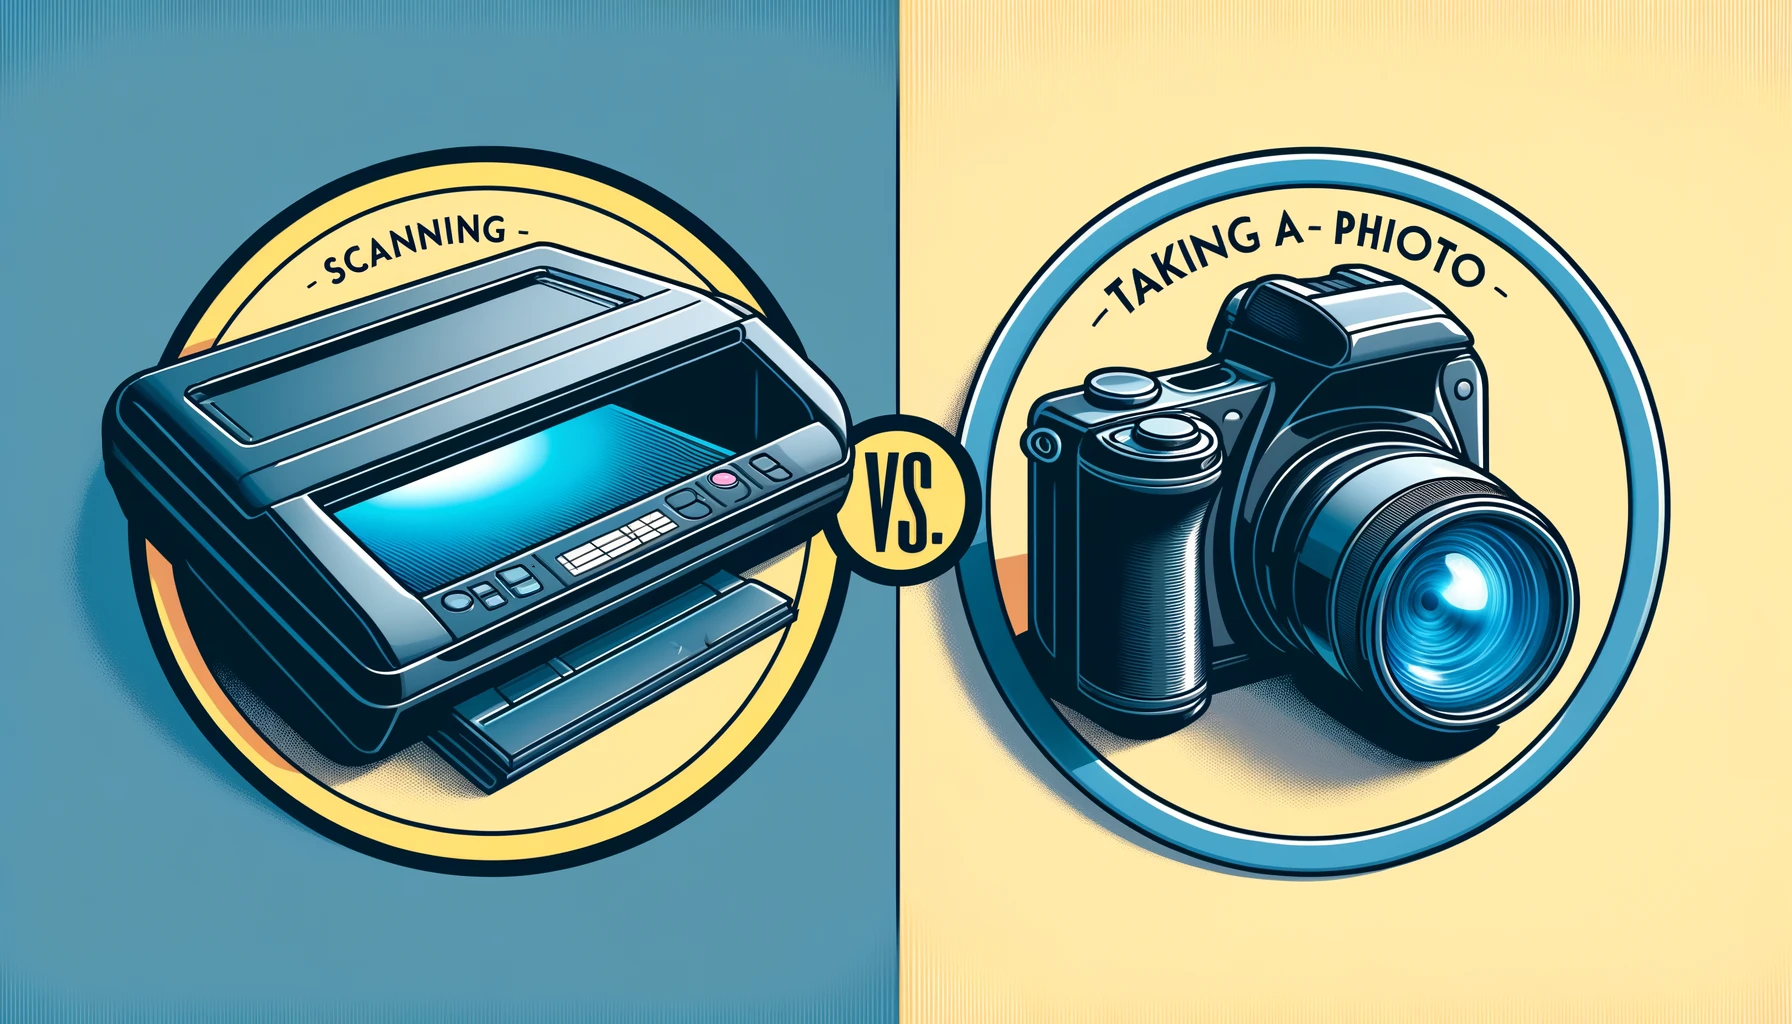
Image Quality:
Scanning produces high-quality images that are clearer and sharper than photos, especially when dealing with text and graphics.
Formats:
Scanning allows you to save your document in different formats, including PDF, TIFF, and JPEG, while taking a photo is usually limited to JPEG.
Searchability:
Scanned documents can be easily searched for specific words or phrases, while photos are not typically searchable unless you use specialized software.
File Size:
Scanned documents tend to have smaller file sizes compared to photos, which can be useful if you have limited storage space.
Editing:
Scanned documents can be easily edited and modified using OCR (optical character recognition) software, while photos may require additional editing tools to achieve similar results. This step matters because the phone still needs a different SIM to prove the previous carrier restriction is gone.
Customization:
Scanning also allows for more customization options, such as selecting the resolution and adjusting the color and contrast.
Quick:
Taking a photo may be quicker than scanning, but the quality and functionality of the resulting image may not be as good as a scanned document.
In conclusion, scanning documents on your iPhone has never been easier. With the built-in Notes and Files apps, you can easily scan, sign, share, and save your documents with just a few taps. If you need more control, compare the built-in tool first so you know what is missing.
Remember to make adjustments for the perfect scan and mark up your documents as needed. And if you're looking for more iPhone-related articles and tips, be sure to check out our blogs for the latest updates. Don't miss out on all the amazing things your iPhone can do!