How to Send a Fax from an iPhone [4 Top Apps]

Using an app on your iPhone, you can send a fax. But be careful! Even if you download the app for free, most of them charge a fee when you want to send a fax. Some apps give you a short free trial, but after that, you'll need to pay. Most iPhone fax guides work best when readers compare app pricing, supported file types, and how the document is uploaded.
A quick tip: If you have more than one fax to send, try sending them close together. This way, you might save on costs. That gives readers a more practical way to judge which iPhone fax app fits a quick send versus regular use.
1. iFax
iFax is a handy app for sending faxes from your iPhone. They give you a week-long free trial. Every month, you can send 5 pages for free, even to other countries. Readers usually get better results when they compare upload quality and delivery confirmation instead of looking only at price.
If you try out the iFax Plus trial, you can send and get 500 pages a month. With their Pro plan, you can do 1000 pages. Remember, if you stop before the trial finishes, you won't be charged anything.
Price:
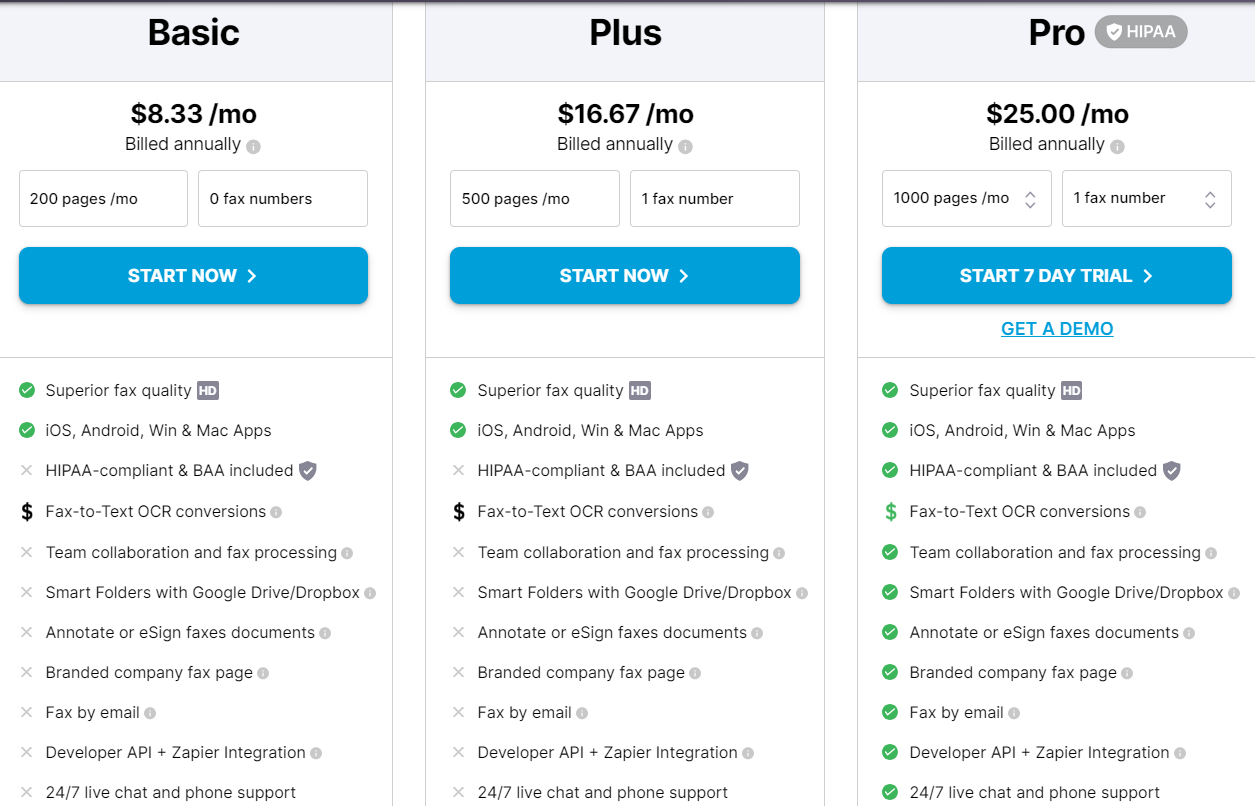
Features:
Live Fax Tracking: Stay updated in real-time about where your fax is and when it's received.
Dedicated Support: iFax's support team is ready to help you anytime, any day, throughout the year, 24/7/365. The most useful difference between fax apps is usually cost, page limits, and whether they confirm delivery clearly.
Top-Level Security:Your documents are super safe with our military-grade encryption. This means you don't have to worry about your info getting into the wrong hands. If the first method does not work, compare software version, device compatibility, and account status before repeating the same step.
Unlimited Cloud Storage: Never run out of space with iFax. Store all your documents easily and securely in the cloud.
Complimentary Fax Number: Sign up and get a free fax number, whether you're in the US, Canada, or the UK.
Trustworthy and Compliant: iFax sticks to health privacy rules (HIPAA). So if you're sending medical records, know they're in safe hands.
Straightforward Faxing Process: Choose a document from your cloud storage, attach a cover sheet if needed, and off it goes. Sending a fax has never been this easy.
Here's a step-by-step guide on how to send a fax using iFax:
Get the App: Download and install iFax from the App Store.
Sign Up:If you've already used iFax, just log in. If you're new, you'll get an invitation to join their service. Click Continue. You can either register for a free trial or close that offer by tapping the X to use your 5 complimentary monthly pages. No need to have your own fax number to send faxes, so feel free to ignore any offers for a new number. The most practical comparison point is usually whether the app sends clear scans, supports your file type, and confirms delivery.
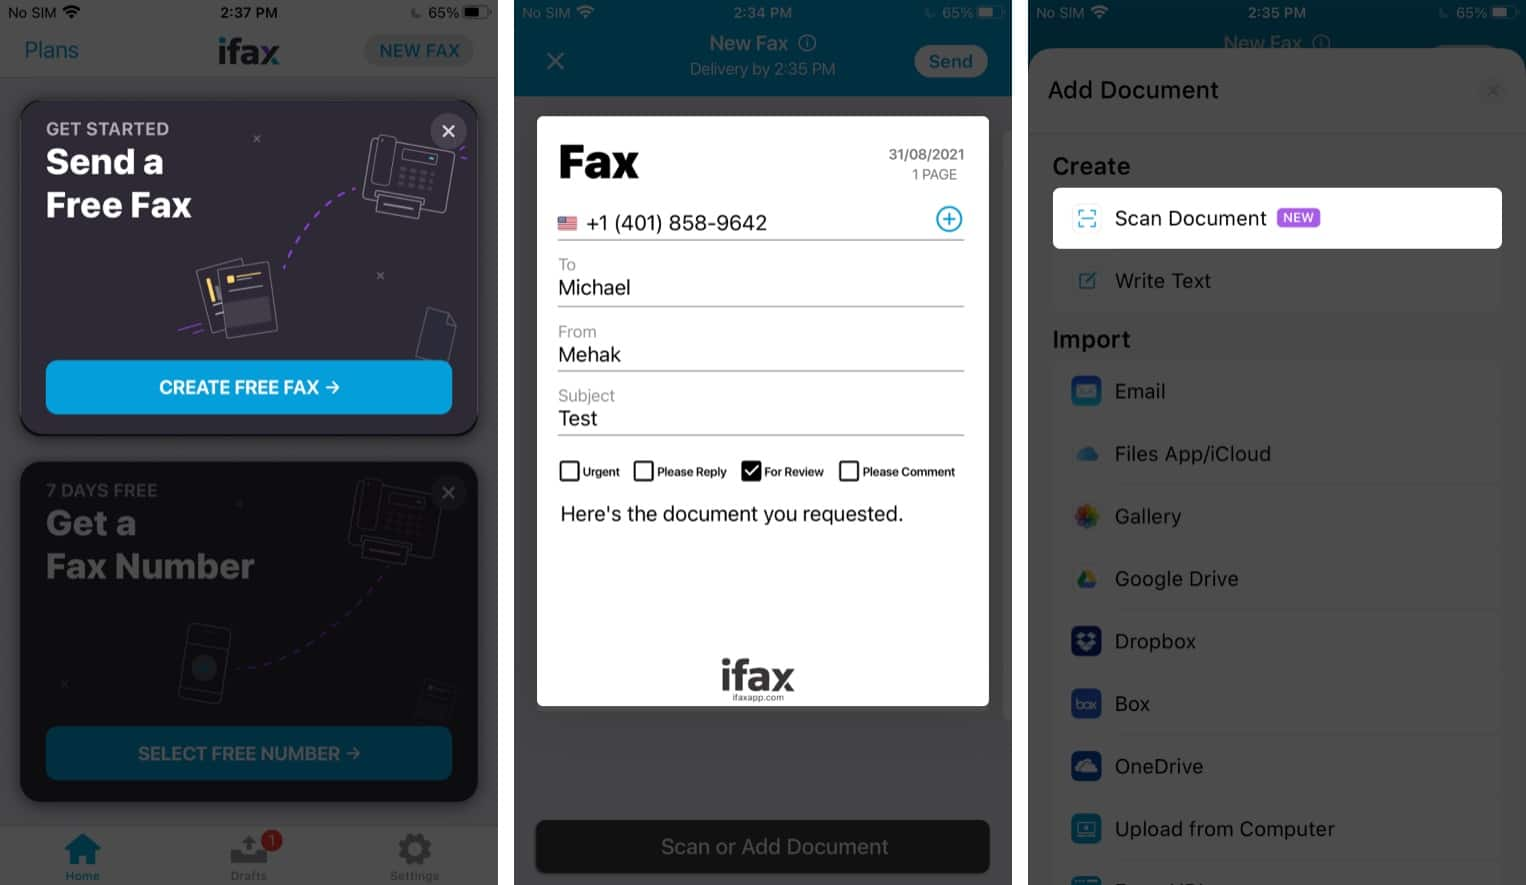
Start a New Fax: On the main page of iFax, press the Create a Fax button.
Recipient Info: Fill in the details of the person getting the fax. This includes their fax number, name, and the subject of the fax.
Add Your Document: Tap the Scan or Add Document button.
Choose How to Add: Now, decide how you want to add your document:
Scan Document: Use your phone's camera to snap a pic of what you want to send.
Type It Out: If you'd rather type your message, choose this.
Email: If you want to send an email as a fax, find the email, then share its attachment to iFax.
Use a Photo: Pick a photo from your phone to fax.
Cloud Services: If your document is in Google Drive or Dropbox, grab it from there. A small settings or account difference is often what explains why the same steps look different on another device.
Add More If Needed: Back on the Fax page, hit Scan or Add Document again if you want to add more pages. You can mix and match document types, like snapping a pic and typing a note.
Send It Off: All set? Press Send and your fax is on its way!
2. FAX.PLUS
Fax.Plus makes faxing simple and offers many free features, allowing you to fax to as many as 180 countries. With Fax.Plus, you can send up to 10 pages to several people, and if you need to send more, there's a small fee. Need to sign a document digitally? No problem. And if you upgrade, you get even more perks, like getting your own personal fax number.
Price:
Features:
Top-Notch Security: Fax.Plus doesn't cut corners on safety. It meets big global safety standards, including HIPAA.
Works for Everyone: Whether you're sending just one page or you're a big company with tons of faxes, Fax.Plus has got you covered.
Teamwork Made Easy: If you use tools like Google Workspace or Slack at work, Fax.Plus smoothly blends in, making team faxing a breeze.
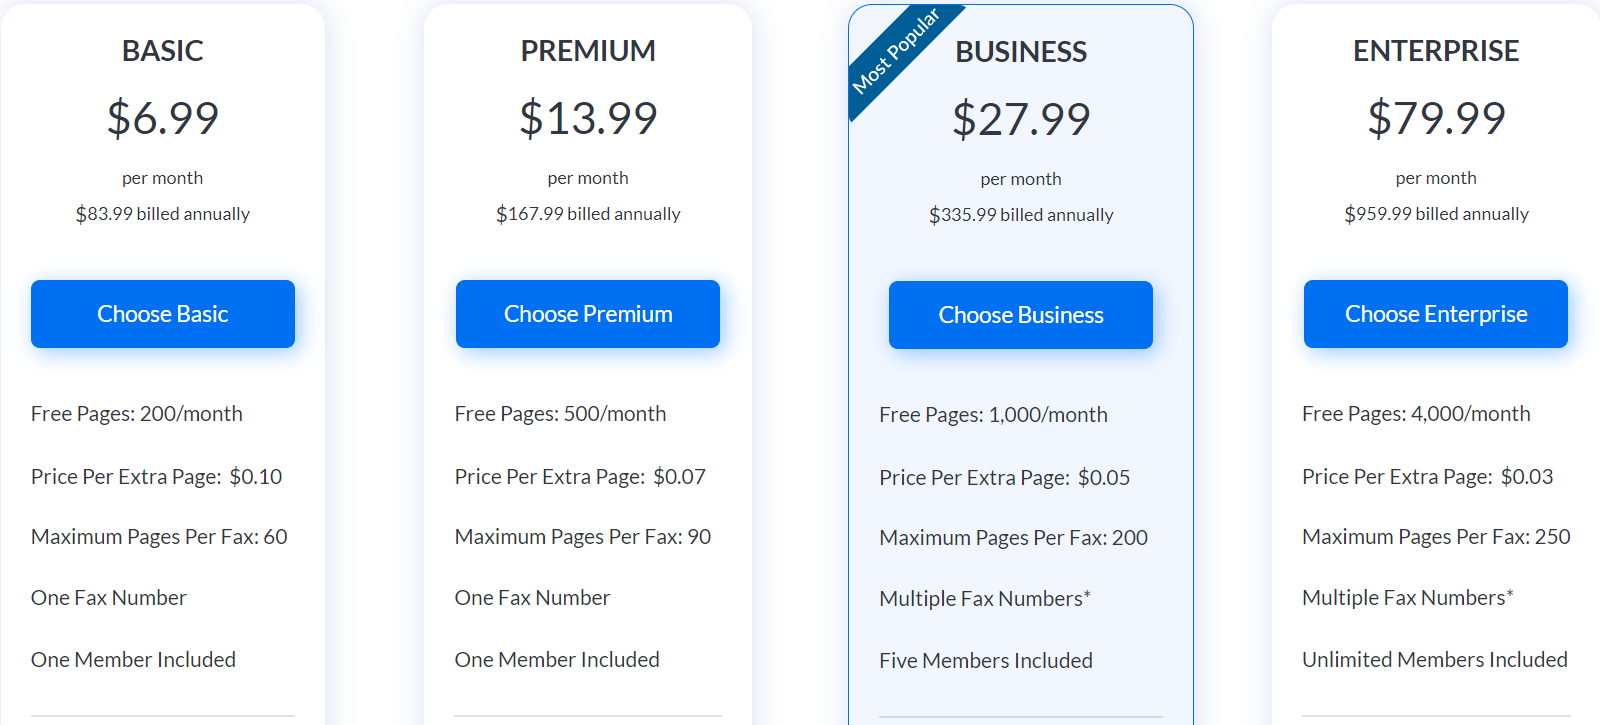
Pick Your Price: Fax.Plus offers plans for pretty much everyone. Starting with the Basic plan at $5.99 a month, you can pick and choose based on what you need. Bigger plans come with more features, so there's something for everyone.
Here's a simple guide on how to send a fax using FAX.PLUS:
Access FAX.PLUS: You can either visit their website at https://www.fax.plus or download their iPhone app from the App Store.
Open & Sign Up: Once you have the mobile app, open it so you can review the changes before sending the final copy. Create your account and confirm your phone number.
Prepare to Send:click the Send Fax option and fill in the details of the person you're faxing to.
Add Your Pages: You can attach up to 10 pages without any charges. Just hit the Add File button. A quick settings check usually saves more time than repeating the same action without changing the surrounding conditions.
Include a Cover Letter: Want to add a personal touch or some extra info? click Add Text and type away.
Send It Off: Done with everything? Press Send, and your fax will be on its way!
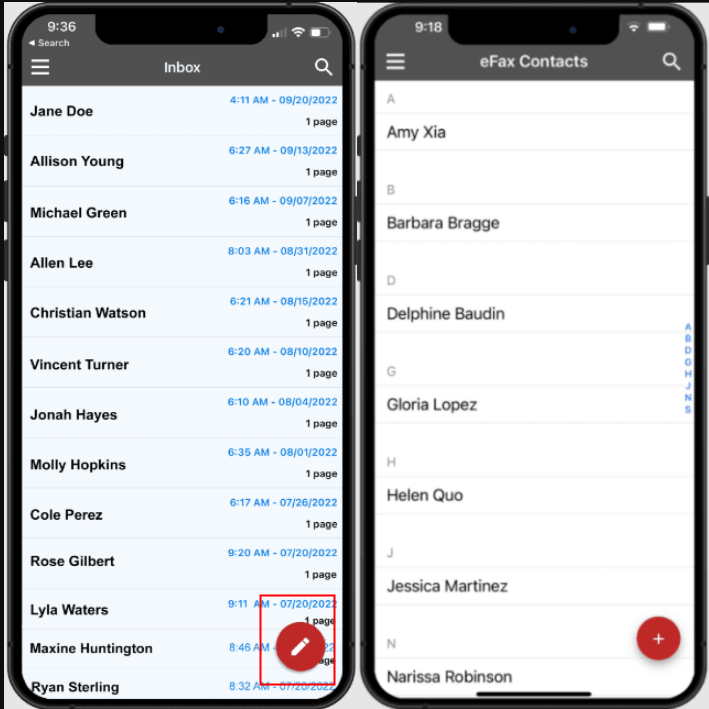
3. eFax
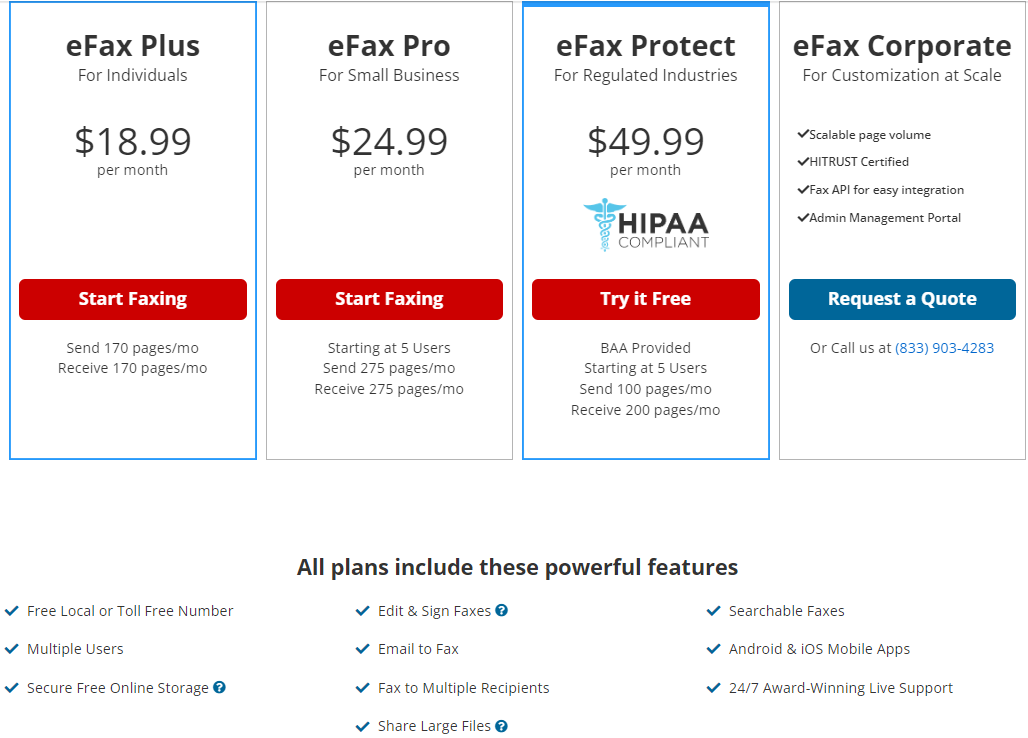
For those who fax more often, eFax can be a great choice. With different plans available monthly or yearly, eFax boosts security, lets you fax internationally, and even gives you a free local or toll-free number for incoming faxes. Whether you're on a computer, phone, or tablet, eFax works everywhere - on the web, through email, or via its app specifically made for your iPhone or iPad. If one fax app feels restrictive, check page limits, export quality, and confirmation records before sending again.
Price:
Here's a guide to faxing with eFax:
Access eFax: Download the eFax app from the App Store or head to https://www.efax.com on your web browser.
Getting Started: Open the eFax mobile app and set up your account.
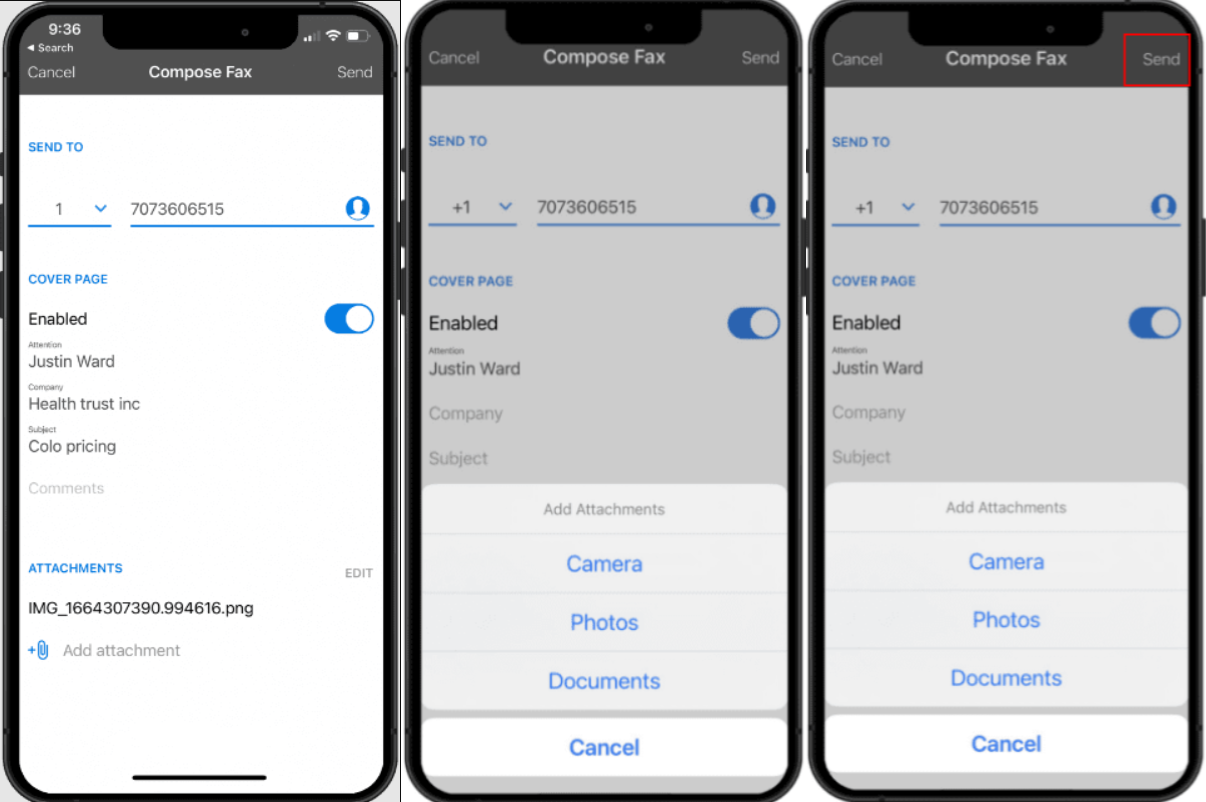
Ready to Fax:click the pencil symbol to open the Send Fax form.
Recipient Details: If you've saved contacts, pick your recipient. If not, simply type in their fax number.
Add a Cover Page: Want a cover page? Turn that option on and fill it in.
Attach Documents: click the + button to add files. Or use the Camera option to snap a picture of a paper document.
Off It Goes: All set? Press Send, and your fax is on its way!
4. FaxBurner
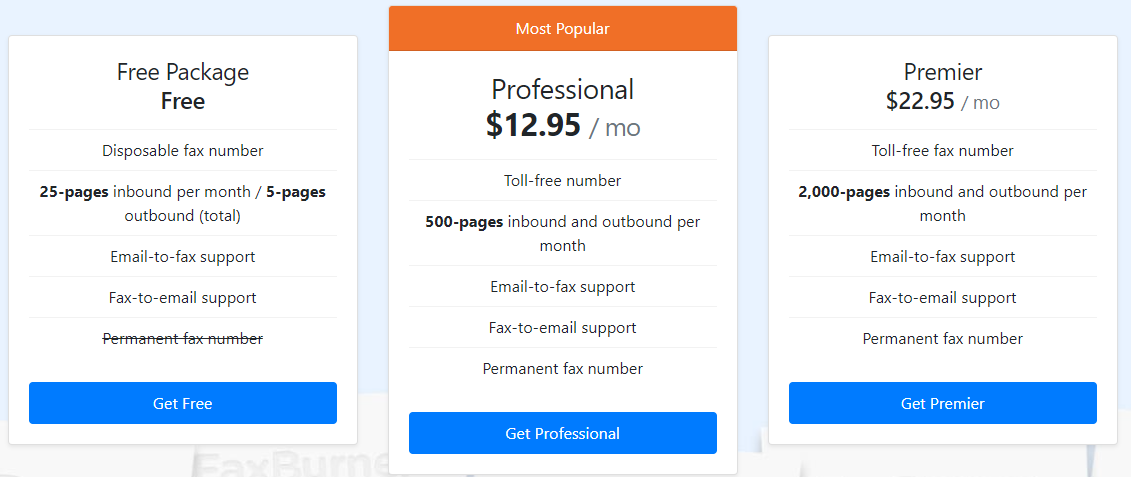
FaxBurner offers a convenient way to send and get up to 25 pages each month for free, as long as you're faxing to US or Canada numbers. Need to handle more pages? Consider their paid options, which come with more features like a dedicated fax number that's all yours. That usually helps readers choose between a free trial, pay-per-fax option, or subscription app more confidently.
Price:
Features:
Keep Your Faxes: After sending a fax, FaxBurner saves a copy on your iPhone and also emails you a PDF version. This way, you always have a backup.
Temporary Fax Number: Every time you're sending something, FaxBurner provides you with a unique fax number, free for the next day.
Easy Integrations: Whether it's Dropbox or your email, FaxBurner meshes well, making faxing even more straightforward.
Stay Updated: Turn on FaxBurner notifications, and you'll be the first to know when a new fax arrives.
Here's how you can send a fax using FaxBurner:
Download the FaxBurner app from the App Store for your iPhone or iPad. Alternatively, you can access FaxBurner on your web browser by visiting https://www.faxburner.com.
Set up an account. You have the choice of a free version, which provides a fax number active for a day, or subscribe to a plan to have a permanent fax number.
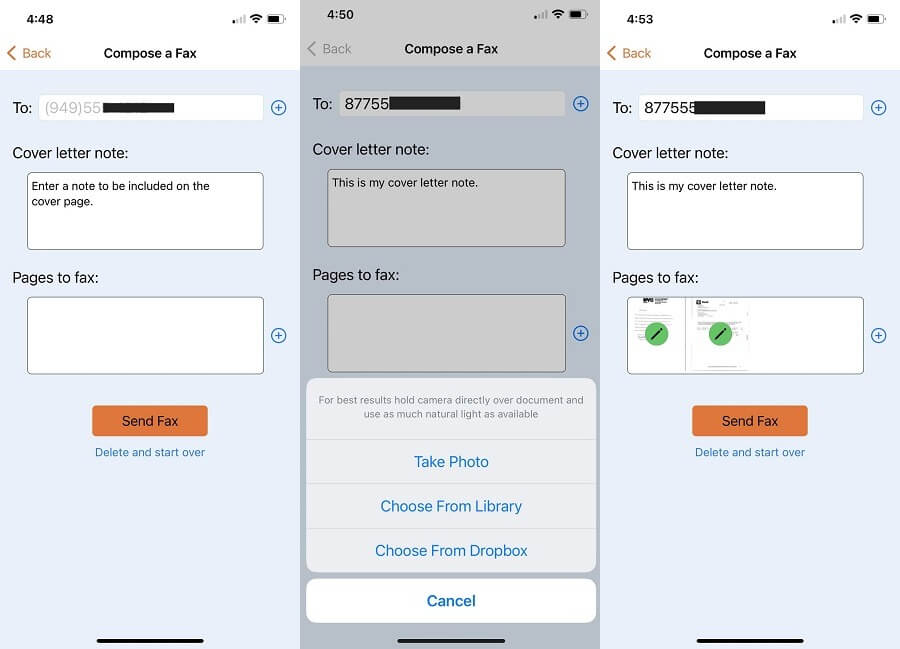
After activating your account, begin the faxing process by opening the app and selecting “Compose a fax”.
Fill in the details of both the sender and the recipient.
Upload your documents either as PDFs, by snapping a photo of the document, or by using FaxBurner's camera feature to scan it. Within the app, there are options to add a cover sheet, sign the document, and more.
When you're all set, hit the Send Fax button.
Also, you can fax via email using FaxBurner. After registering in the app, draft an email to send@faxburner.com, write your cover letter in the body, and attach any PDF documents you wish to fax. If one fax app feels limiting, check page limits, image quality, and delivery confirmation before sending again.
FAQs
How to scan documents from your iPhone?
Before diving into faxing, here's a quick guide on scanning documents using your iPhone. There are a couple of methods to choose from.
First, you can simply snap a photo of the document. Using flash might enhance clarity and overall picture quality. That often makes the next troubleshooting choice clearer than guessing and retrying the same path.
Alternatively, the Notes app offers a built-in scanning feature. Many aren't aware of this nifty tool, but it essentially transforms your iPhone into a handy scanner. To use it:. This is where app differences show up most clearly, especially when you need readable scans and a delivery record.
Press and hold the Notes app icon.
Select the “Scan document” option so the document is captured clearly before you move to the next screen.
This will launch a camera-like interface. Capture your document and adjust its borders as needed. Checking the surrounding conditions first usually saves more time than repeating the same action without any new information.
You can pick a color setting: color, grayscale, black & white, or photo.
Once satisfied, tap “Done”. The scan will be saved to your Notes app, ready for you to share, store, or Use as needed. That matters because fax apps differ most in how they scan pages, export PDFs, and confirm delivery.
Can I fax from my iPhone without downloading an app?
Currently, the iPhone doesn't have a built-in fax feature. To send or get faxes, you'd need a third-party app. That means the practical comparison is less about iPhone settings and more about which app handles your pages, pricing, and confirmation records best.
Can I directly fax from iPhone Notes?
While you can use items from your iPhone Notes for faxing, the iPhone itself doesn't have an inherent fax feature. Here's a brief guide to fax from iPhone using Notes:
Access the desired note you want to fax.
Export or save the note to your cloud storage, turning it into a fax-ready file.
Move the file to your chosen fax app and follow its faxing steps.
How soon will the recipient get the fax I sent?
Typically, they should get it within minutes after you send it. But if their fax line is engaged, there might be some delays. Delivery receipts or in-app status updates are useful here because they tell you whether the app is still retrying or the fax has already gone through.
How secure are iPhone fax apps?
To Make sure an app's security, check if it adheres to standards like HIPAA and uses encryption. User reviews can also give insights into the app's reliability. If you plan to send personal or work records, it is worth checking where the app stores files and how long uploaded documents stay available.
