
Did you forget your passcode and make numerous wrong attempts? Or maybe somebody else repeatedly tried to guess your password? Can you now see that "iPhone is disabled connect to iTunes" alert on your screen? If you can, you or someone else entered the wrong passcode more than ten times.
Don't fret. In this guide, you will find three proven methods to fix "my iPhone is disabled and won't connect to iTunes." Wanna know how? Dive in.
Why your disabled iPhone won't connect to iTunes?
An "iPhone is disabled connect to iTunes" alert shows up if you enter the wrong passcode more than ten times. Providing the wrong passcode between one to five times gives you a chance to try again. On the other hand, each failed attempt between six to nine will provide you with a waiting time before attempting again. After the tenth consecutive failed attempt, your device will be locked entirely.
Unlocking a disabled iPhone via iTunes won't work unless you have synced your locked iPhone to iTunes. If you connect your disabled iPhone to a computer, it will ask you to provide the passcode you forgot. Your iPhone will also not connect to iTunes if it has no access to an internet connection. To resolve this situation, you need to use a professional unlocking tool to factory reset the iPhone and then set it up afresh or restore it from a backup.
Three Methods to Fix my iPhone is disabled and won't connect to iTunes

Method 1: Fix Disabled iPhone won't connect to iTunes via Mobitrix LockAway
Mobitrix LockAway is a dedicated unlocking tool that provides the fastest and simplest way to remove an iPhone/iPad screen lock. This tool can help you regain access by unlocking or factory resetting your iPhone without a passcode in 20 minutes. It is also security-oriented and guarantees 100% privacy protection.

Mobitrix LockAway's R&D team has over ten years of experience in iOS cracking, making this tool a comprehensive one-stop-shop. The software also doesn't require any technical knowledge to handle it.
Scenarios when you may need Mobitrix LockAway:
- You cannot remember your iPhone screen lock password.
- You entered too many failed passcode, causing an "iPhone is disabled connect to iTunes" alert.
- You obtained a used iPhone.
- Your Face/Touch ID is dysfunctional.
- Your iPhone screen is ineffective due to cracking.
If you're tired of reading text guide, you can check the following video guide.
Steps:
- On your Mac or PC, Download Downloadand Install Mobitrix LockAway
- Using a compatible USB cable, connect your disabled iPhone to the computer.
- From the main interface, select Unlock Screen Passcode.
- Click Start to remove your forgotten passcode.
- Your iPhone is now successfully unlocked!
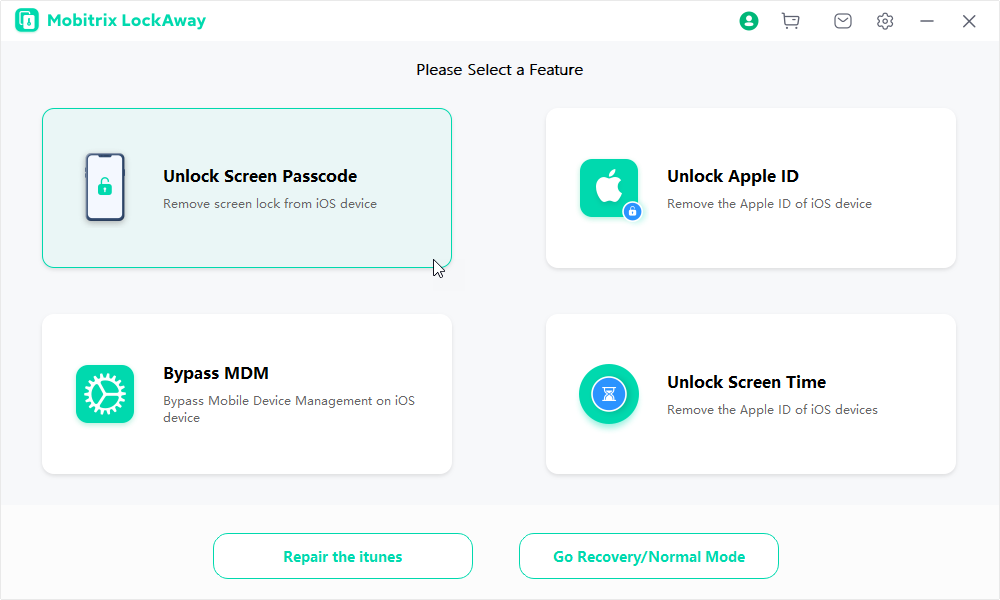
Mobitrix LockAway Unlock Screen Passcode
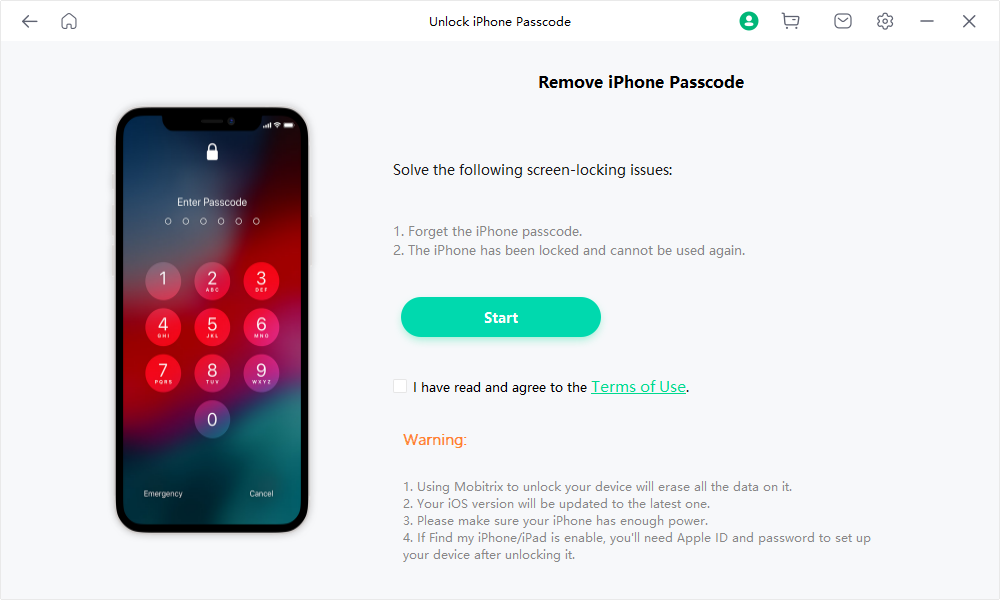
Mobitrix LockAway Click Start to Remove iPhone Passcode
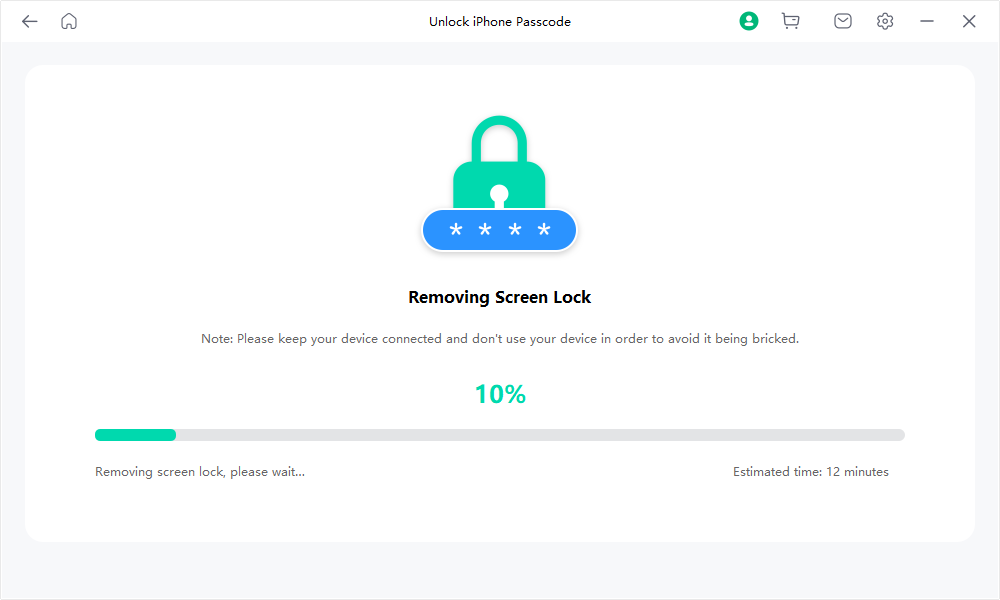
Mobitrix LockAway The Process of Removing Screen Lock
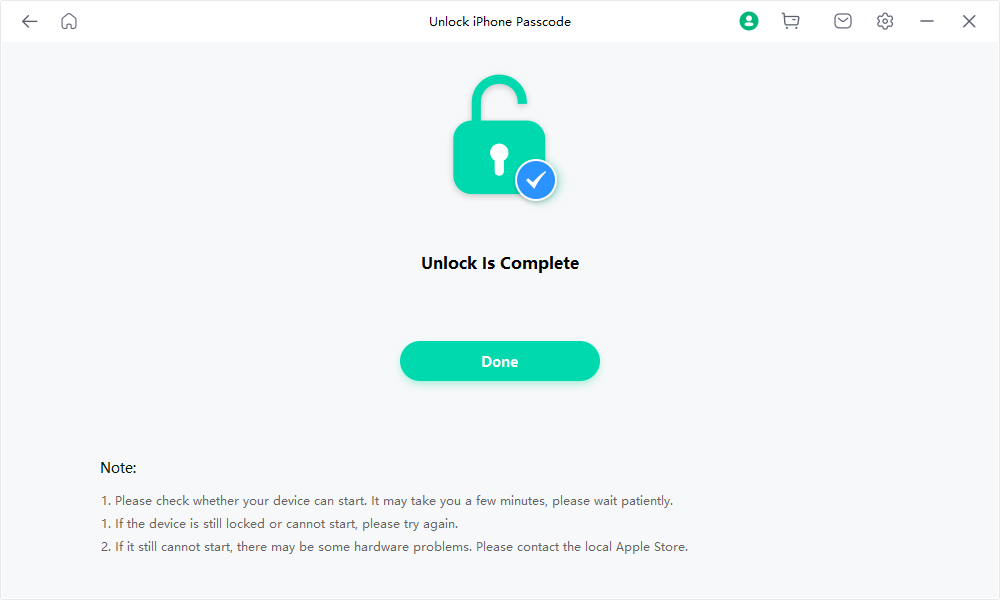
Mobitrix LockAway Unlocking is Complete

Why Do I Recommend Mobitrix LockAway?
- No iTunes? No problem!
- Super simple to use, even if you're not a tech whiz.
- Trustworthy with a 99% win rate.
- Super speedy! Get unlocked in just 20 minutes. Perfect for when you're in a rush.
- Keeps your details private and safe.
- It fully supports iPhone 5s to iPhone 17 and iOS 26 and earlier versions.
Method 2: Forgot iPhone Passcode? Bypass it via Find My iPhone
Find My is the go-to app for everything related to location tracking. Not only is it perfect for tracking down misplaced or stolen devices, but it also has a handy "Erase" feature. This allows users to effortlessly reset their locked Apple devices. By opting for the "Erase" function, all data and settings are wiped clean from the iPhone, including that pesky screen passcode blocking access.
Requirements for using the Find My app:
- Find My must have been enabled on your disabled iPhone
- Your locked iPhone is still logged into your iCloud account
- Your locked iPhone must have an internet connection
- You know your Apple ID & password
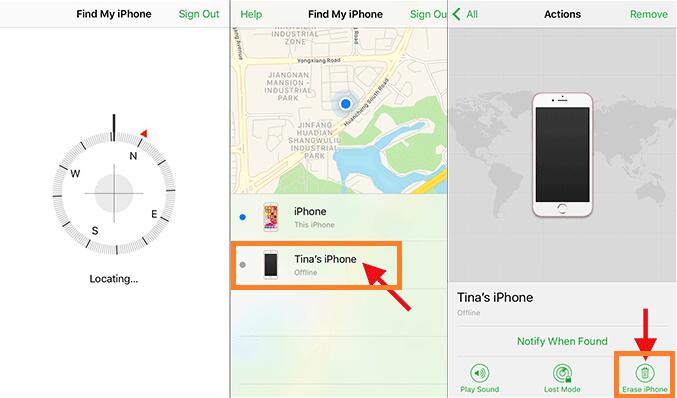
Situation 1: Via iCloud.com
Steps:
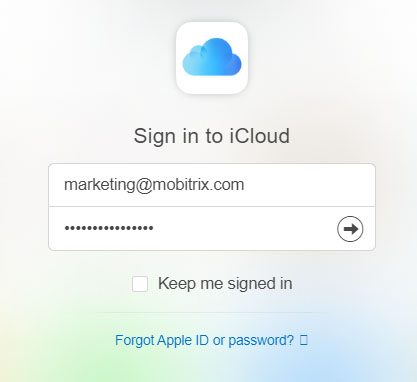
- Open iCloud.com on any browser
- Enter your Apple ID & password
- Once the login is successful, click Find iPhone, provide your Apple ID again and tap Sign in.
- Next, click All Devices and pick yours.
- Tap Erase iPhone. When you notice a prompt saying, “Erase this iPhone?” Tap Erase.
- Next, enter your Apple ID password.
- A verification code will be sent to your trusted device via message. Key in this code.
- Provide your phone number and click Next
- The iCloud site will show you Erase Started. Your iPhone will also show the erase progress with white Apple logo.
- Your iPhone will self restart once the process is done. It will also display an iPhone locked to owner message. Once you see this notification, enter your Apple ID & password and click Next, then create a new passcode.
Sign in to iCloud
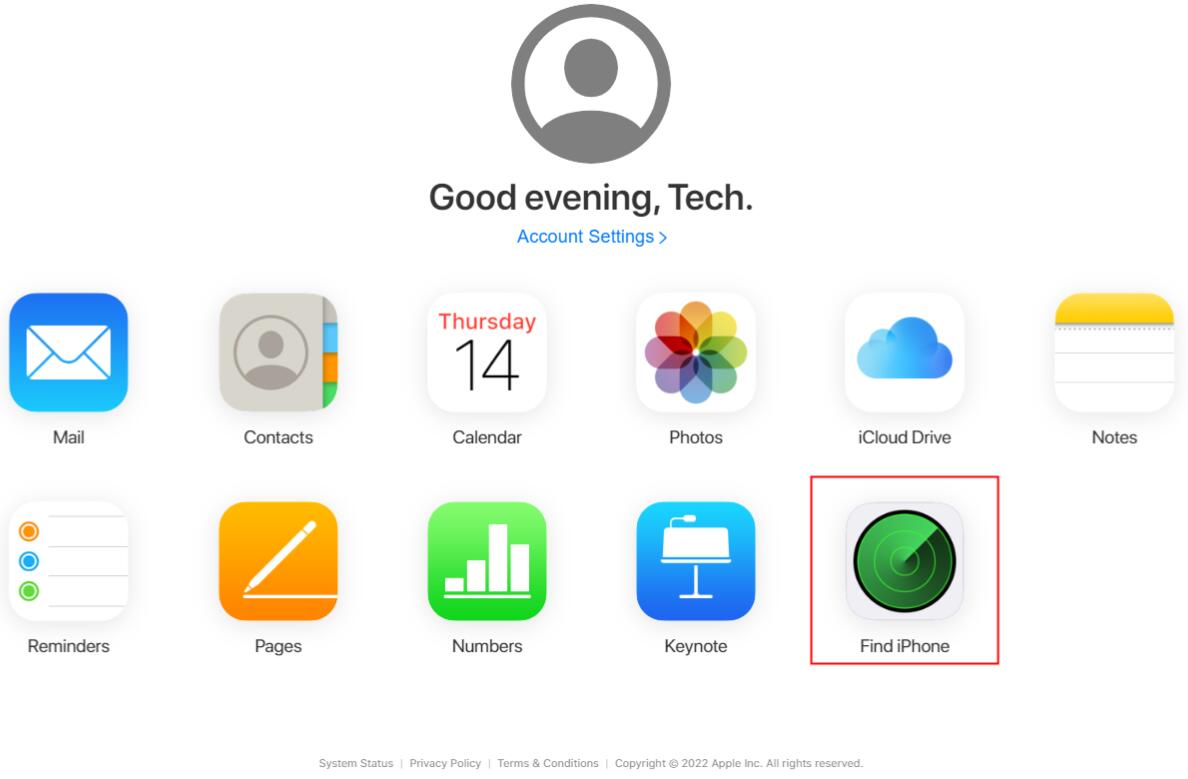
Click Find iPhone
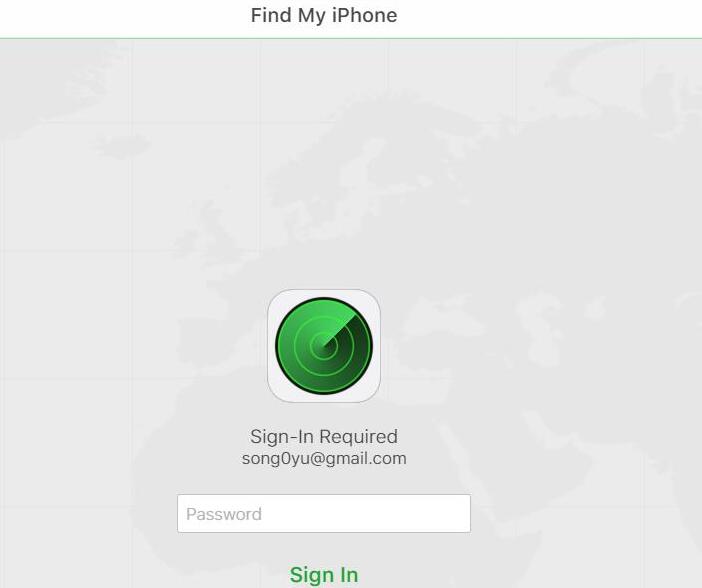
Find My iPhone Enter Your Apple ID Password

Click All Devices and Choose Your Disabled Device
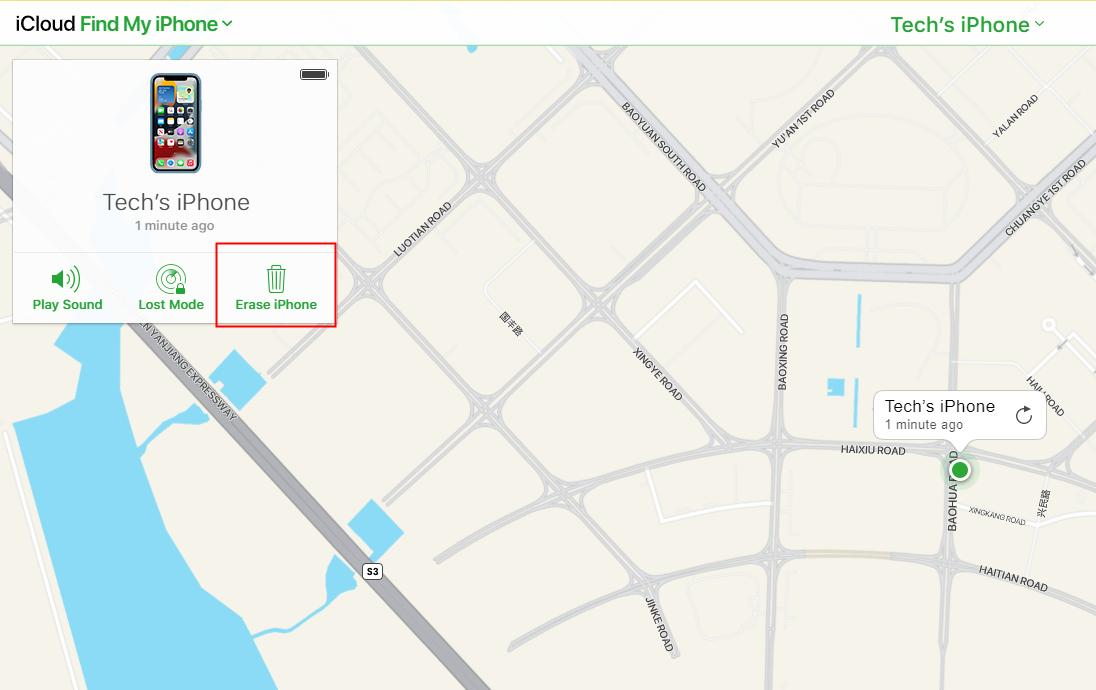
Click Erase iPhone

Click Erase to Confirm
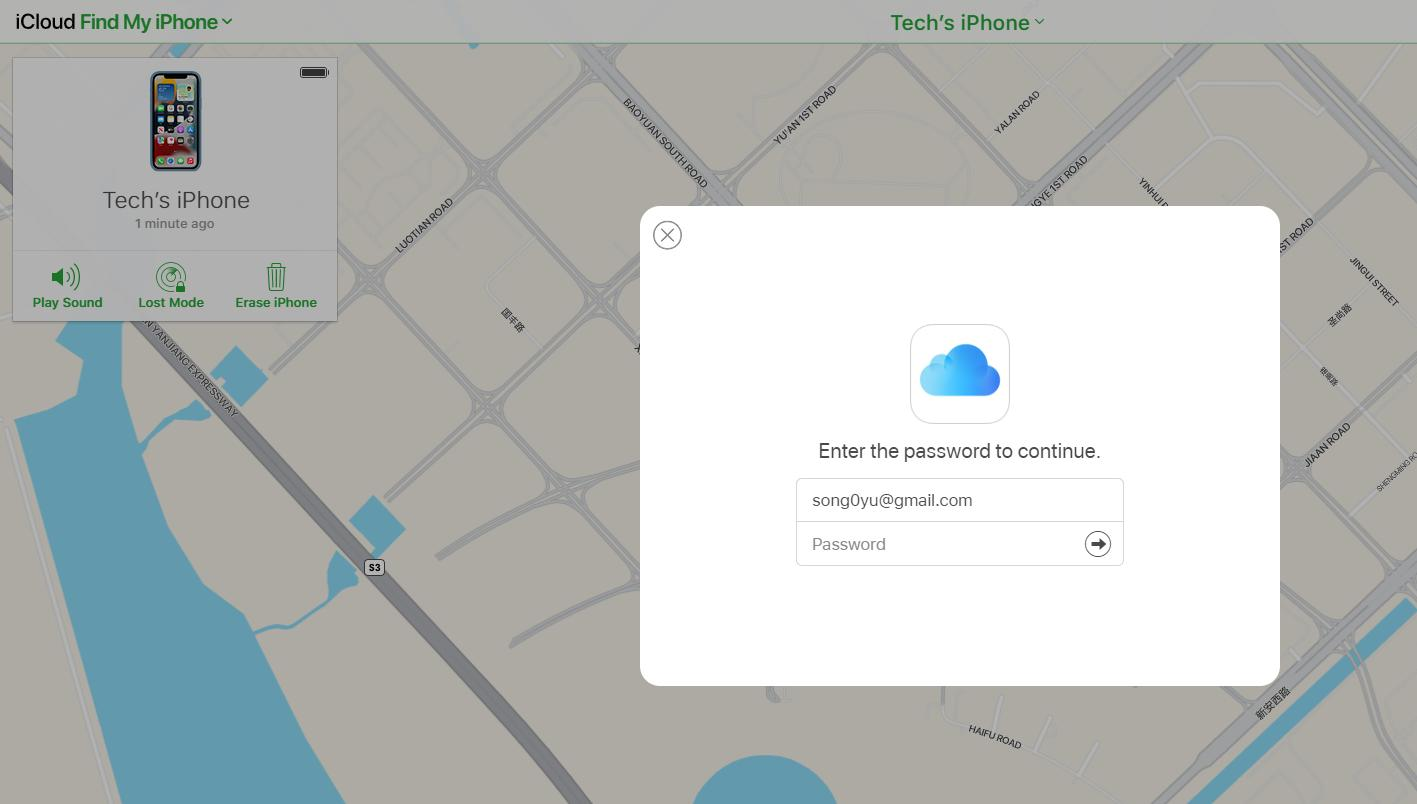
Enter the Password to Continue
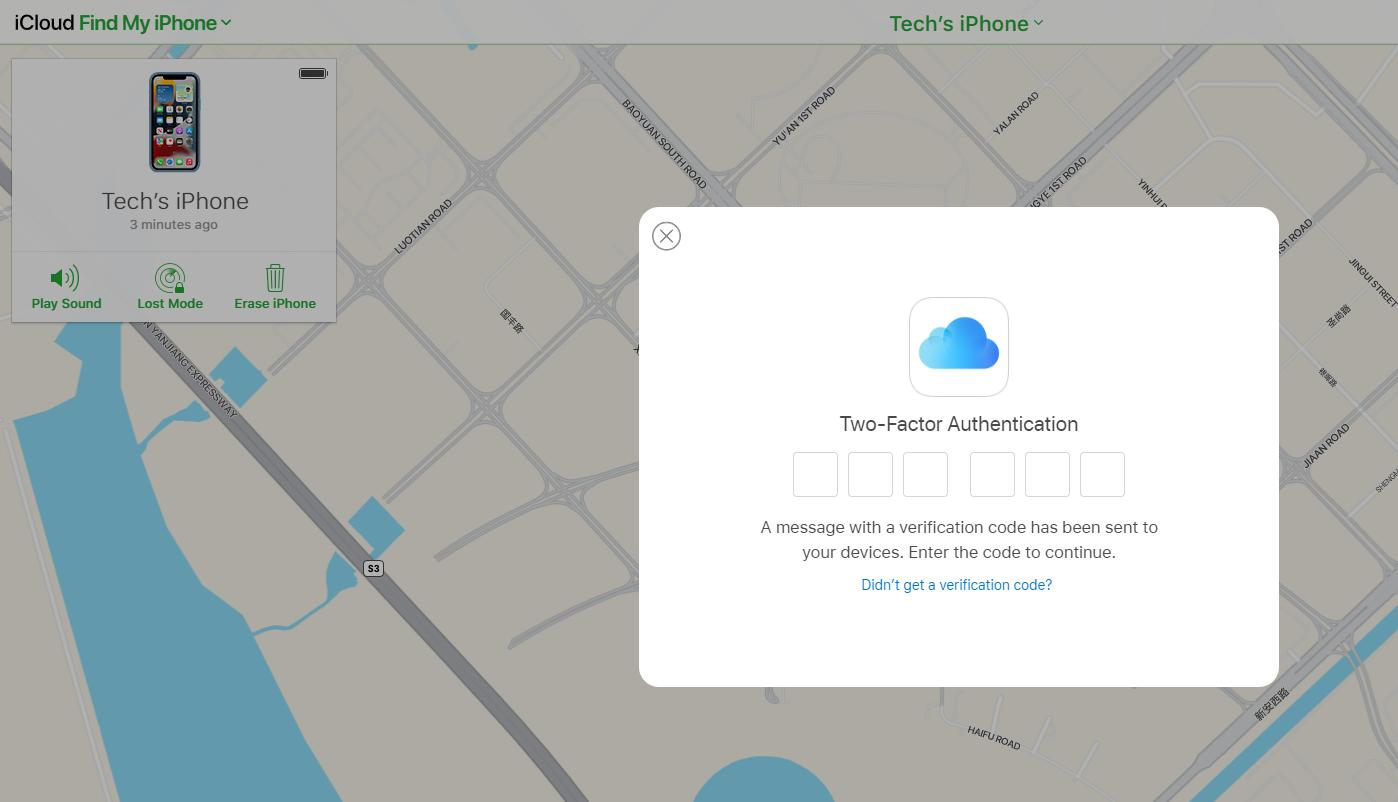
Two-Factor Authentication
Engaging in other activities while running this process and returning to it later will require you to reenter your password again. You will also receive a new verification code which you will have to reenter. To avoid repeating the process over again, complete it in ago.
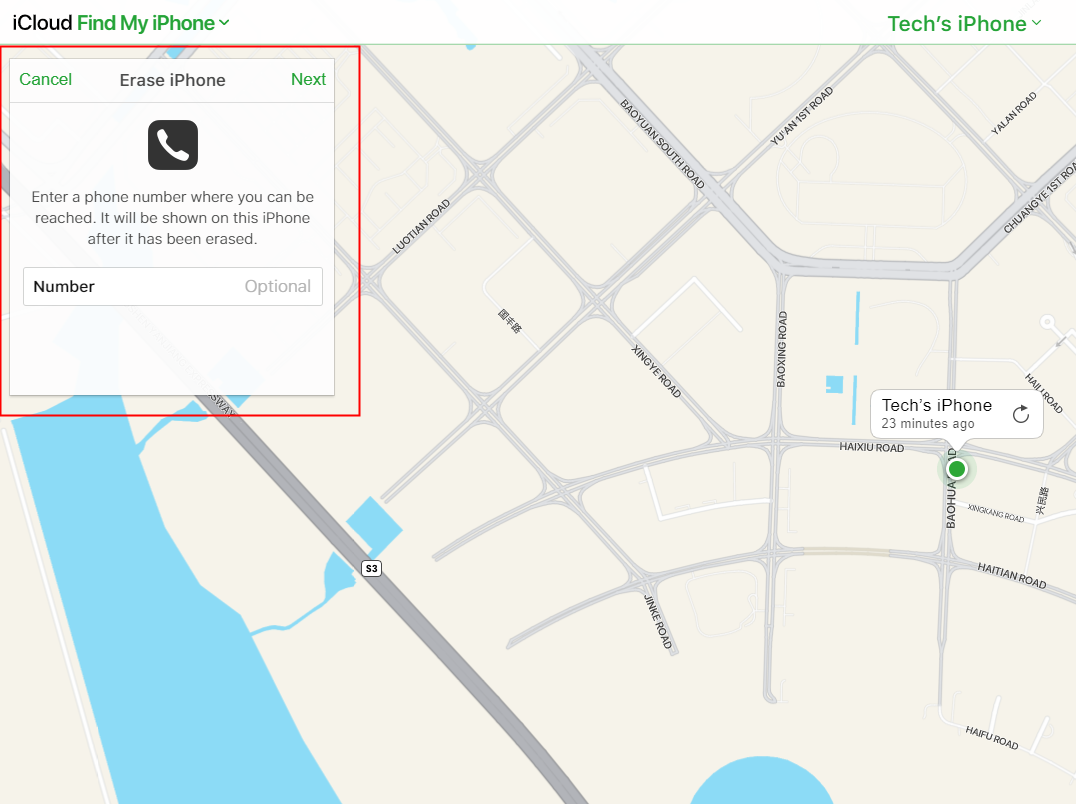
Enter Your Phone Number
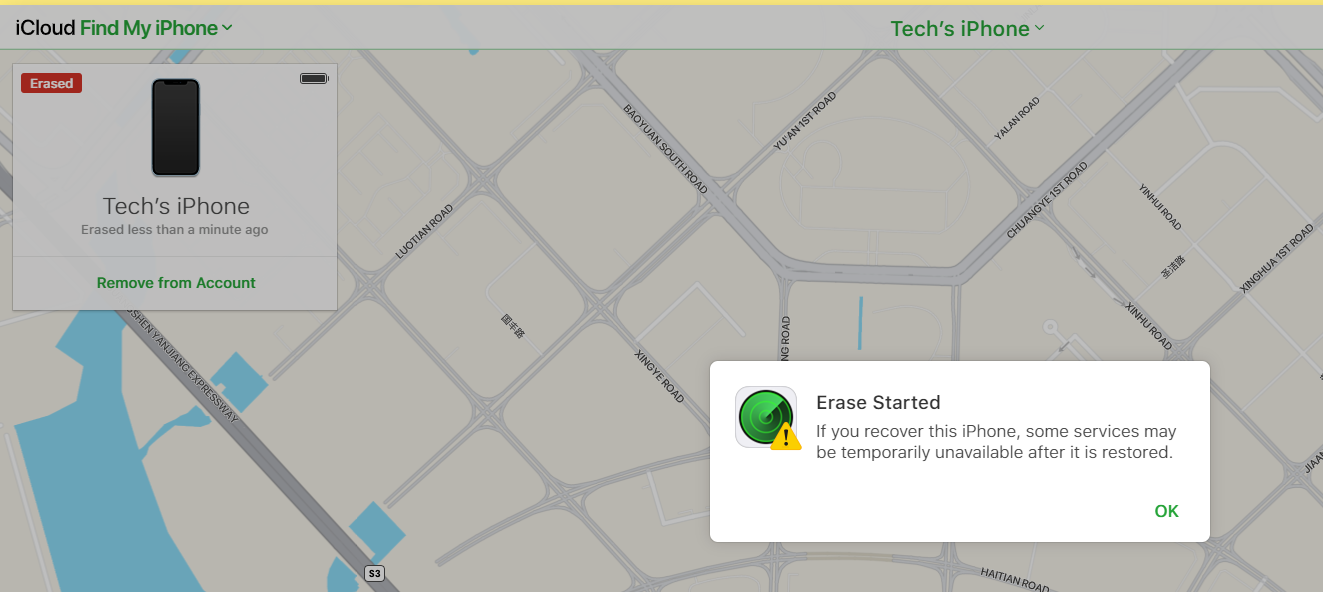
Find My iPhone Erase Started
Situation 2: Via Find My iPhone (App)
If you possess another Apple device or someone around you has an iOS, you do not need a computer to erase your iPhone. You can use the Find My app to accomplish the same task.
Steps:
- Open the Find My app (If you don't own the device you are using, you will need to log in using your own Apple ID & password)
- Tap on Devices and choose the device you want to wipe
- Scroll down and click Erase iPhone.
- A prompt will pop up asking you to confirm Erase This Device. Click Erase.
- Enter your Apple ID password to continue
Find My iPhone App Erase iPhone
Method 3 Use iTunes Recovery mode to unlock your disabled iPhone
For devices running on iOS 15.4.1 and later versions, if you forget your screen passcode and disable your iPhone, iTunes cannot recognize your device automatically. To use iTunes to unlock your device, you will have to set it to recovery mode manually so iTunes can recognize it first. Once iTunes notices your disabled iPhone is in recovery mode, it will provide you with an option to factory reset (restore) it.
Preparations:
1) You will require a PC or a Mac
For PC: Ensure you have windows 8 or later and install the newest version of iTunes
For Mac:
- For macOS Catalina or later models, open a Finder window
- For macOS Mojave and earlier, install and run the latest version of iTunes.
2) You will need a compatible USB cable.
Steps: (For Windows users)
- Power down your iPhone
- iPhone 8, 8 Plus X, and newer, including iPhone SE (2nd & 3rd gen): Press and hold the side and volume down buttons until you see the switch-off slider appear.
- iPhone 7, 7 Plus, 6S, and 6: Press down and hold the side button until the power off slider appears
- For iPhone SE (1st gen), 5S, and older: Press the top button and don't release it until the power off slider is visible.
- Set your iPhone to recovery mode
- For iPhone 8, 8 Plus, X, and later, including the 2nd and 3rd generation of SE, press the side button.
- On iPhone 7 and 7 Plus, use the volume down button
- For the 1st generation of iPhone SE and iPhone 6 and earlier models, use the home button.
- Restore your iPhone
a. Disconnect your iPhone from the computer if it is connected
b. Switch off your iPhone according to its model:
c. Drag the slider to power off your iPhone and wait a minute to ensure it is entirely switched off.
a. Get ready by identifying which button you will need to press and hold down in the next step.
b. Press and hold down the appropriate button for your iPhone and immediately connect it to your computer without releasing the button.
c. Hold the button until your screen shows recovery mode, then let it go.
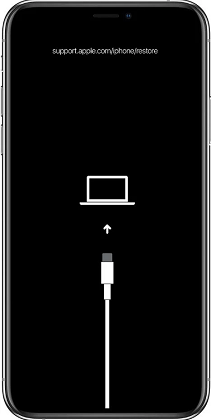
Recovery Mode Screen
a. Open iTunes. You will encounter a message saying, “There is a problem with the iPhone “iPhone” that requires it to be updated or restored.” You will then be offered two options, Update or Restore. Click Restore.
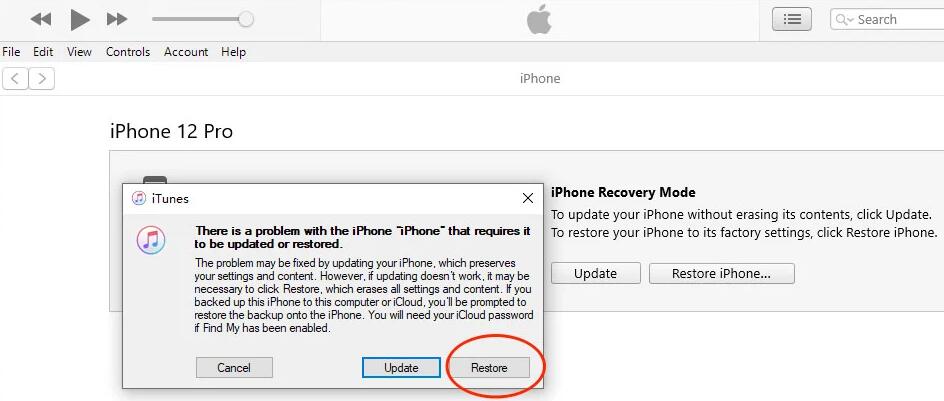
iTunes Click Restore iPhone
b. Next, click Restore and Update.
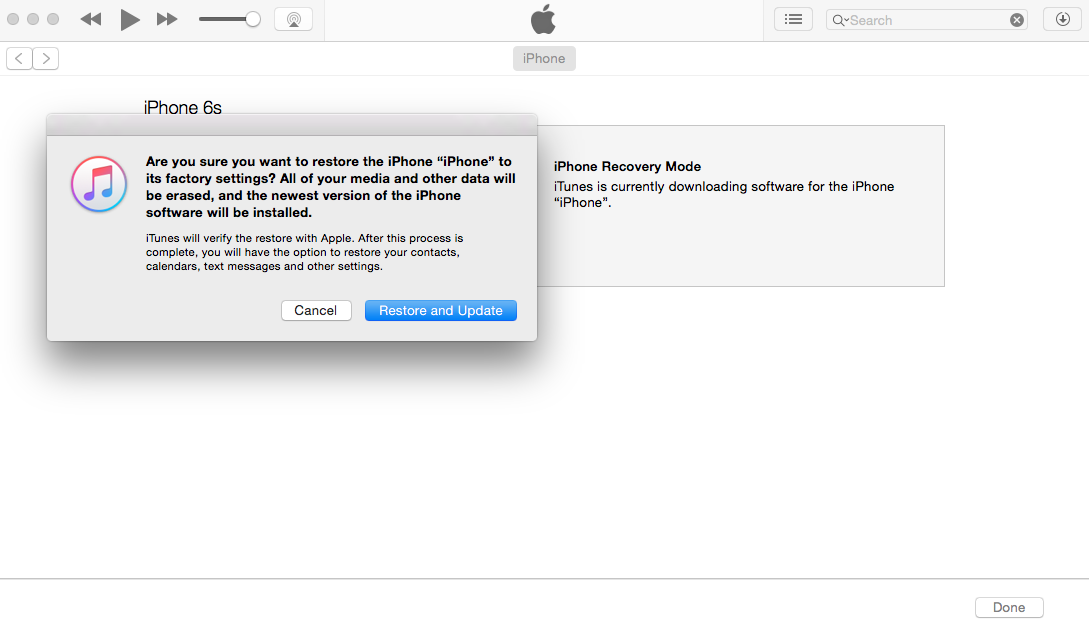
iTunes Click Restore and Update
c. An “iPhone Software Update” Window will come up. Click Next, then click Agree to accept the terms.
d. After downloading the “iPhone software update” successfully, you will notice the following pop-up, “iTunes will erase and restore your iPhone to ios 15.4.1 and verify the restore with Apple”. Click Restore.
e. On the screen, the bar will display “Extracting Software...” This means iOS 15.4.1 iTunes is getting ready to restore the iPhone.
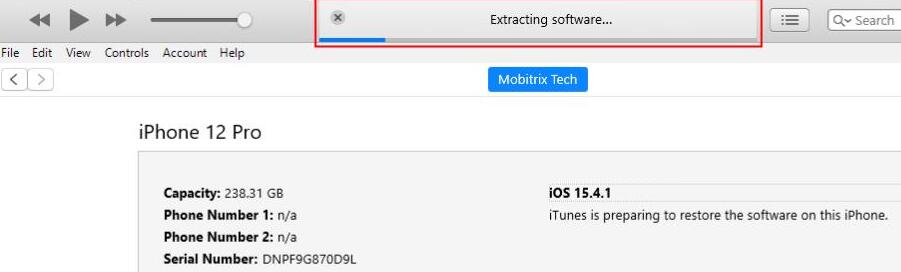
iTunes is Preparing to Restore the Software on this iPhone
f. Your iPhone screen will display a progress bar to track the restoration process with the white Apple logo. Once the process is complete, your iPhone will automatically restart.
Your iPhone has been restored to factory settings
g. Once your iPhone has powered on, you can reset it and create a new passcode if you wish.
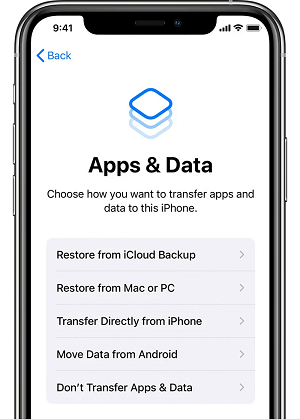
Set up Apps & Data
In this article, we've explored the reasons behind the “iPhone is disabled and won't connect to iTunes” issue and presented three solutions suitable for different iPhone models. Among the methods discussed, Mobitrix LockAway stands out as the top choice. Its high success rate, quick operation, and security make it shine. Plus, its user-friendly design, requiring just a few clicks, ensures it's accessible to everyone, regardless of their tech expertise.