
Have you ever been excited for the latest iOS update, only to find your iPhone stubbornly stuck on the 'Preparing Update' screen? Fear not! Troubleshooting usually works best when you move from the simplest checks to the more disruptive fixes.
Below, you'll explore 9 truly effective, tried-and-tested solutions to get your device updated smoothly. Let’s dive in! It is helpful when you want to polish the clip a bit more before you export and share it elsewhere.
Method 1: Perform a Hard Reset
A force restart can be a quick fix when your iPhone is stuck on the "Preparing Update" screen. Unlike a standard restart, it is more useful if the device is unresponsive. If one step does not change the behavior, move on instead of repeating it several times.
This method reboots your device, clearing any minor software issues that might be hindering the update process, without deleting your data. This makes it an ideal first step in troubleshooting the issue of an iPhone stuck during an update. A quick check of the device model, software version, and account state usually explains why the same menu looks different on another device.
Here's how to force restart different iPhone models:
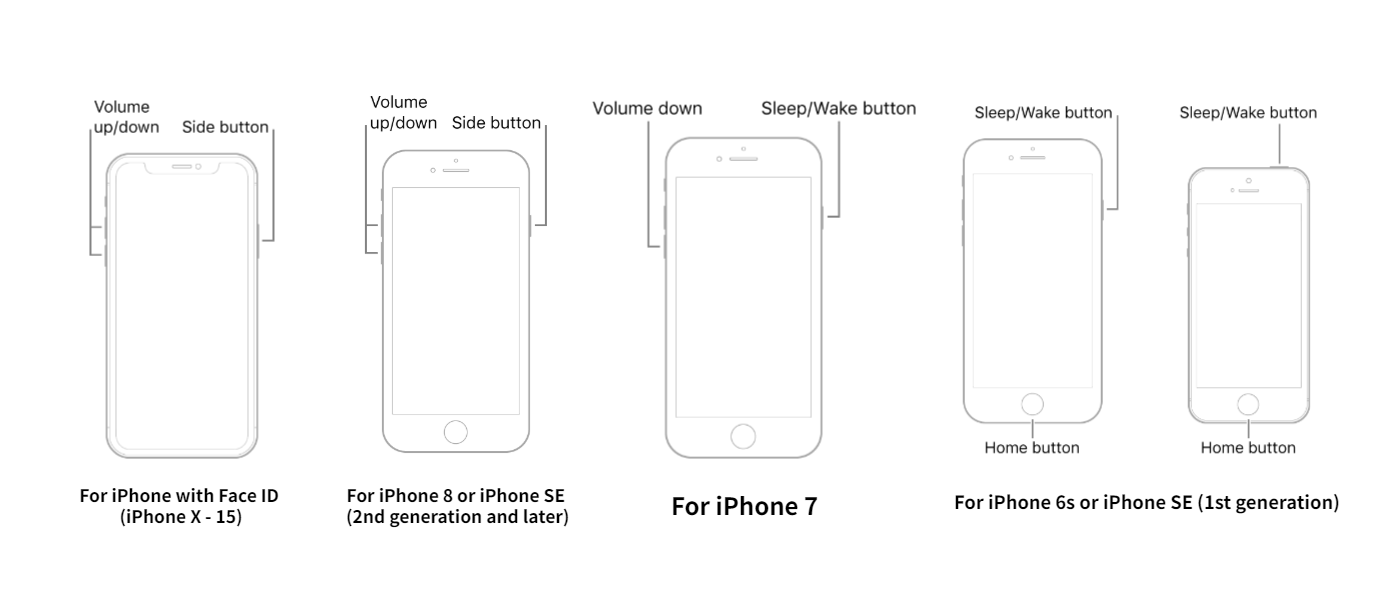
For iPhone with Face ID (iPhone X - 15):
- Press thePress thevolume up button and instantly release it so the next part of the process is easier to complete without backtracking. This is useful when the speed change should affect only one section instead of forcing the whole clip to slow down.
- Press thePress thevolume down button and instantly release it so the next part of the process is easier to complete without backtracking.
- Press thePressthe side button, then hold it until you see the Apple logo so the next part of the process is easier to complete without backtracking.
- When the Apple logo appears, release the button.
For iPhone 8 or iPhone SE (2nd generation and later):
- Press and quickly release thePress andquickly release the volume up button so the next part of the process is easier to complete without backtracking.
- Press and quickly release thePress andquickly release the volume down button so the next part of the process is easier to complete without backtracking.
- Then press and hold the side button.
- When the Apple logo appears, release the button.
For iPhone 7:
- Press thePress thePress the Sleep/WakePress theSleep/Wake button and the volume down button simultaneously until you see the Apple logo so the next part of the process is easier to complete without backtracking.
For iPhone 6s or iPhone SE (1st generation):
- Press thePress thePress the Sleep/WakePressthe Sleep/Wake button and the Home button simultaneously until you see the Apple logo so the next part of the process is easier to complete without backtracking.
Method 2: Delete the Update and Redownload
During the download process, update files can become corrupted due to issues like unstable internet connections or insufficient storage space. This corruption might prevent the update from installing properly, leading to your iPhone getting stuck. If a step looks different on your device, the app version is usually the first thing to compare before assuming the feature is missing.
Deleting and redownloading the update can resolve issues caused by incomplete or corrupted update files.
How to Delete the Update:
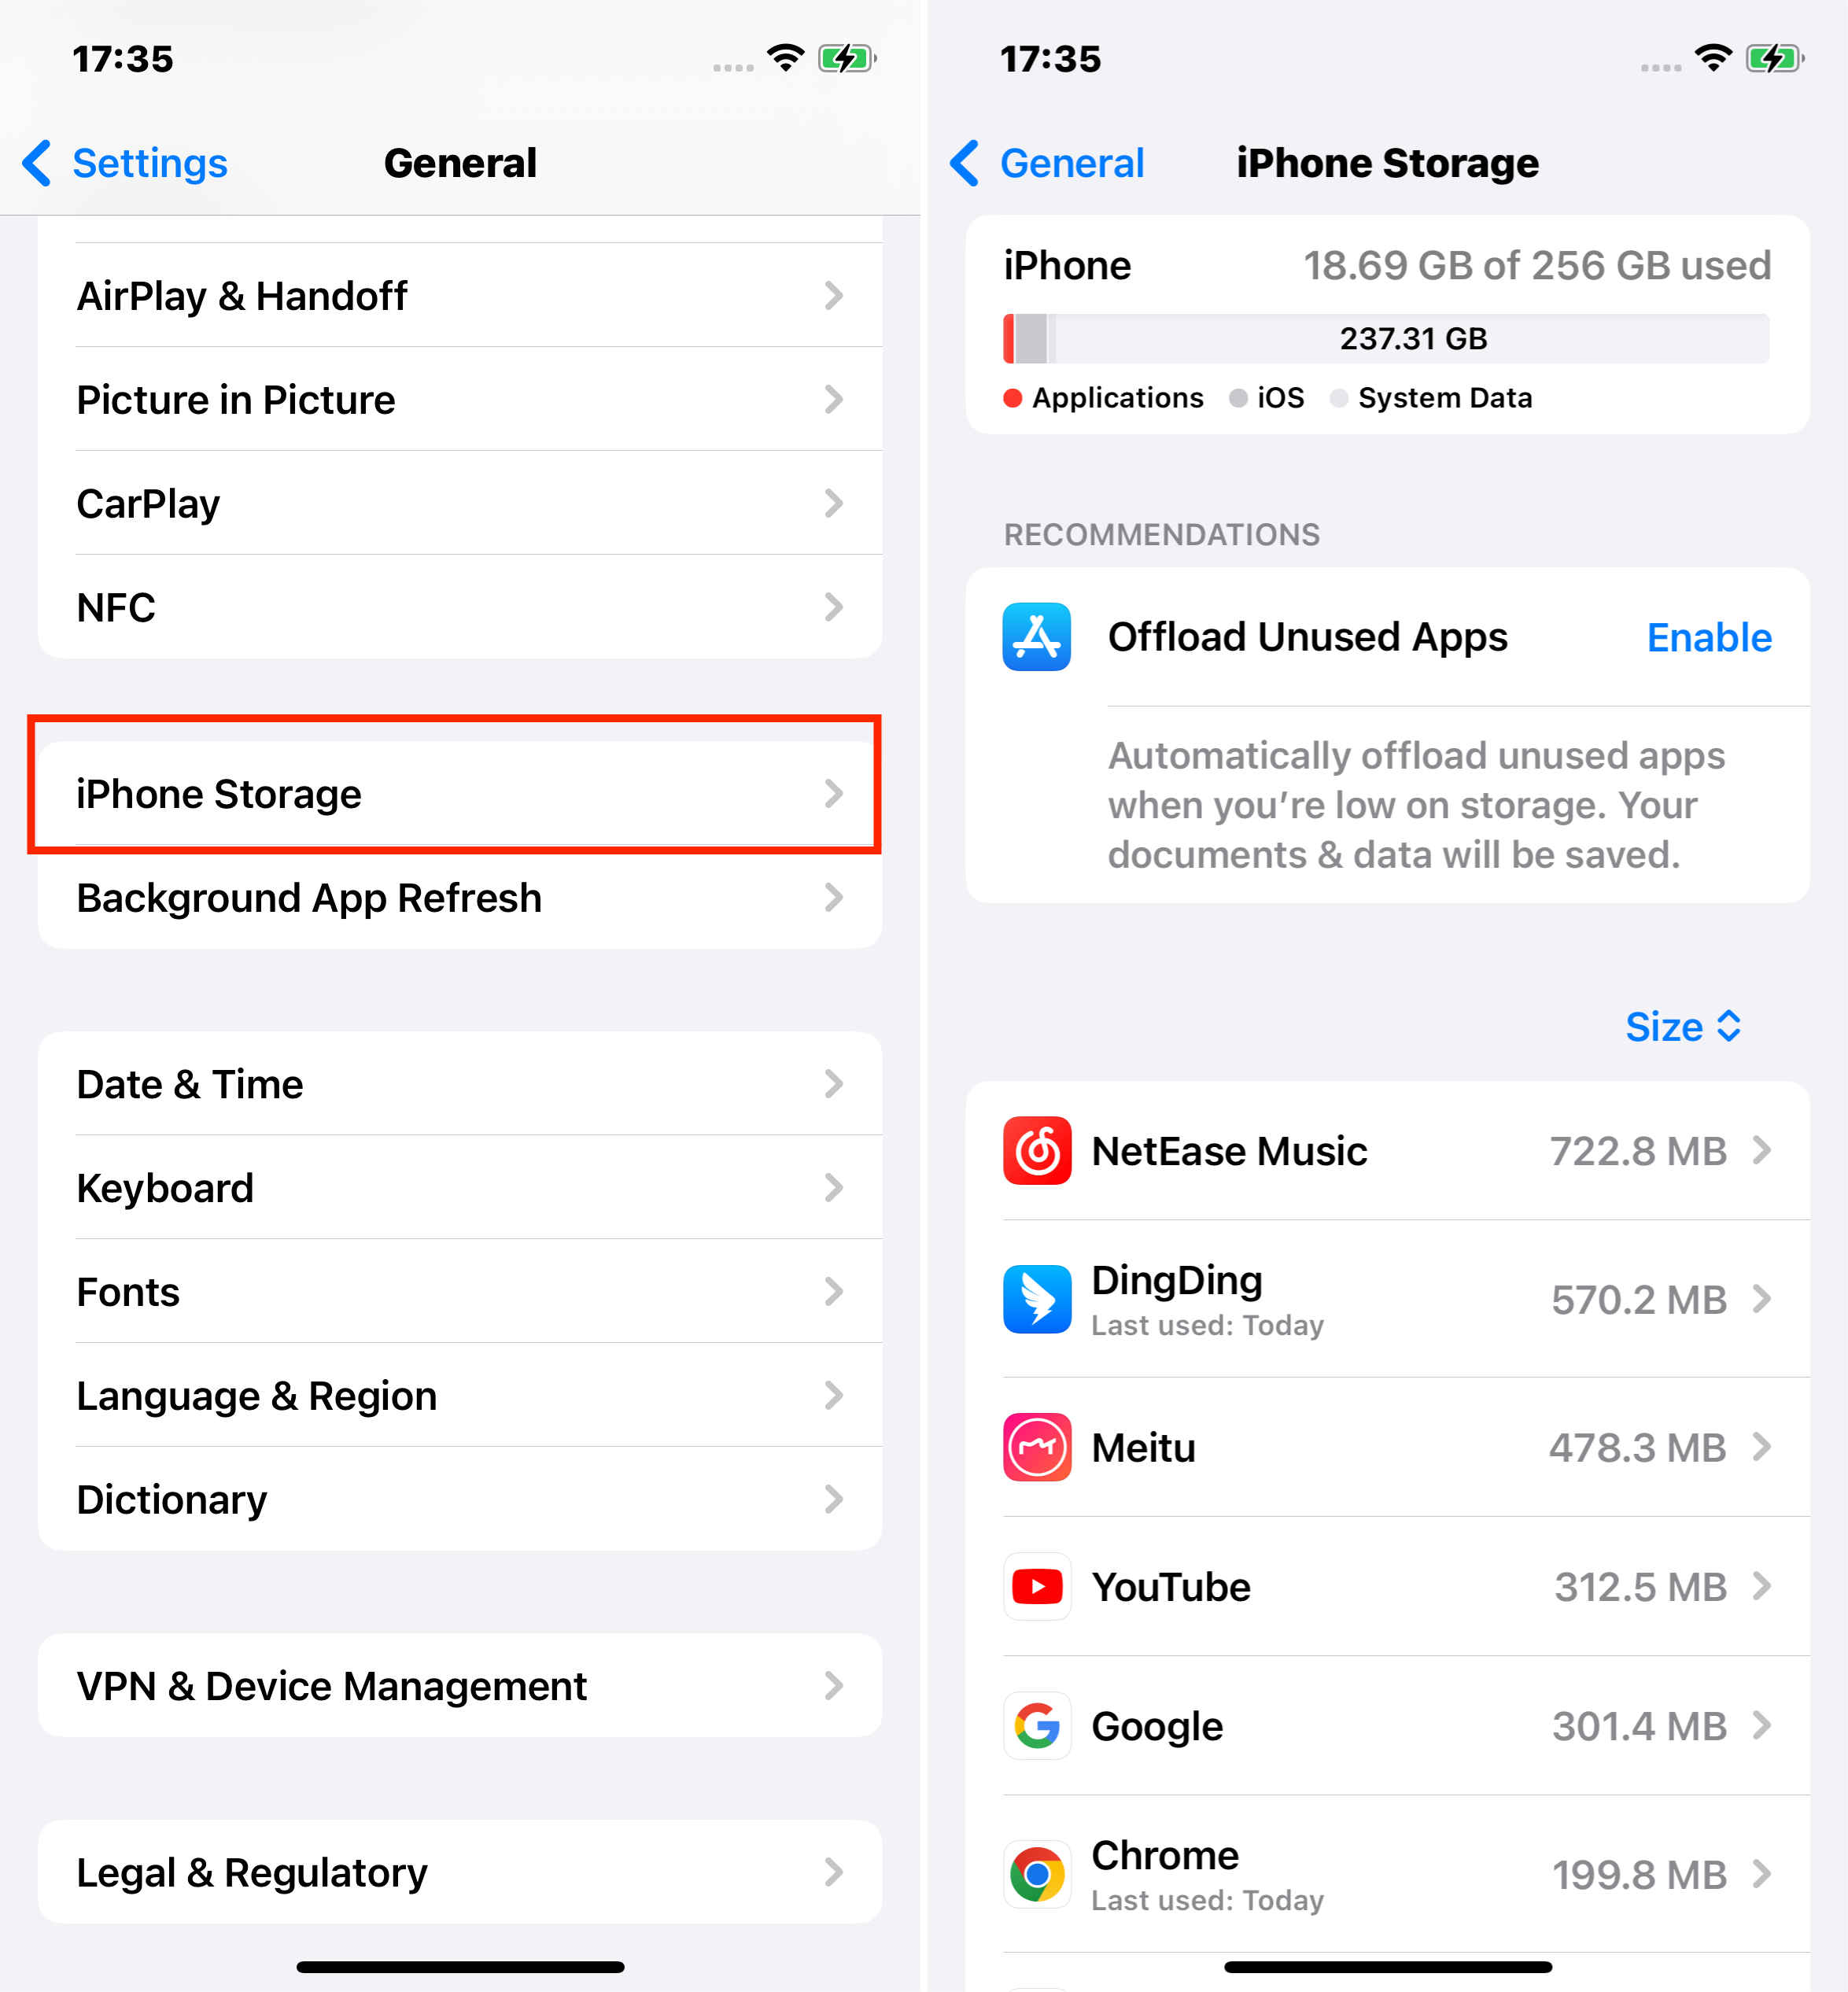
- Open Settings > General > iPhone Storage
- Select the previously downloaded update file.
- Click Delete Update to remove it from your device.
Redownloading the Update:
- Ensure you have a stable Wi-Fi connection and sufficient storage space on your device.
- Go back to Settings > General > Software Update
- The iPhone will search for the latest iOS update. Once found, download and install it as usual.

Method 3: Use Mobitrix Perfix (The Most Effective and Fastest Way)
As a professionally designed iOS repair tool, Mobitrix Perfix effortlessly identifies and fixes issues on your iPhone with just a few simple clicks. Enjoy a user-friendly experience without concerns about data loss or privacy – it's all handled automatically and securely.

- Download and install Mobitrix Perfix on your computer.
- Open the software and click Start, then choose iOS Update Problem and select Fix Now.
- Connect your iPhone to the computer using a USB cable.
- SelectSelect StandardRepair so the device has a cleaner chance to reconnect on the next attempt. In about 20 minutes, your iPhone should be updated to the latest iOS version, free from any updating issues.
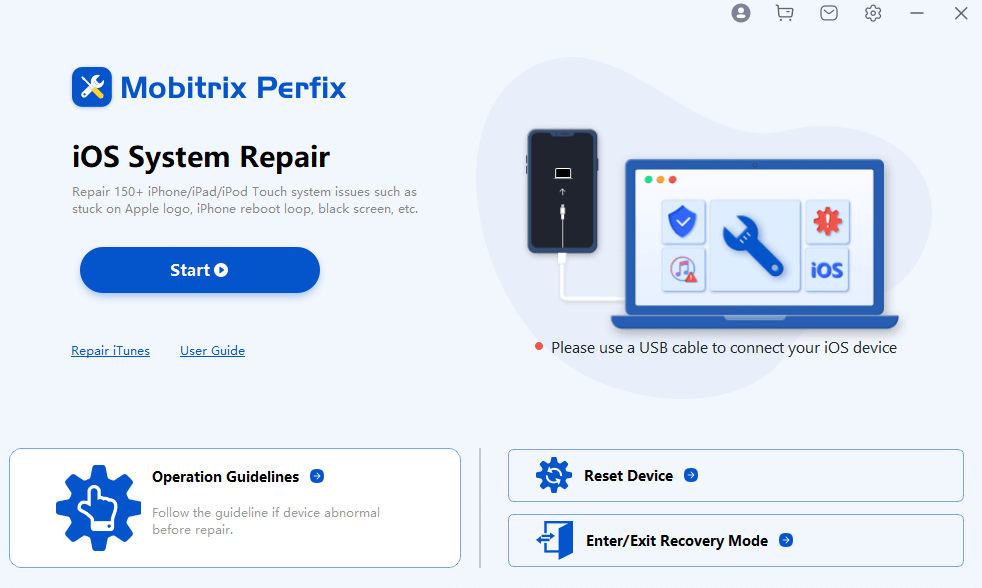
Mobitrix Perfix Click Start to Fix Issues
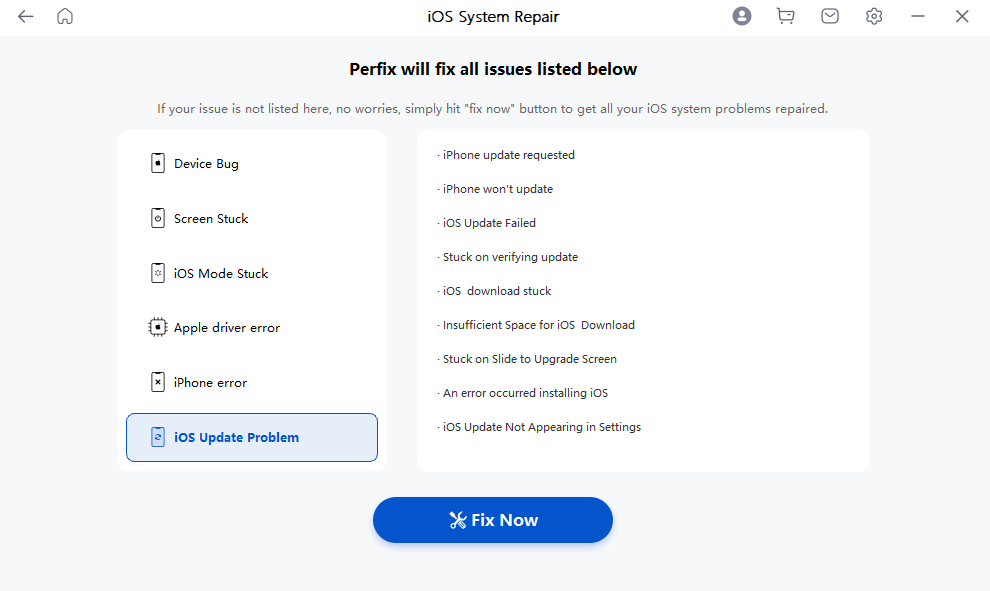
Mobitrix Perfix Fix iOS Update Problem
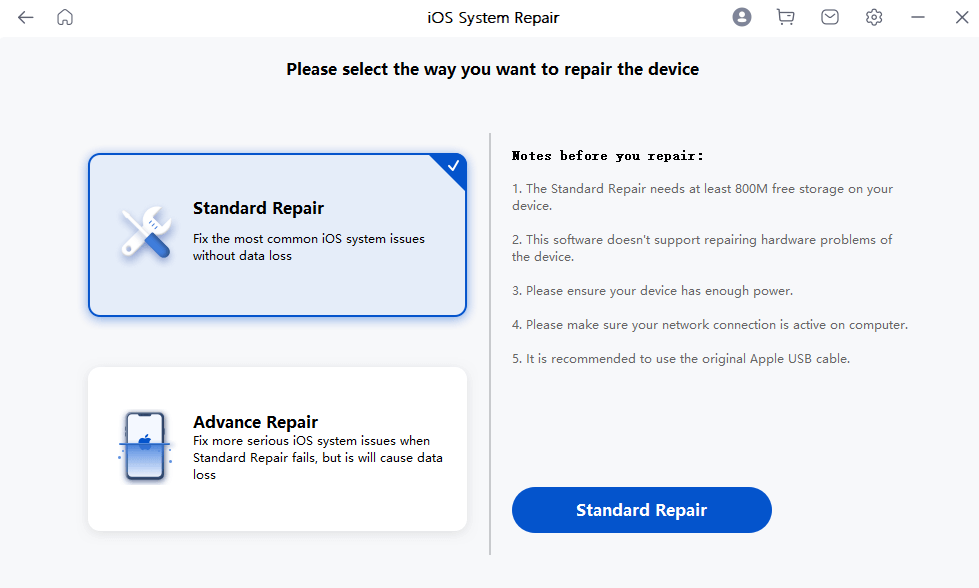
Mobitrix Perfix Standard Repair
Method 4: Free Up Storage Space
iOS updates often need more space than the size of the update file itself, as the device requires additional room to unpack and install the update. If your iPhone doesn’t have enough free space, it can hinder the update process, causing the phone to get stuck.
Checking Storage Space:
- Go toGoGoGoGoGo toSettings > General > [Device] Storage so the next part of the process is easier to complete without backtracking. This will show you how much space is used and how much is available. It gives you finer control when only one moment should stay slow and the rest of the recording should play normally.
- The graph and list give you a breakdown of what is consuming your storage, such as apps, photos, and other media.
Freeing Up Space:
- Delete Unnecessary Apps and Data: Remove unused apps, clear app caches, and delete old messages and large attachments.
- Manage Photos and Videos: Back up photos and videos to iCloud or another cloud service, then delete them from your device. Alternatively, you can transfer them to a computer.
- Clear Browser Cache: Safari and other browsers store data that can take up space.
- Offload Unused Apps: This feature (found in the iPhone Storage settings) allows you to remove apps but keep their data, in case you want to reinstall later.
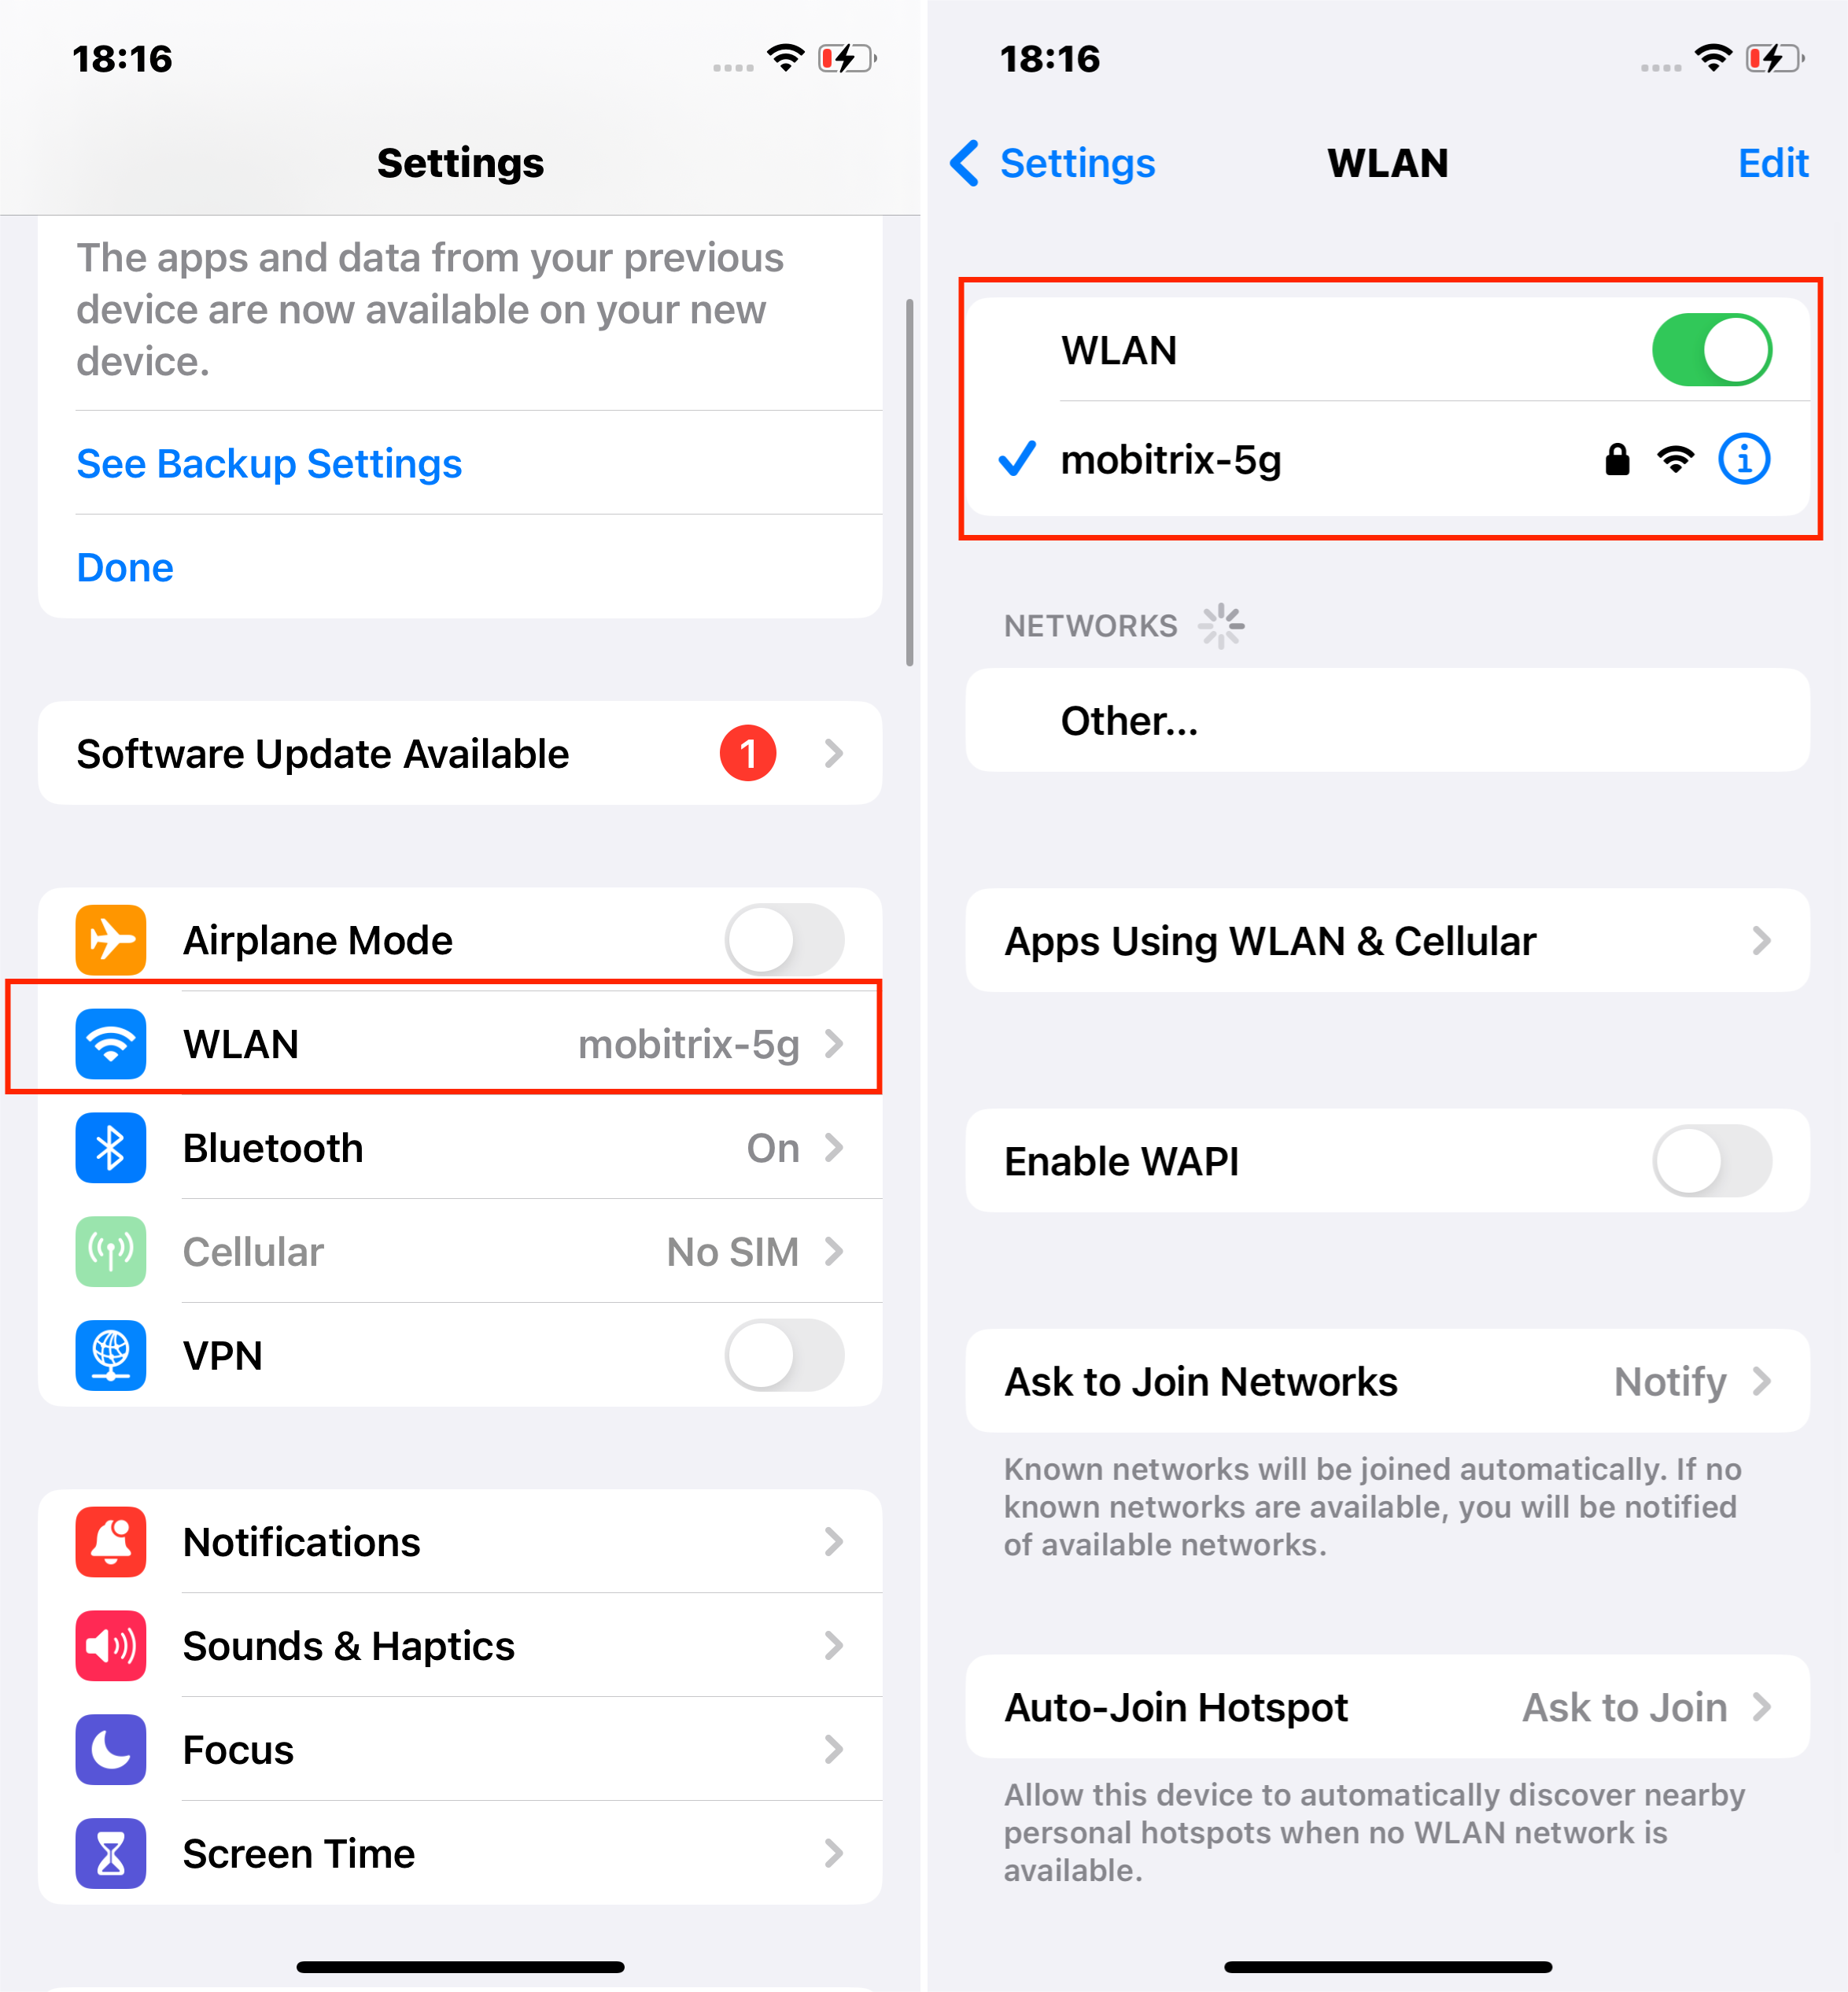
Method 5: Check Network Connection
The process of downloading and preparing an iOS update relies heavily on a stable and strong internet connection. A poor connection can lead to incomplete download files, which might cause the update process to hang or fail.
How to Check and Improve Your Network Connection:.
- Wi-Fi Connection: Ensure your iPhone is connected to a Wi-Fi network. If already connected, try toggling Wi-Fi off and back on. Alternatively, try connecting to a different Wi-Fi network if one is available.
- Restart Router/Modem: Sometimes, the issue might be with your home network equipment. Restarting your router or modem can resolve connectivity issues.
- Check for Network Congestion:If many devices are connected to your network, it might slow down your internet speed. Disconnecting some devices can improve the connection. That helps when the speed change needs to line up with one exact moment instead of affecting the whole video evenly.
Once you’ve confirmed or improved your network connection, try the update process again.
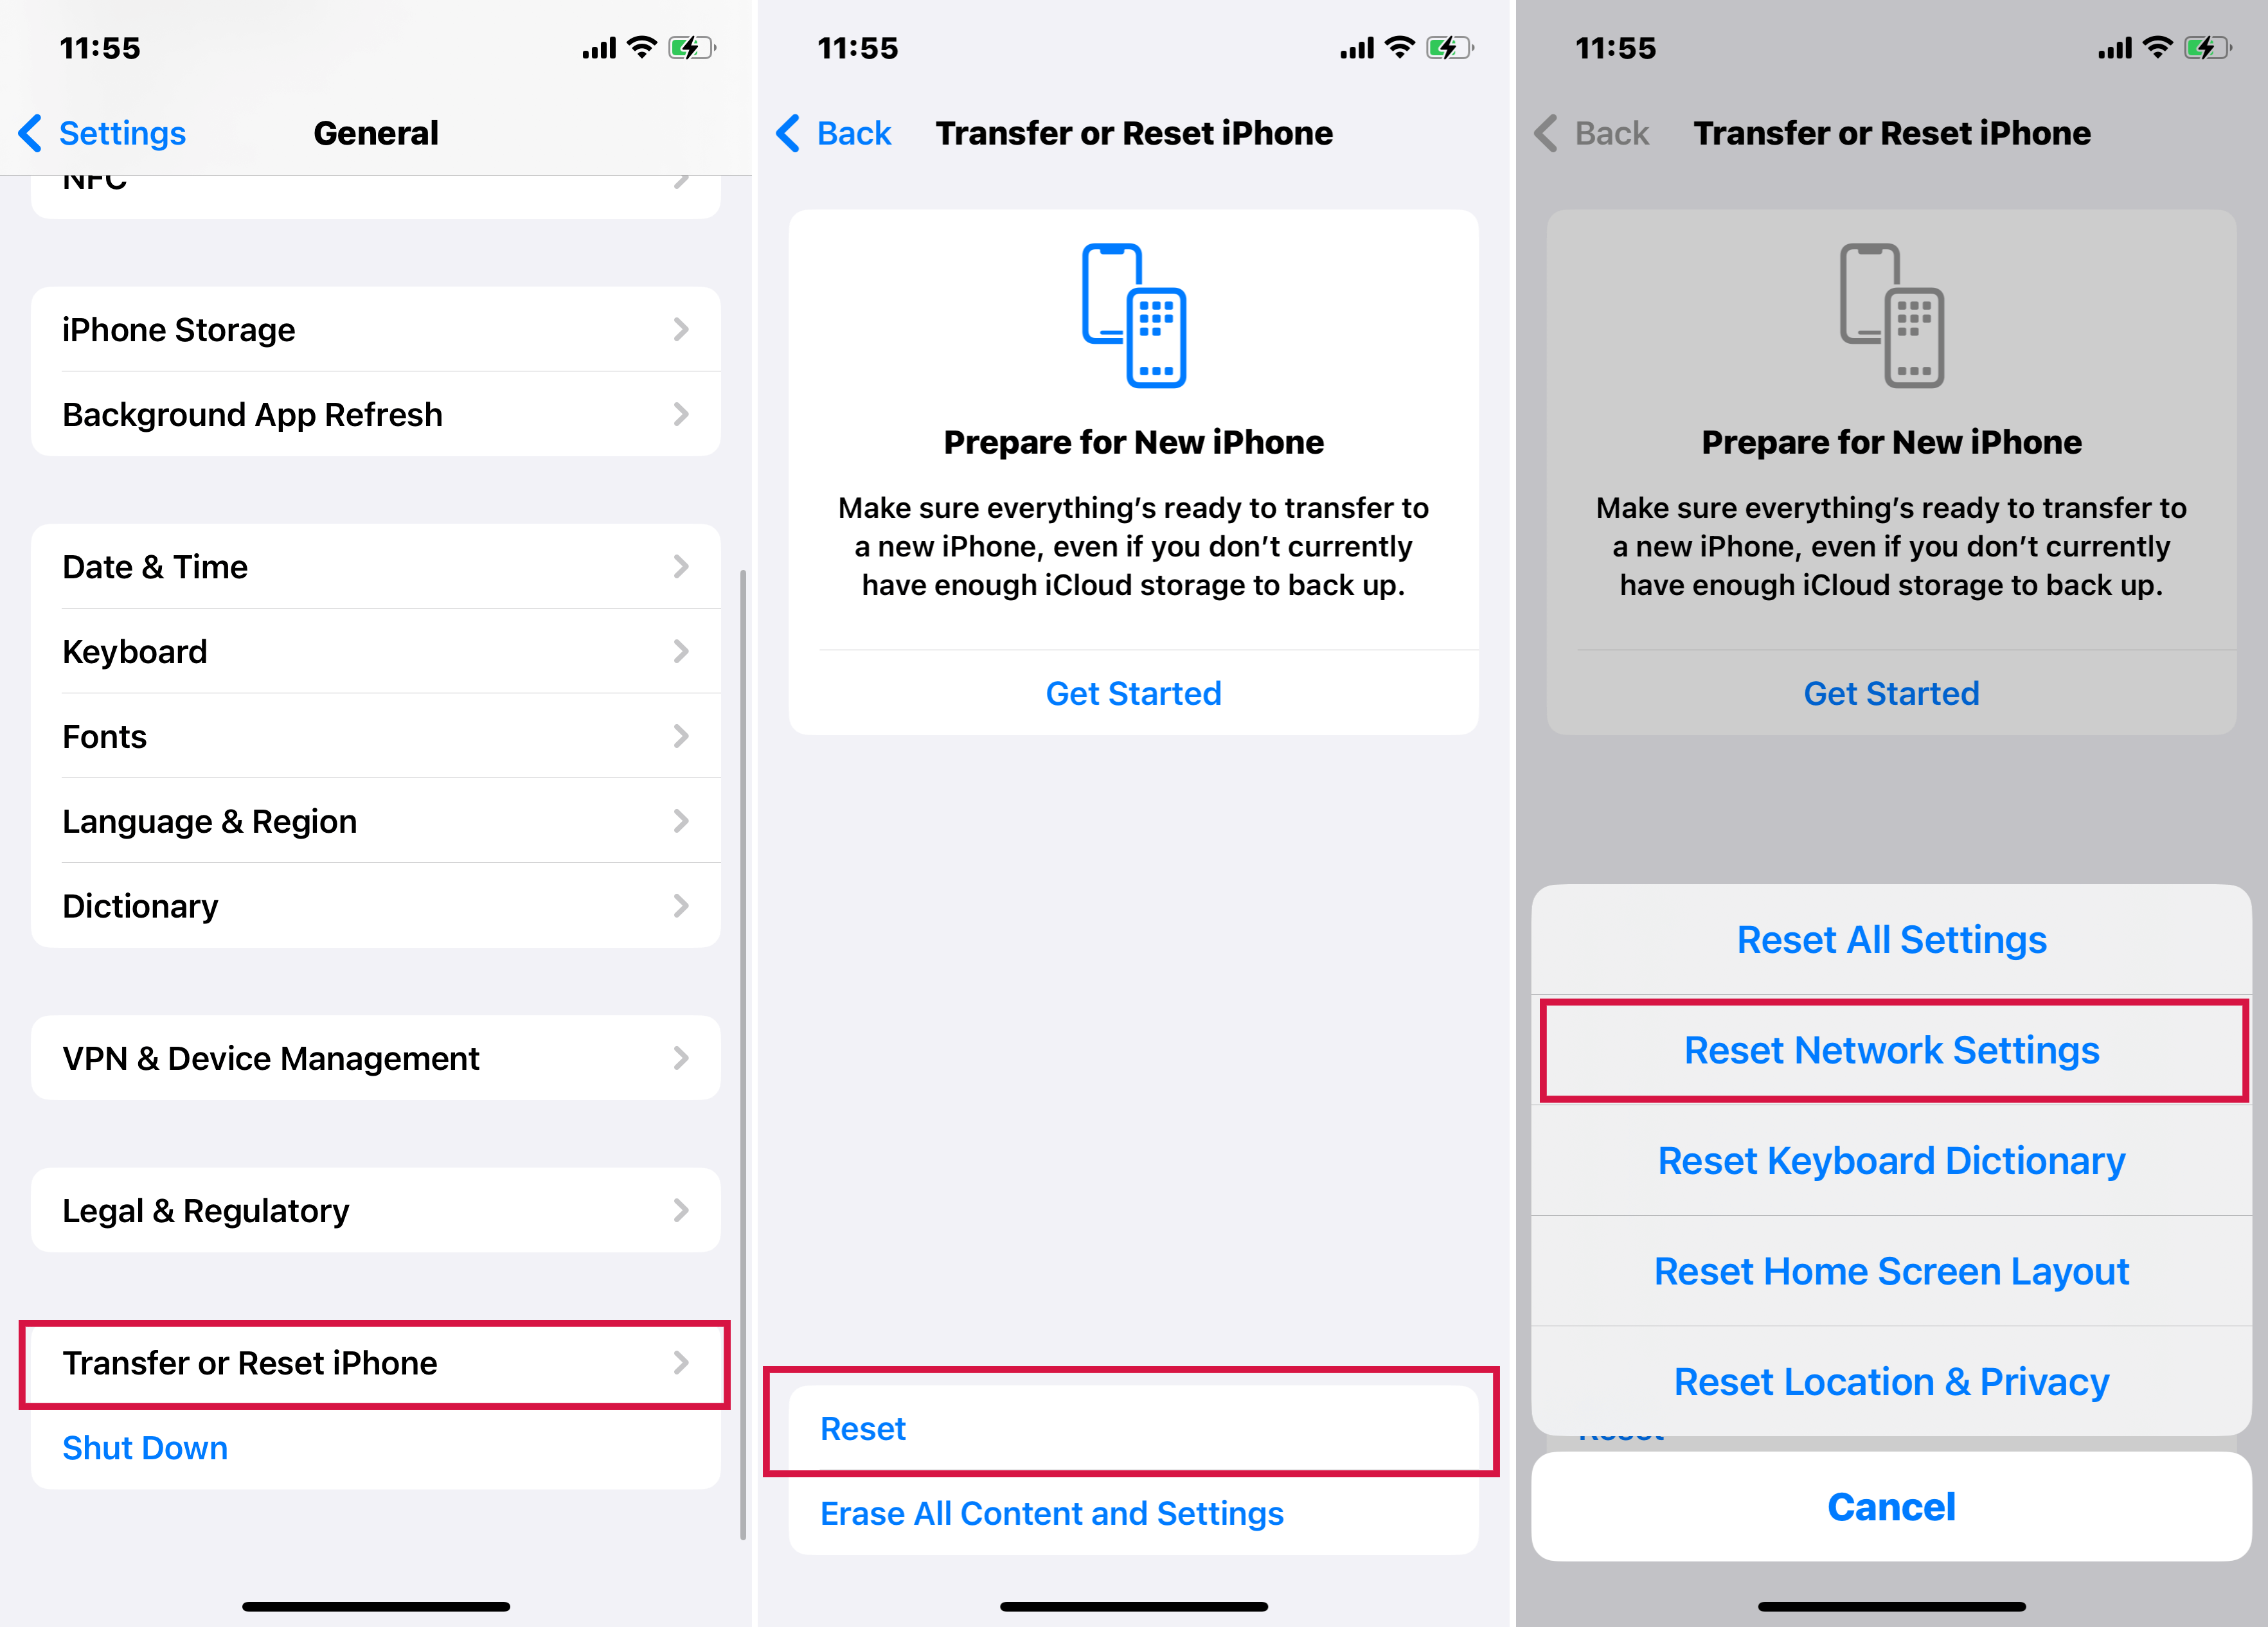
Method 6: Reset Network Settings
Resetting network settings can occasionally resolve this issue, though it's not the most direct solution.
The process of downloading and preparing an iOS update relies heavily on a stable network connection. If there are underlying issues with your network settings, such as corrupted Wi-Fi settings or network conflicts, it could impede the update process. Resetting network settings clears these configurations as a complementary solution.
How to Reset Network Settings:
- Go to Settings > General > Reset.
- Select Reset Network Settings and confirm.
It also lets you use iTunes/Finder to fix your iPhone, though note that iTunes can be very difficult to use.
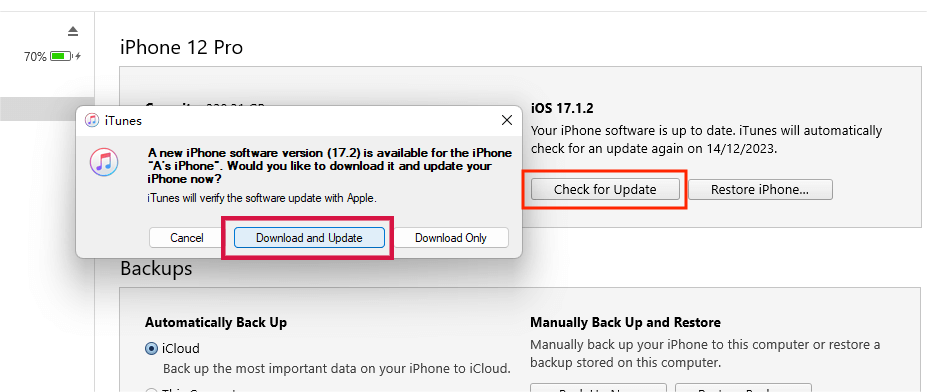
Method 7: Update iOS via iTunes/Finder
Sometimes, iTunes (for Windows and older macOS versions) or Finder (in macOS Catalina and later) offers a more stable environment for the update process, often bypassing these issues.
However, the process can be more time-consuming and complex compared to an over-the-air update.
Steps to Update via iTunes or Finder:
- Back up Your iPhone: If you haven't backed up your iPhone recently, there's a risk of data loss. It's crucial to back up your device before proceeding with this update method.
- Install or Update iTunes/Finder: Makesure you have the latest version of iTunes (for Windows or older Macs) or use Finder (for macOS Catalina and newer).
- Connect Your iPhone to Your Computer: Use a USB cable to connect your iPhone to the computer.
- Find Device in iTunes/Finder: Your iPhone should appear in iTunes or Finder. Select it to view its details.
- Start the Update:Start the Update: In iTunes or Finder, look for the option to check for anStart the Update:Start theUpdate: In iTunes or Finder, look for the option to check for an update. click “Check for Update” and then “Download and Update.”
- iTunes or Finder will then update your iPhone to the latest version of iOS, bypassing the "Preparing Update" screen on the device.
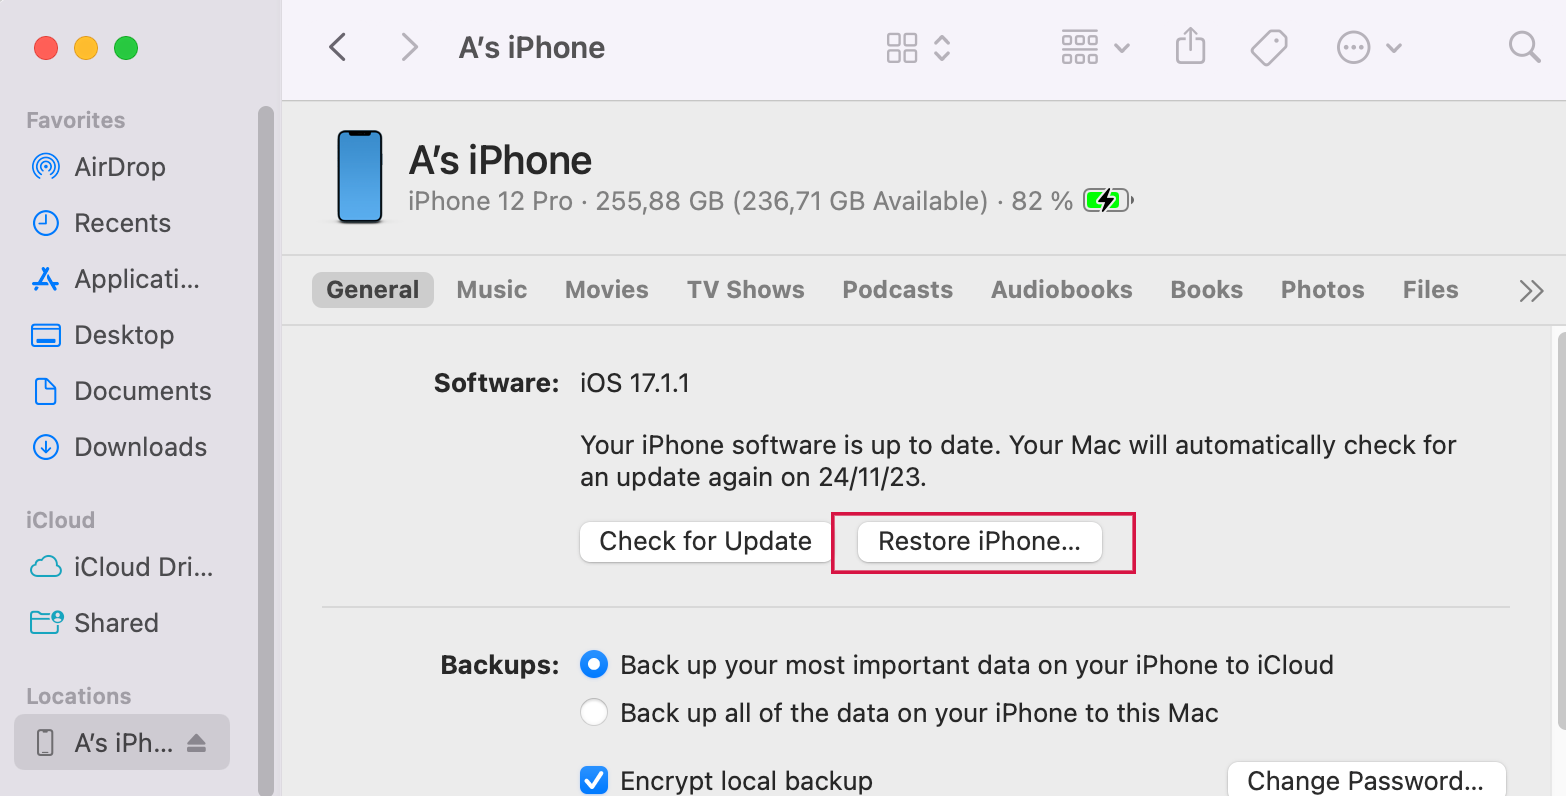
Method 8: Performing a Restore via iTunes/Finder
A restore involves erasing all content and settings from your iPhone and reinstalling the operating system. This can be effective in resolving complex software problems that a simple update cannot fix. That can save time when you want the video ready for social posting without moving it into another editor first.
But the process might take longer than a standard update, especially if you have a lot of data to back up and restore.
How to Restore via iTunes/Finder:
- Connect your iPhone to your computer and open iTunes (for Windows or older Macs) or Finder (for macOS Catalina and later).
- Select your iPhone when it appears in iTunes or Finder.
- Choose theChoosethe "Restore" option to restore your iPhone so the next part of the process is easier to complete without backtracking. iTunes or Finder will download the latest iOS version and restore your iPhone to factory settings with the new iOS. That matters when you only want one part of the video to play back slower while the rest keeps its normal speed.
- After the restoration process, you can set up your iPhone as a new device or restore your data from a previous backup.
Method 9: Check Apple's Server Status
Checking Apple's server status helps you understand whether the issue is on your end or Apple server-side issue.
Apple's servers are responsible for delivering iOS updates. If there's an issue with Apple's servers, it can affect your device's ability to download and install updates.
Server issues can lead to a range of problems, including updates not downloading properly, getting stuck during the installation process, or failing to start at all.
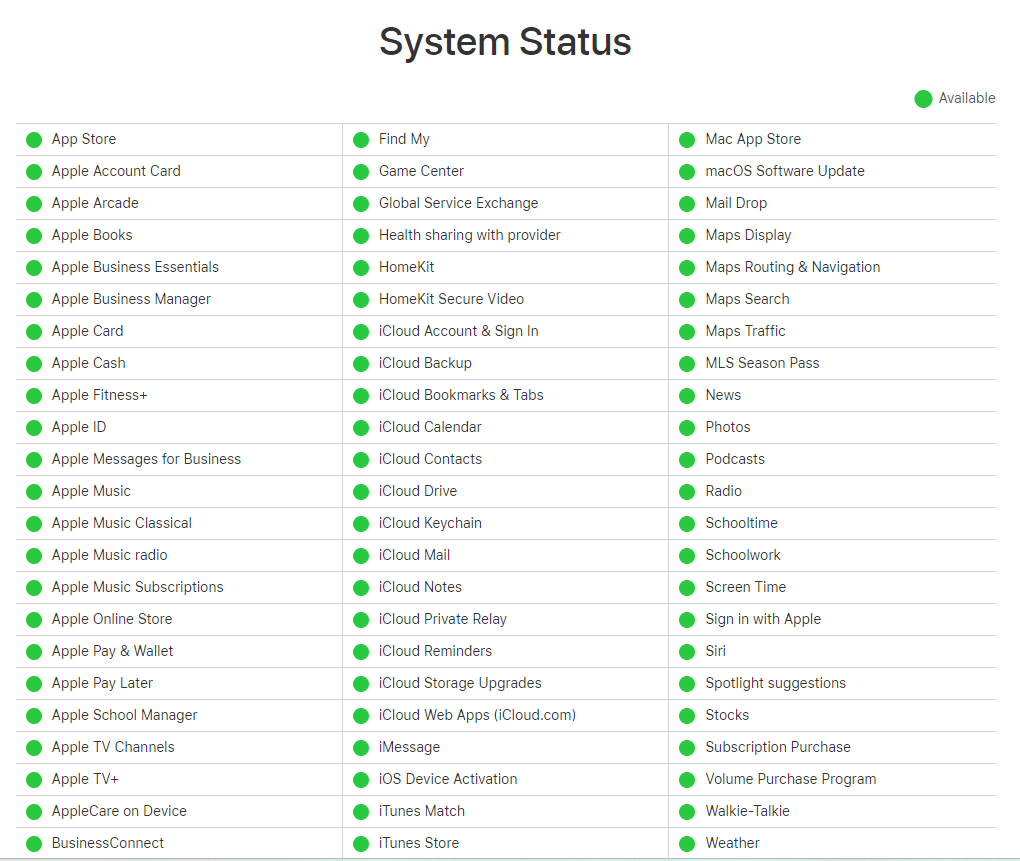
How to Check Apple's Server Status:
- Visit the Apple System Status webpage. This page provides real-time information about the status of various Apple services, including iOS Device Update.
- If the iOS Update service (or related services) is marked with green, it means everything is functioning normally, and the issue might be with your device or internet connection.
- If any services are marked withIf any services aremarked with yellow or another color, it's likely a server-side issue. This indicates issues or maintenance work in progress. In this case, the best course of action is to wait until Apple resolves the issue.
Once the servers are back up and running, try updating your iPhone again by going to Settings > General > Software Update.
This article has provided you with a total of 9 full solutions for resolving the 'iPhone stuck on preparing update' issue.
If speed and reliability are key, consider Mobitrix Perfix. With its near 100% success rate, it can swiftly resolve your iPhone's update issues in about 20 minutes.