
- With iTunes, you can sync your iPhone’s content using cable or wirelessly and repair your iPhone using the recovery mode. The built-in setting is usually the safest place to start before you try extra tools.
- Alternative methods to connect iPhone to iTunes
If you need to sync your iPhone or back up its data freely and easily, iTunes will come in handy. This free app lets you sync your iPhone’s content, back up data, and repair several OS-related issues. You are probably wondering, “How do I connect my iPhone to iTunes?”. That gives you another route if the built-in iPhone tools feel too limited for the result you want.
I received this question almost every day in my 5 years working at Apple. Currently, as an ex-Apple Store senior repair technician, I keep researching and offering up-to-date solutions to your iPhone issues. Today, I will guide you step-by-step on how to connect an iPhone to iTunes. Whether you have an IT background or not, you can easily connect your iPhone to iTunes. If the menu looks different on your device, compare the software version before assuming the feature is gone.
How to Use iTunes to Sync your iPhone
Whether you are a macOS or Windows PC user, you can use iTunes to sync your iPhone’s content. There are two ways to sync your iPhone using iTunes:
- Using USB
- Using WiFi
How to Set Up Sync between your iPhone and MacOS Computer
You can seamlessly sync your iPhone’s content like media and contacts with your Mac using these simple steps:. A quick check of the device model, software version, and account state usually explains why the same menu looks different on another device.
- Connect iPhone to your Mac via USB cable so the device has a cleaner chance to reconnect on the next attempt.
- Select your device in the Finder sidebar or iTunes depending on the version so the next part of the process is easier to complete without backtracking. It gives you finer control when only one moment should stay slow and the rest of the recording should play normally.
- Select the content you want to sync.
- tap “Sync (type of content) onto (your device name)” so the next part of the process is easier to complete without backtracking. That matters when you only want one part of the video to play back slower while the rest keeps its normal speed.
- To continue syncing, repeat steps 3 and 4.
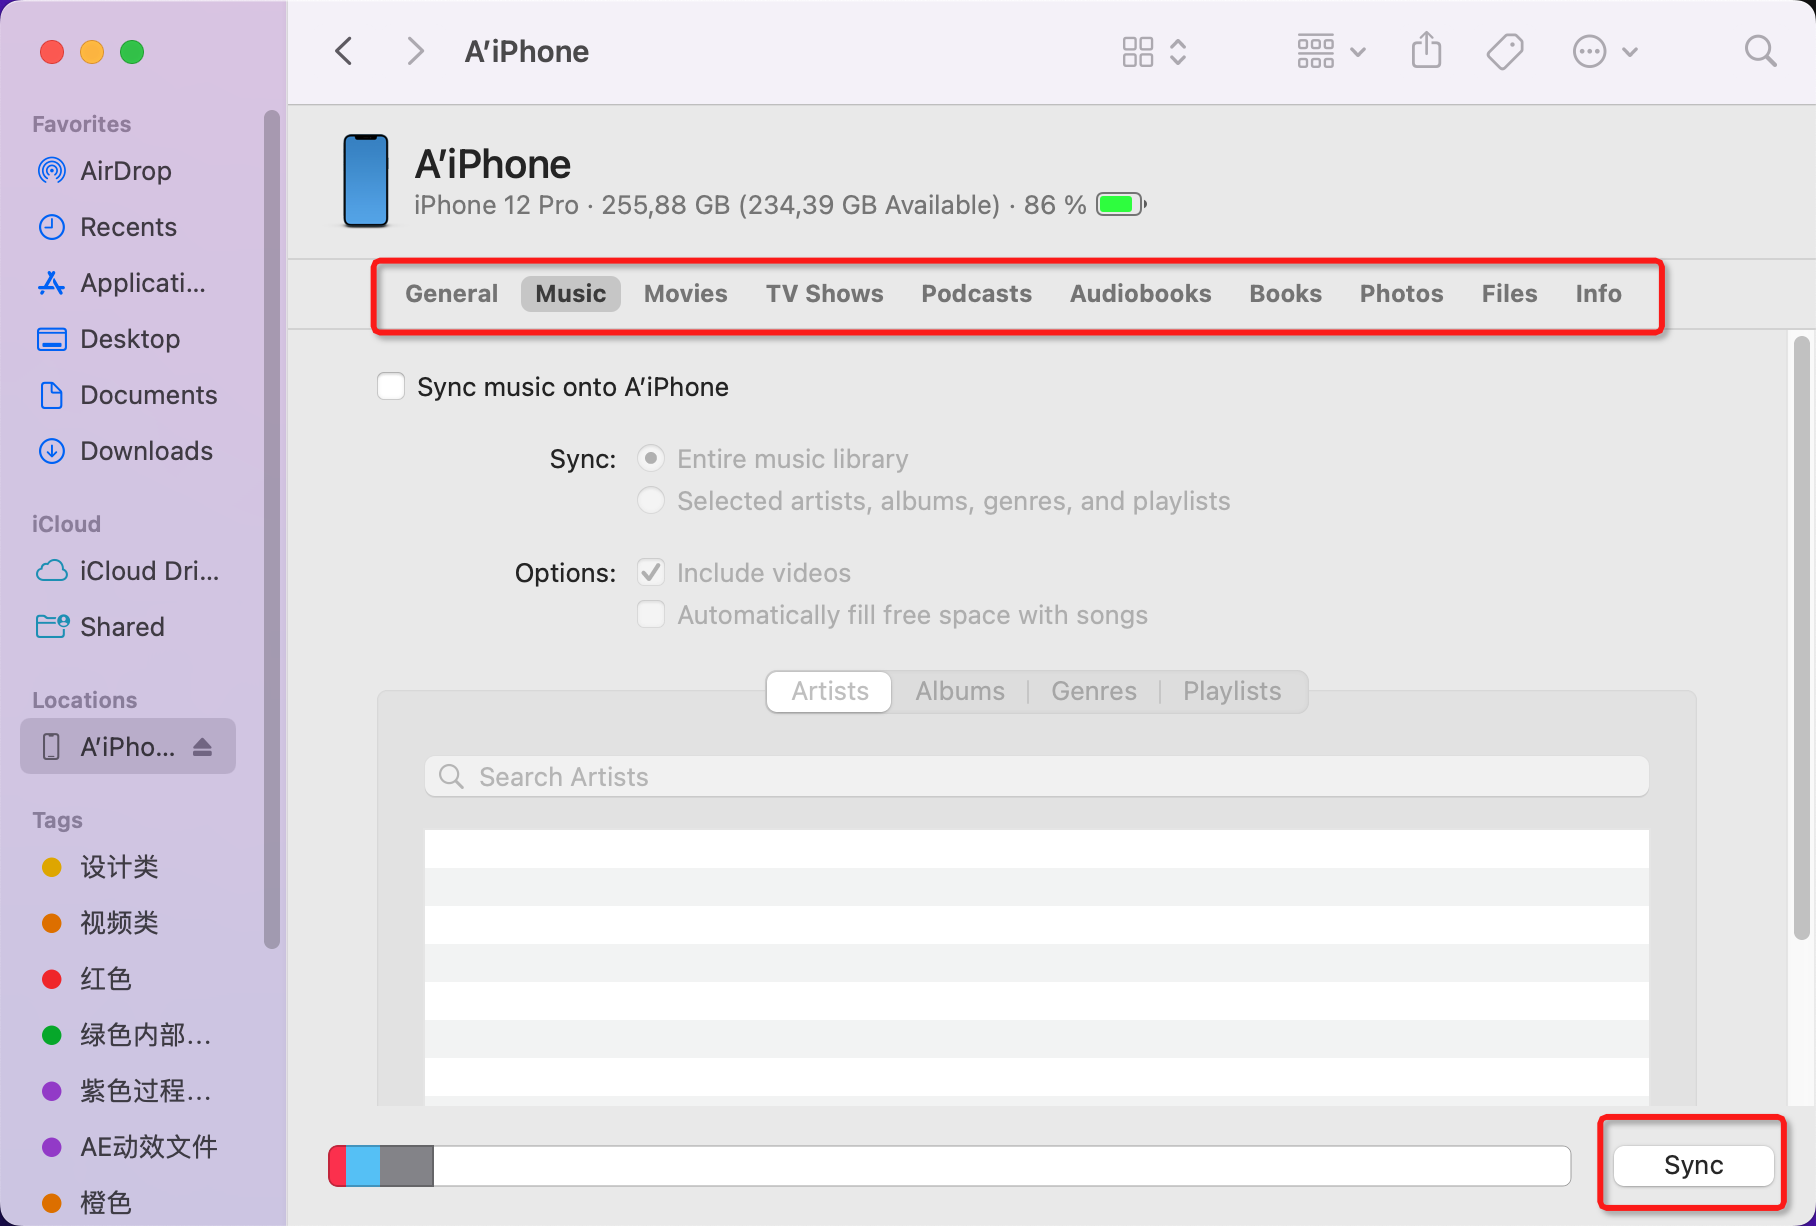
Once done, always remember to eject your iPhone by clicking the “eject button” in your Mac’s Finder sidebar, before disconnecting it.
How to Set Up Sync Between iPhone and Windows PC
You can also sync your iPhone’s content with your Windows PC using the following steps:
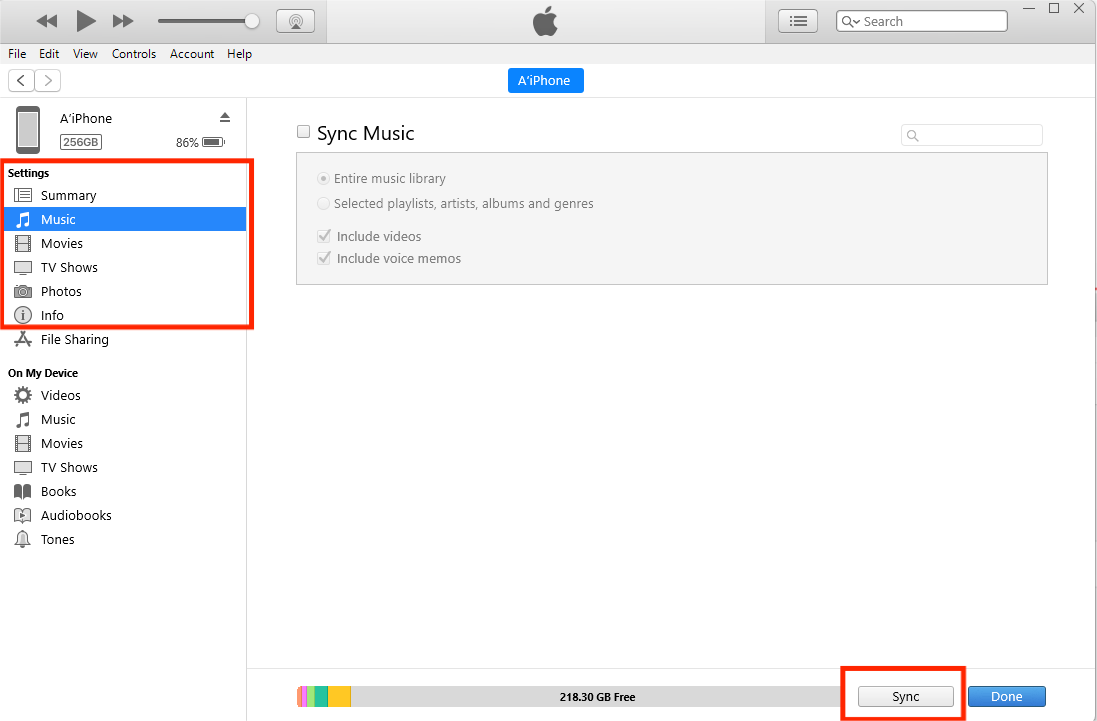
- Install the latest iTunes version
- Connect your iPhone to PC using a USB cable so the device has a cleaner chance to reconnect on the next attempt.
- Open iTunes and tap the iPhone icon on the top left side so the next part of the process is easier to complete without backtracking.
- Choose the content you need to sync.
- Click on Sync to turn on syncing.
- Repeat steps 4 and 5 to continue syncing, then click Apply.
Your iPhone will sync automatically with the Windows PC whenever you connect the device via USB cable. However, you can remove the auto-sync feature using this guide
How to Set Up Syncing via WiFi
Besides using a USB to sync your device, you can wirelessly use WiFi. After setting up sync between your device and your computer, do this:
- Connect your iPhone to PC via USB cable so the device has a cleaner chance to reconnect on the next attempt.
For macOS PC:
a. Select your device on the Finder sidebar
b. Click General
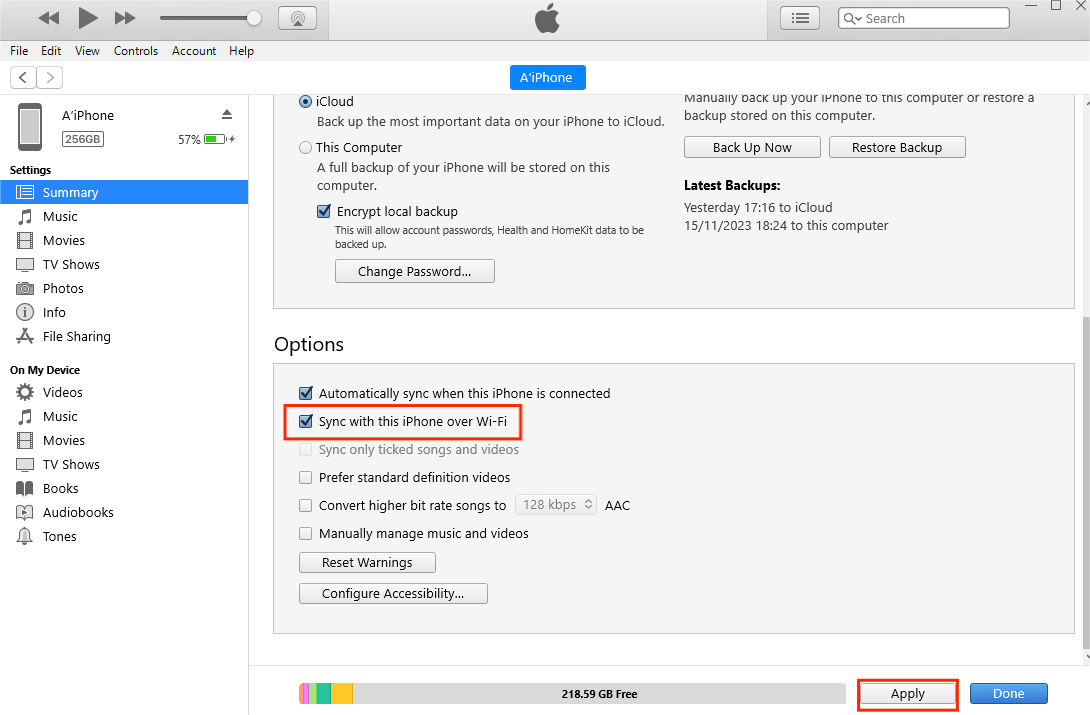
c. Click on “Show this (your device name) when on Wi-Fi”For Windows PC:
a. Open iTunes
b. Click the iPhone icon
c. Select Summary
d. Select “Sync with this (your device name) over Wi-Fi”
e. Click Apply- They share the same Wi-Fi network
- iTunes is open on your PC
- The iOS device is plugged into a power source
After this, your iPhone will auto-sync with your computer if:
How to Connect iPhone to iTunes in Recovery Mode
Even the latest iPhone can develop technical issues. If your iPhone won’t turn or you can’t remember your screen passcode, you can troubleshoot using recovery mode. Additionally, go to recovery mode if:
- Your iPhone turns on and off while trying to update the iOS
- The iPhone is stuck on the Apple logo
- Your PC is unable to recognize your iPhone
To connect iPhones to iTunes while in recovery mode:
- Connect your iPhone to your PC using a cable so the device has a cleaner chance to reconnect on the next attempt.
- Open iTunes.
- Activate the recovery mode on your iPhone:
- iPhone 8 or newer (inclusive of iPhone SE 2nd generation): Hold and quickly release the volume up button, then hold and quickly release the volume down button. Then immediately press and hold the power button until the iPhone goes to recovery mode.
- iPhone 7 and 7 Plus: Press and hold power and volume down buttons continuously until the iPhone switches to recovery mode.
- iPhone 6s or earlier: Press and hold the side and home buttons until it switches to recovery mode
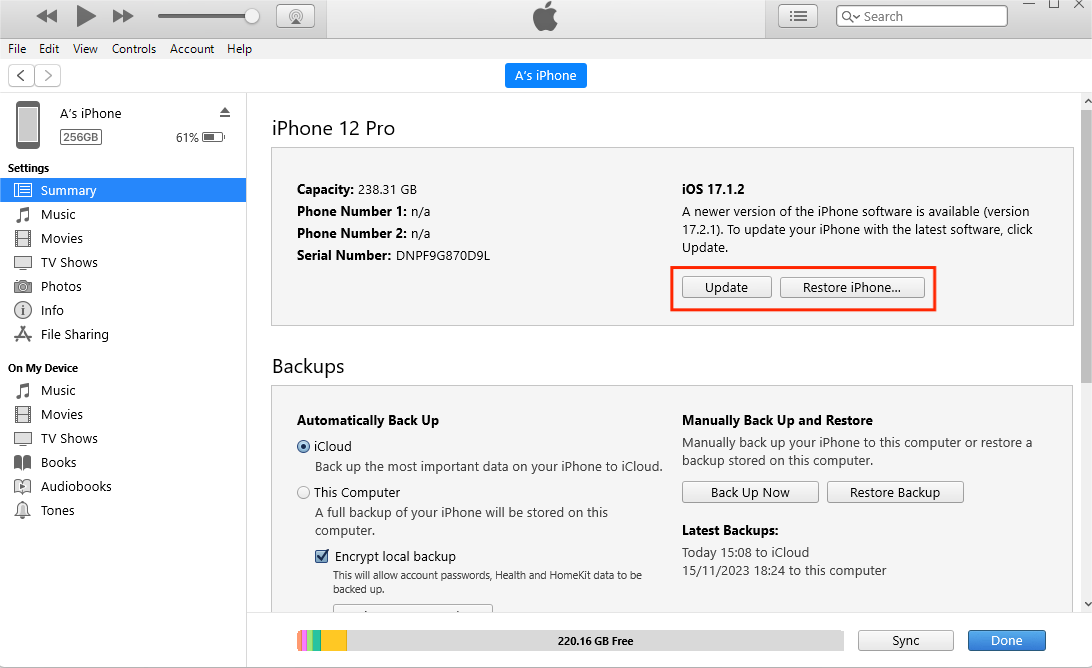
- On iTunes, tap the iPhone icon.
- SelectSelectSelect Update to troubleshoot without erasing your iPhone’sSelectSelect UpdateSelectUpdate to troubleshoot without erasing your iPhone’s contents so the next part of the process is easier to complete without backtracking. Alternatively, select the Restore option to wipe clean your iPhone. This is useful when the speed change should affect only one section instead of forcing the whole clip to slow down.
Once done, the iPhone will exit the recovery mode automatically. But if the issue wasn’t resolved, keep reading for more troubleshooting hacks.
Methods to Connect iPhone to iTunes
Connecting your iPhone to iTunes can sometimes be challenging. You may encounter technical issues like your iPhone getting stuck on the Apple logo or iTunes not recognizing your device.
Whether your iTunes or iPhone has errors, you need a solution. There are a lot of tools out there, but as a senior repair technician who has worked for Apple Store for 5 years, I would highly recommend theMobitrix Perfix.
Method 1: Repair iTunes using Mobitrix Perfix (free and easiest)
What’s Mobitrix Perfix? This tool is a solution to fix 99% of iOS software issues with no data loss. In case your iTunes is experiencing serious bugs disabling you to fix your iPhone as planned, you can also repair iTunes with this tool. It fully supports iPhone 5s to iPhone 17 and iOS 26 and earlier versions.

To repair your iTunes, follow these steps:
- Click Repair iTunes in the main menu
- Click Repair
- Start Repairing
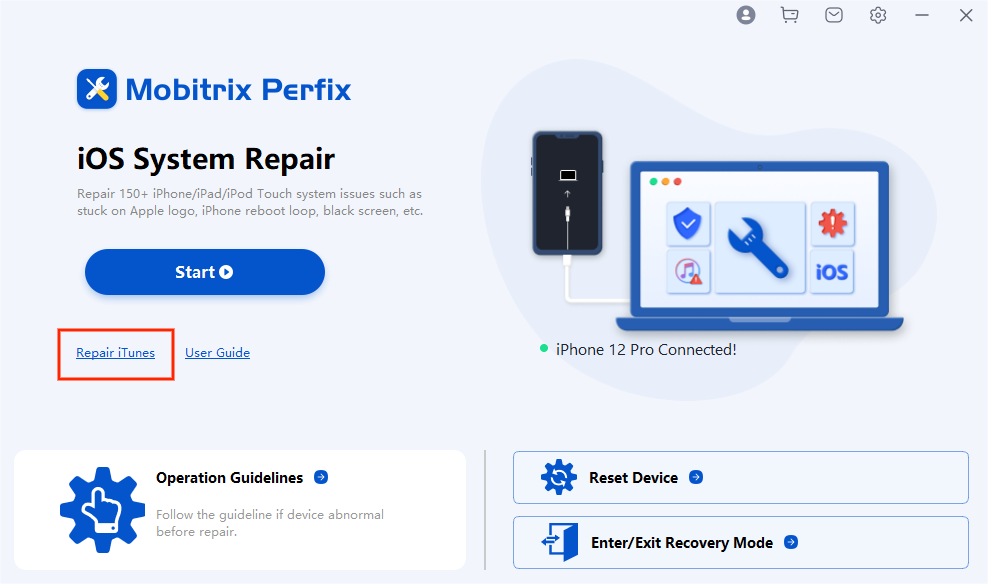
Mobitrix Perfix Repair iTunes Function
After finishing repair, your iTunes will be able to restart without errors. Now you can connect your iTunes to your iPhone. But mind you! You don’t actually have to rely on iTunes as the first choice for all your tasks. Why? Based on my experience in working for Apple Store, tons of customers have complained about how challenging it is to use iTunes. It consumes a lot of time and power and may not be very friendly.
I’ve used it to more easily fix all iOS-related issues with my iPhone. Also, according to the feedback from other customers, Mobitrix Perfix is fast and easy-to-use, and that’s why I highly recommend it to everyone. If the screen looks different on your device, compare software version, model, and account state first.
An Alternative Way to fix iPhone faults without iTunes
If you are troubled by technical issues like being stuck on recovery mode or Apple logo, the best tool to fix these glitches is Mobitrix Perfix.
Why do I recommend Mobitrix Perfix? Here’s why:
- You don’t have to install Finder or iTunes
- No data loss
- User friendly–a few clicks
- Faster and higher success rate than iTunes
- Supports all iOS devices regardless of their versions
- 100% safe and secure: No malware, virus, or spyware
To repair several faults in your iPhone without any data loss, follow these steps:
- Click on Start in the main menu.
- Click on Standard Repair
- Start Repairing
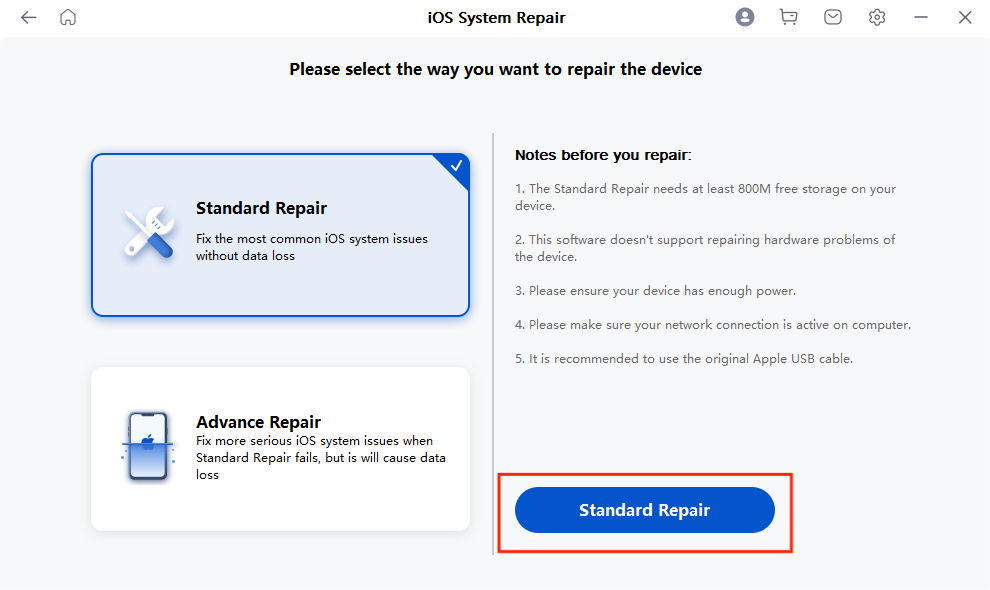
Mobitrix Perfix Standard Repair Function
If you want to reset your iPhone to factory settings, Mobitrix Perfix can quickly help you with a few clicks.
Here are the steps:
- click Resetclick ResetDevice in the main menu
- Click on Factory Reset
- Your device will be restored to factory settings without any hassle.
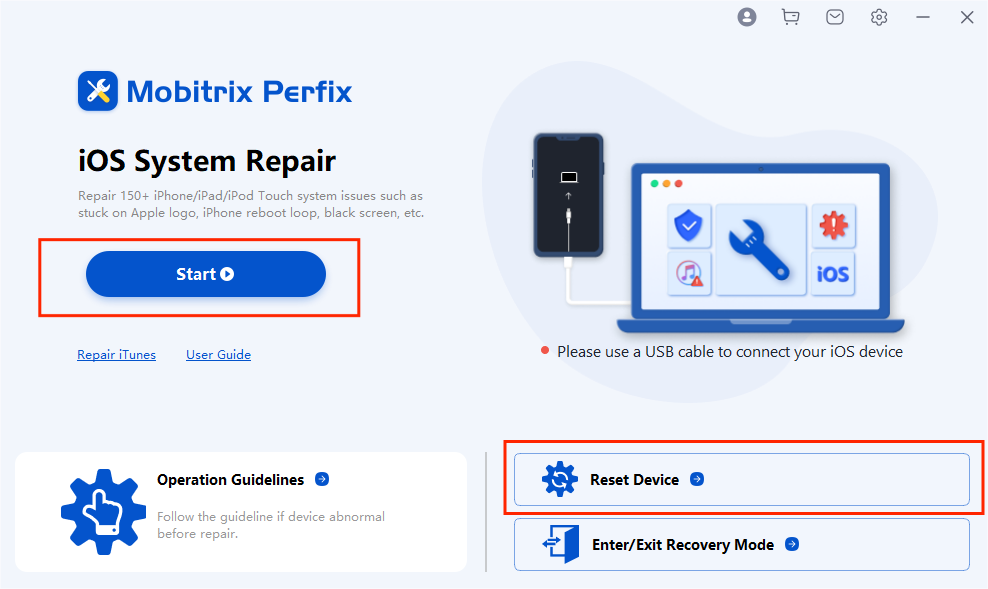
Mobitrix Perfix Reset Device
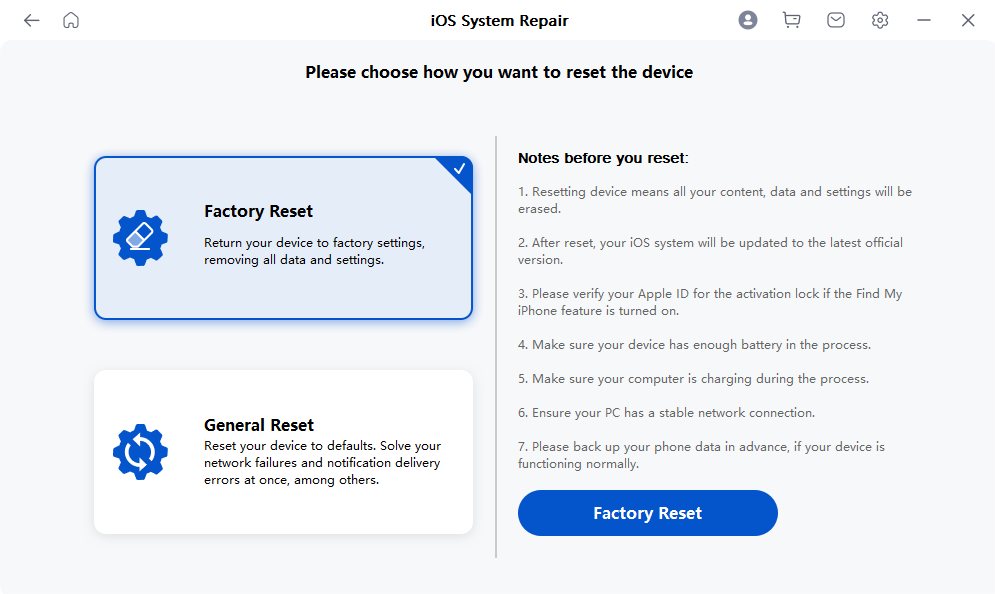
Mobitrix Perfix Factory Reset Function
Though Perfix is a paid third-party tool, its value is unmatched. With just a little investment, you will bid all your iPhone issues goodbye. It is a useful fallback when the default iPhone editor does not give you enough control over the final clip.
But if you need free methods to fix your iOS issues, you can give the following a try:
Method 2: Reset All Your iPhone Settings
You may have configured several settings that may hinder your device from connecting to PC. To solve this, reset all settings on your iPhone using these steps:
- Unlock your iPhone
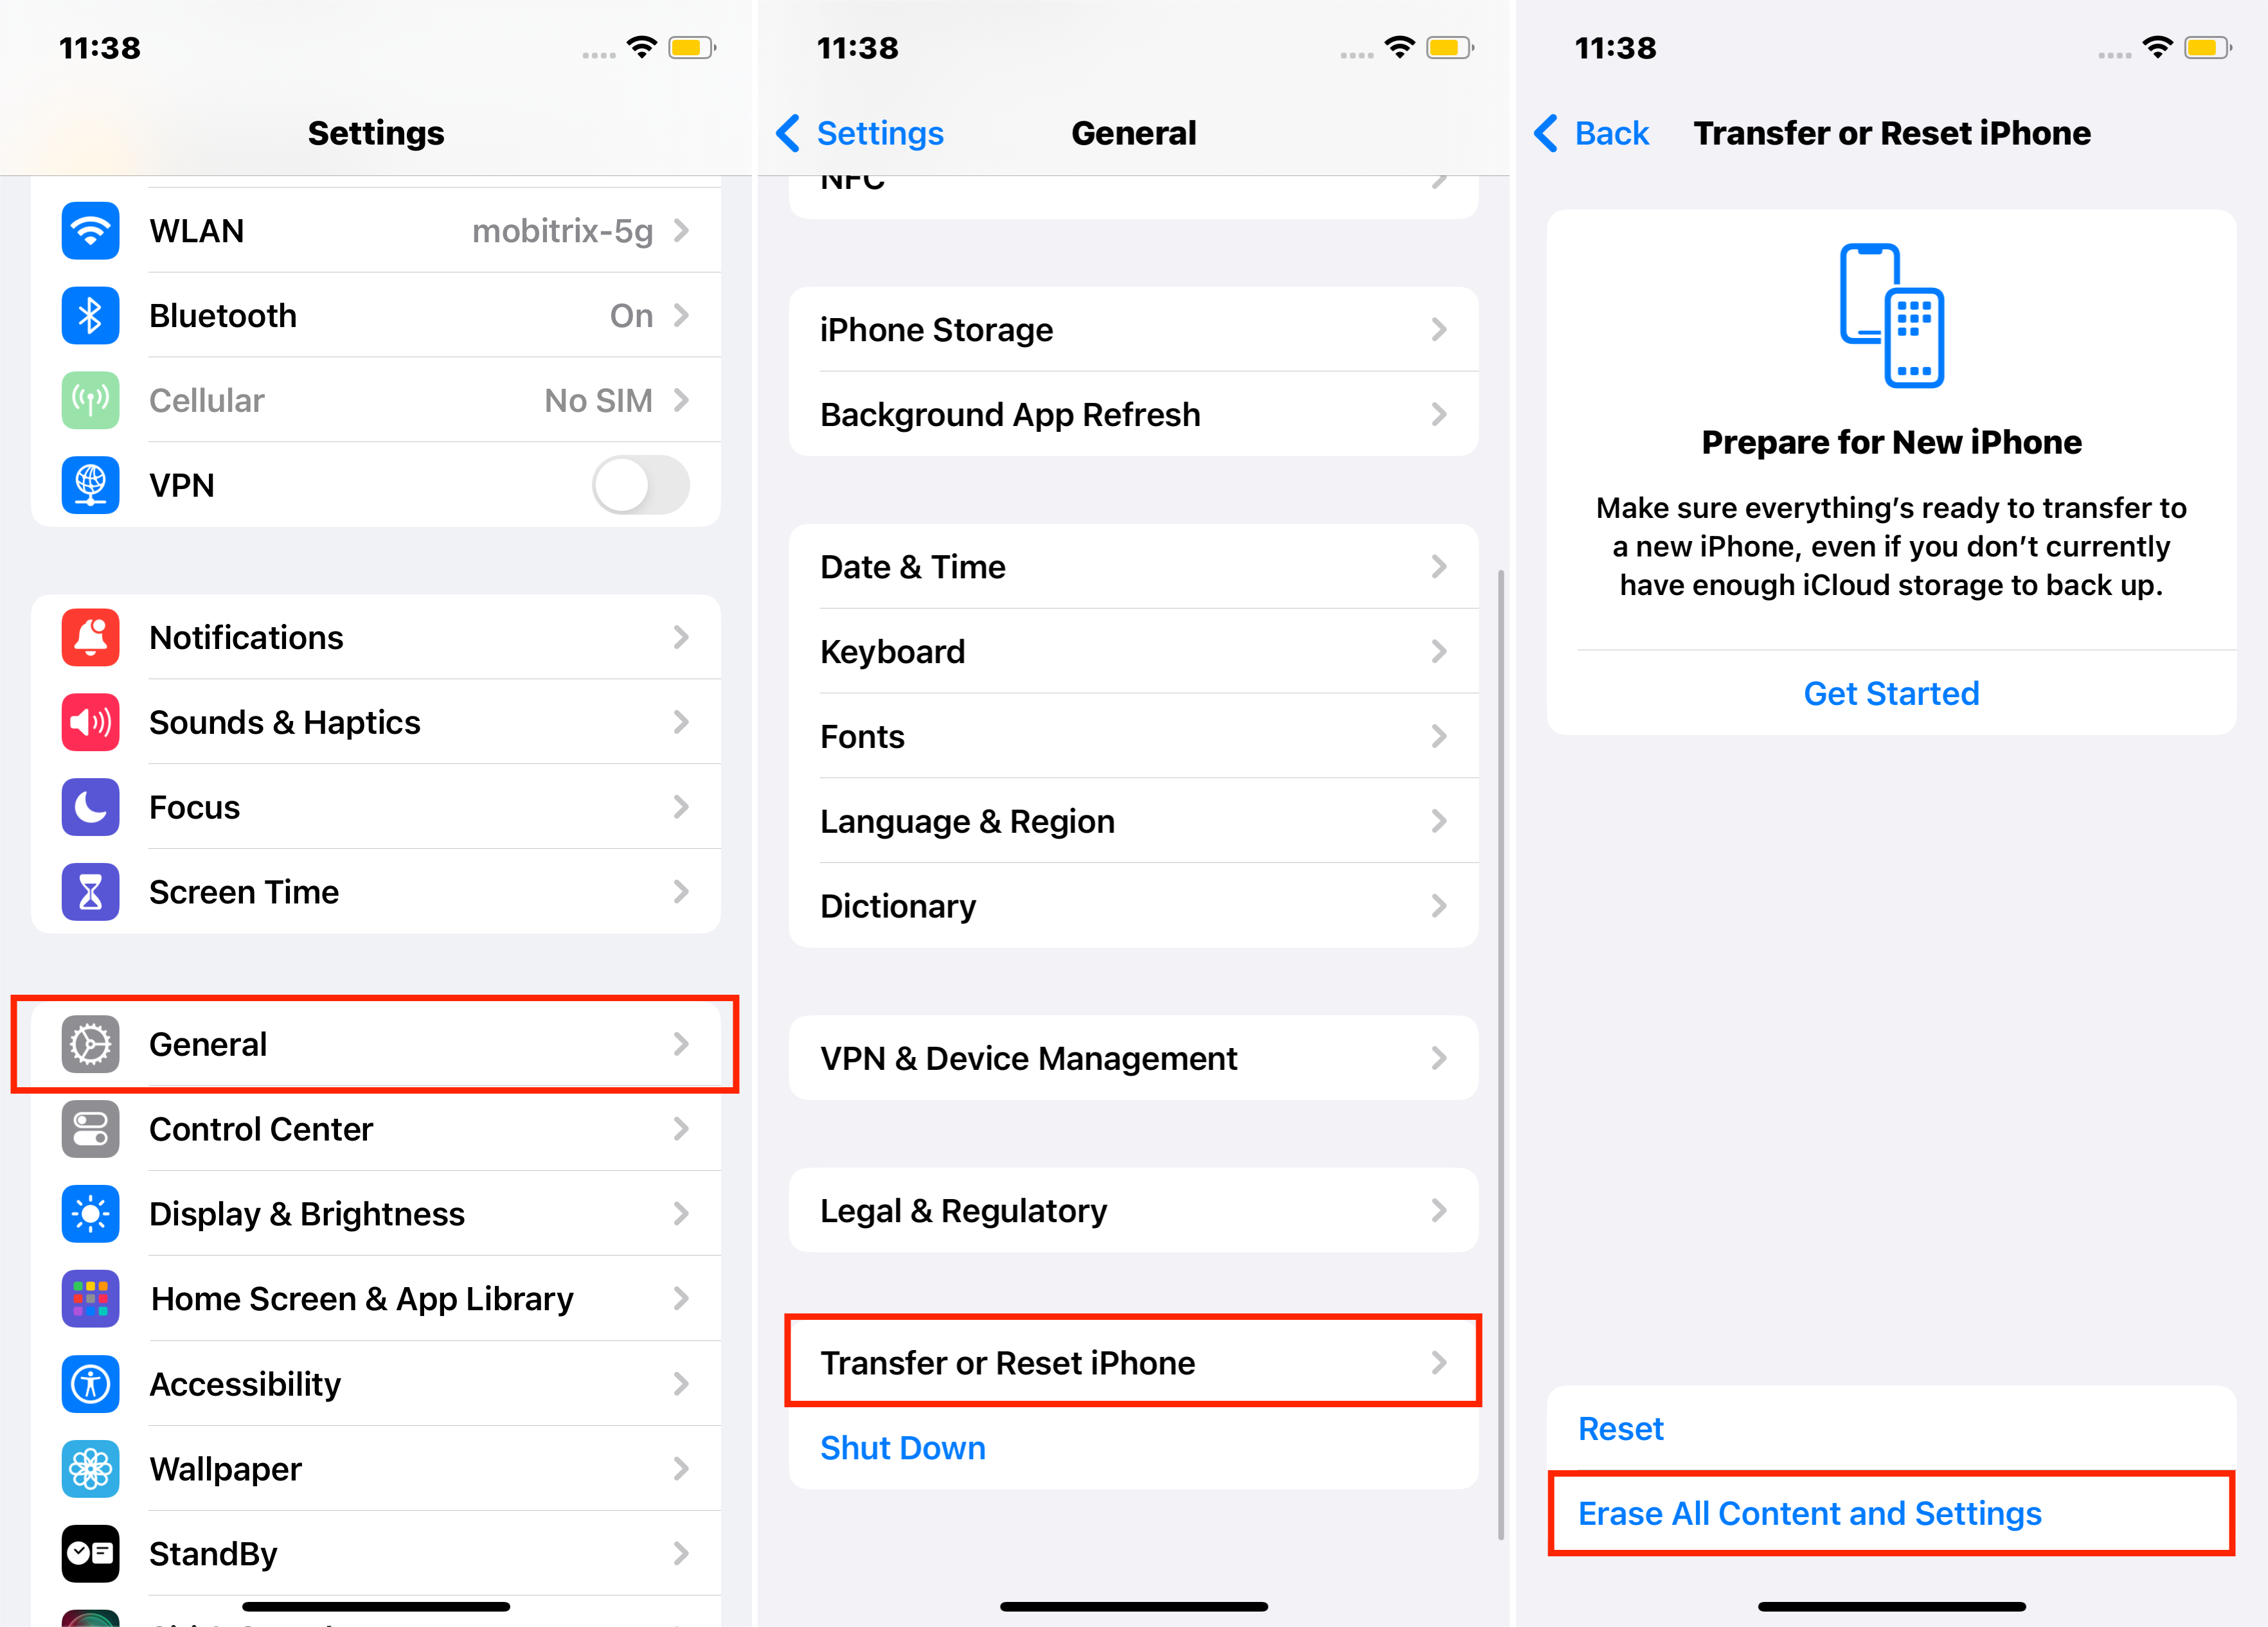
- Go to the Settings menu
- Scroll toScrollScrollScroll to General >ScrollScroll to General > Transferor Reset iPhone > Erase All Content and Settings.
- Wait for the iPhone to reboot, then connect it to your PC so the device has a cleaner chance to reconnect on the next attempt.
- When iTunes shows “ Welcome to Your New iPhone” interface, select Set up a new iPhone or restore your backup, then click continue
- iTunes will start syncing your content.
This will delete all settings you have changed or added. But your data like apps, music, photos, videos, etc., won’t be affected. That can save time when you want the video ready for social posting without moving it into another editor first.
Method 3: Update your iTunes to the Latest Version
If your iTunes is outdated, it can develop issues while connecting the iPhone to iTunes. To fix this, update your iTunes.
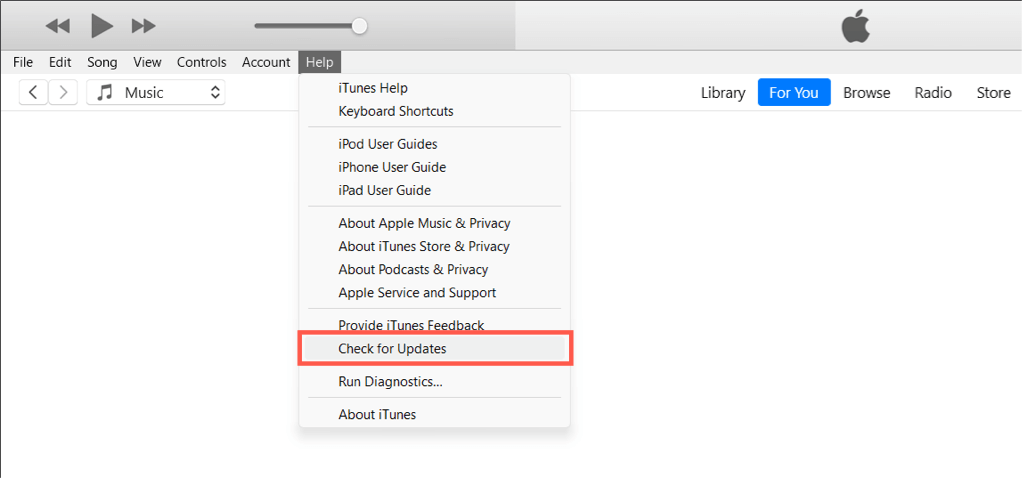
For Windows PC:
- Launch the iTunes
- Click Help
- Click on Check for Updates.
- Download and install the updated version of iTunes.
For Mac users:
- Launch iTunes
- Click on the iTunes menu
- Select Check for Updates
- Wait for it to download and install
After updating your iTunes, check if it recognizes your device. If it doesn’t, check out other methods in this post to fix the issue at hand.
Method 4: Reinstall the Mobile Device USB Driver on Your PC
The USB driver enables your iPhone to communicate with the PC’s OS. If it is lacking or has errors, your PC won’t perform any actions via a USB cable. To fix this error, follow the steps below.
If you downloaded iTunes from Microsoft Store:
- Unplug the USB cable and close iTunes
- Open iPhone’s home screen, then connect it to PC via cable so the device has a cleaner chance to reconnect on the next attempt.
- If iTunes launches, close it.
- Right-click your computer’s start button and choose the Device Manager option.
- Locate your phone on the Portable Devices section
- Right-click on the phone
- Select Update Driver and searchautomatically for updated driver software so the next part of the process is easier to complete without backtracking.
- Confirm if iTunes recognize your device
If you downloaded it from Apple:
- Disconnect, then reconnect your iPhone from your computer.
- If iTunes launches, close it.
- Hit the Windows + R buttons, key in %ProgramFiles%Common FilesAppleMobile Device SupportDrivers, then click OK.
- Right-click the file labeled usbaapl64.inf
- Select Install.
- Unplug your iPhone, then restart the PC
- Reconnect your iPhone to the PC and confirm it recognized your iPhone
If your PC doesn’t recognize your device, try the following troubleshooting method.
Method 5: Check Apple Mobile Device Service
Another possible reason iTunes cannot recognize your iPhone is an error with the Apple Mobile Device Service. You can restart the service on your Windows computer using the following simple steps:
- Disconnect your iPhone from the PC and close iTunes
- Hit the Windows + R at once
- Enter theEnter theservices.msc command, and tap enter so the next part of the process is easier to complete without backtracking.
- Right-click on the Apple Mobile Device Service option and select Properties
- On the General menu, switch the Startup type to Automatic.
- In the Service status, click Stop.
- Once the service has stopped, select Start, then click OK.
- Restart your computer and reconnect your iPhone
- Confirm if the method worked.
FAQs:
How do I unlock an iPhone that won’t connect to iTunes? If
If your iPhone is dead, frozen, and does not connect to iTunes or show anything on the screen, you can repair it in recovery mode. Once in recovery or DFU mode, update or restore your iPhone. But that is time-consuming. Save yourself time and stress by using the Mobitrix Perfix quick-fix tool. This helps when you want to export the clip, send it quickly, and avoid another round of cleanup edits.
How can I connect my iPhone without a USB?
First, connect via a USB cable, then on the iTunes’ summary tab, select “Sync with this iPhone over WiFi.” Once you’ve set WiFi sync on, wherever your PC and iPhone will share the safe WiFi network, they will connect wirelessly. But to update or restore your iPhone you must use a USB cable. That makes it easier to keep a copy of the edited result and post it right away from the same device.
If you were wondering how to connect an iPhone to iTunes, this article would serve you best. Further, you can try all the tricks we’ve provided to fix issues with your iTunes or iOS devices.
However, if you need to save time and effortlessly fix issues with your iTunes and iPhone, consider using the Mobitrix Perfix. Once you’ve installed this solution-packed tool, you will swiftly solve all issues related to your iOS devices. The best thing is that you never lose your data, and your data privacy and security are always guaranteed.
Switch to Mobitrix Perfix and enjoy a peaceful life with your Apple devices.