
iPhone emergency SOS can be useful when you are in an emergency. It helps you reach out to local emergency services in no time, or share your exact location to your emergency contacts, so that you can be rescued without delay. But if your iPhone is accidentally stuck in emergency mode and you don’t know how to get out of this problem, there are several methods you can use! Troubleshooting usually works best when you move from the simplest checks to the more disruptive fixes. If the first method does not work, compare software version, device compatibility, and account status before repeating the same step.
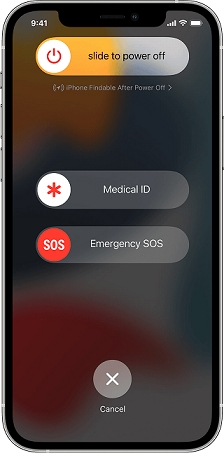
iPhone stuck on emergency SOS mode
What Is iPhone Emergency SOS?
Emergency SOS is a built-in feature in iPhone to help you make an immediate call to emergency services in your area. Users only need to press and hold the side and volume buttons.Without unlocking the iPhone, the call will be dialed out. If one step does not change the behavior, move on instead of repeating it several times. A quick settings check usually saves more time than repeating the same action without changing the surrounding conditions.
For example, in North America, the emergency service is 911. If you’re a resident of Europe or traveling in Europe, it will be 112. The iPhone changes the helpline number by tracking your location with GPS location data so you can call the appropriate number. Through this mode, you can also enable medical ID, where you can put information about your health like your blood type, your height, or weight to get instant help.
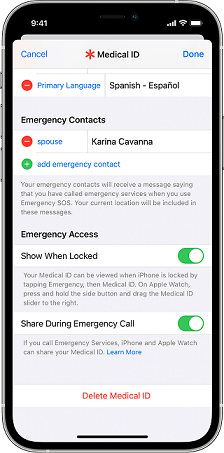
set up medical ID in the iPhone emergenecy settings
The SOS feature also allows you to set up emergency contacts. The advantage of this is that when you finish an emergency call, your iPhone sends out a text message on your behalf to your emergency contacts so they can help you in time if you have a problem. That can save time when you want the video ready for social posting without moving it into another editor first. If the result still looks off, compare a built-in method with one app-based method so you can see which handles your clip more cleanly.
To activate emergency SOS, first go to your iPhone Settings app, then to “General” and finally click “Emergency SOS” and then set things up by enabling “Call with Hold” or “Call with 5 presses”. That gives you another route if the built-in iPhone tools feel too limited for the result you want.
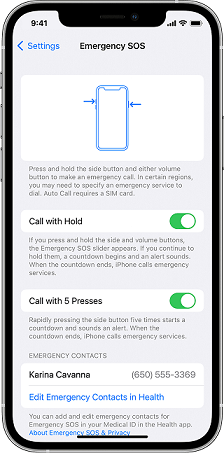
activate emergency sos mode in your iPhone
Why Is My iPhone Stuck on Emergency SOS?
This problem can arise when you accidentally press the wrong key combinations. Besides, your iPhone can get stuck on emergency SOS due to the following reasons:
- Jailbreaking
- Software crashes
- Hardware damage
Through jailbreaking, you bypass the security and protection set by iOS. This can disrupt the basic functionalities of your iPhone, hence your iPhone gets stuck on SOS screen or others.
Software crashes are a major cause of your iPhone being stuck in emergency mode. Maybe you are using an outdated version of iOS, or your apps are conflicting with each other, or you are running a beta iOS 16 version, etc.
You may get stuck in emergency mode when your iPhone is water damaged, or any hardware component, such as the volume buttons, power button, and so on, fails to function properly, or its screen is broken and cannot respond to your screen swipes.
How to Fix iPhone Stuck on Emergency SOS Mode Quickly
Sometimes, when your battery is too low, it fails to respond properly. So the first thing to do is to charge your battery.
Then perform a soft reset. If the problem is still there, then go for a hard reset.
1. Hard Reset Your iPhone
When you perform a hard reset on an iPhone, it forcefully ends all the current software activities running on your iPhone and re-initializes the device’s hardware components. A hard reset refreshes your entire iPhone, including the processor and RAM. How you perform a hard reset depends on the iPhone model you are using.
For iPhone 8 - 13
- Hold and quickly release the Volume Up button.
- Hold and release the Volume Down button quickly.
- Then, hold the power button until you see the Apple logo.
For iPhone 7
Hold down the Power and Volume Down buttons until you see the Apple logo.
iPhone 6 and earlier
Hold down the Home and Power buttons until you see the Apple logo.
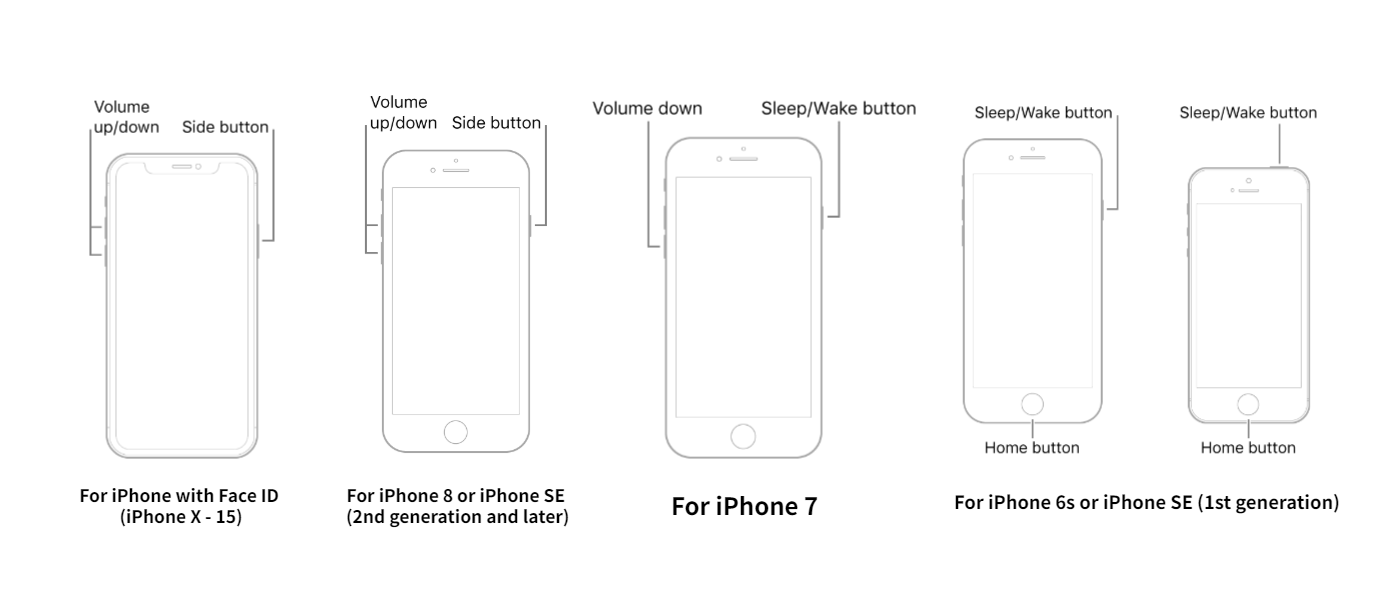
force restart all iPhone models
Note: If your iPhone is too stuck, you may not be able to turn it off. In such cases, there are two ways to solve it. One is to use Mobitrix Perfix as shown below, which only takes 20 minutes. This is a method that has a 99% success rate; another method is to unplug your iPhone from the power source, fully discharge its battery, and then charge it and try force-restarting it again.

2. Fix your iPhone stuck on emergency SOS mode with Mobitrix Perfix
Mobitri Perfix is a professional iPhone repair tool that has long been popular among iPhone users. It can quickly and easily fix your iPhone stuck on emergency SOS. Perfix will be a great option if you want to fix your iPhone with no data loss. And it fully supports iPhone 5s to iPhone 17 and iOS 26 and earlier versions.
Here is how to use it.
- First, download Mobitrix Perfix on your computer and launch it after installation.
- Then, using a USB cord, connect your iPhone to your computer.
- Click Fix Now and then choose Standard Repair.
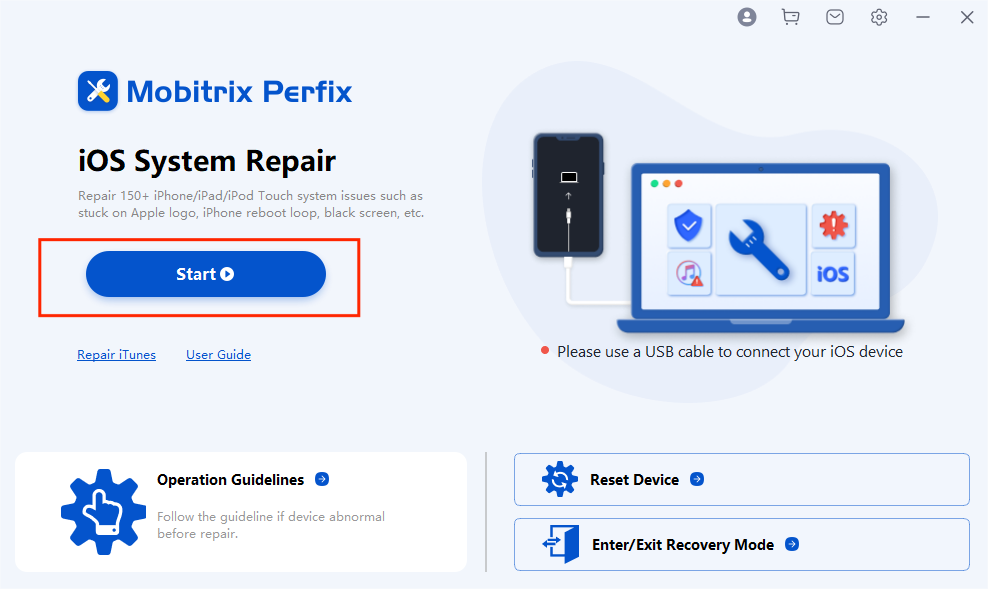
Launch Mobitrix Perfix
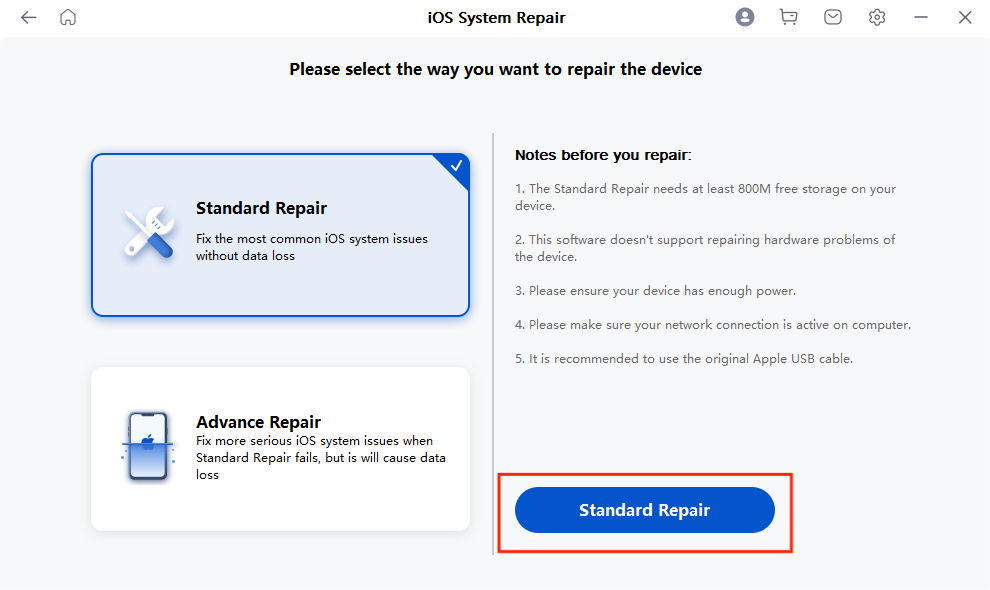
Standard Repair Mode of Mobitrix Perfix
In around 30 minutes, your iPhone will be unfreezed and returned to normal.
3. Factory reset iPhone via iCloud
It also lets you fix this problem by resetting your device via iCloud. iCloud is the same as Google Drive. It is an external hard drive for Apple users to create a backup of their iPhone data. The backed up data is stored on Apple servers and can be accessed from anywhere in the world via the Internet. Running the job while the device is charging and on stable Wi-Fi often prevents having to restart the same backup later.
But if you want to reset your iPhone through this method, you must have an Apple ID along with your password and Find My iPhone enabled on your iPhone.
This method will erase all your data. If you have already created a backup, here is how to erase your iPhone via iCloud.
- First, open the site iCloud.com and click “Find My iPhone.”
- Now a pop-up window will appear. click “All Devices”.
- Find your device and select your iPhone.
- Now there will be three options: Lost Mode, Erase iPhone, and Play Sound.
- click “Erase iPhone” to factory reset it.
- Now you can restore your iPhone from an iCloud backup or you can set it up as a new device.
4. Update/restore your iPhone with iTunes/Finder
The iTunes app is used to organize and manage all media files on your Apple devices. Through this, you can download and stream media, including the iCloud music library, iTunes Match, Apple Music, and podcasts. It also helps in troubleshooting your iOS device’s problems. It is helpful when you want to polish the clip a bit more before you export and share it elsewhere. If the process stalls, storage space, Wi-Fi stability, and available battery are usually the first three checks worth repeating.
But before jumping into it, let me remind you that Apple is going to put an end to iTunes. It was announced at Apple’s Worldwide Developers Conference that iTunes would no longer be available on macOS Catalina. So, if you’re running macOS Catalina or later, you should reinstall your iPhone’s OS via Finder.
- Update your iPhone with iTunes
- Install the latest version of iTunes on your computer.
- Connect your iOS device to your computer.
- Run the iTunes program on your computer now.
- To access the management interface, click the device icon once iTunes has detected your device.
- After that, go to the Summary tab.
- To check for updates, go to the Check for Updates tab.
- If any updates are available, click the “Download and Update” button to download and install them.
- Wait until the entire updating procedure is completed so the next part of the process is easier to complete without backtracking. That matters when you only want one part of the video to play back slower while the rest keeps its normal speed. Testing the change on a short clip first is a quick way to avoid re-editing a longer video from the start.
- Restore your iPhone with iTunes
- First, connect your device to your computer.
- Click the Device button on the top left of the iTunes window in the iTunes software on your PC.
- Now click Summary, then on Restore, and follow the onscreen instructions.
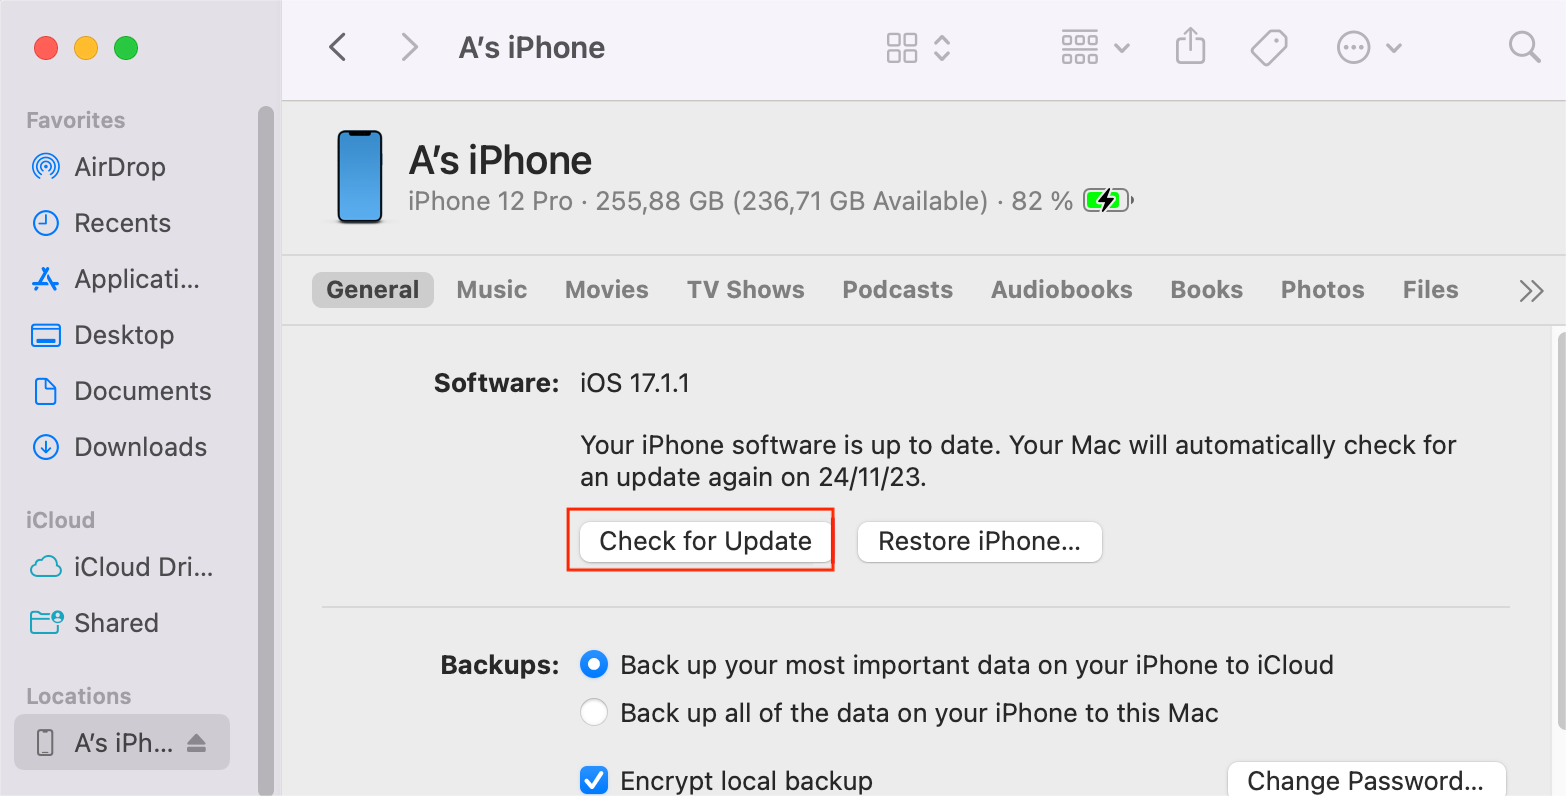
Update or restore iPhone with iTunes
If you are facing any problem, for instance, your computer can’t recognize your device, you can then restore your iPhone with iTunes by putting it into recovery mode.
5. Fix your iPhone with iTunes with recovery mode
Recovery Mode is a special mode designed to help troubleshoot deep system issues of iOS devices. mode. If you are using Mac with macOS Catalina or a newer version, you should use Finder. Otherwise, use iTunes.
Here is the step-by-step procedure.
- First, check if your Mac is up-to-date. Especially if you're using iTunes, make sure you're using the most recent version
- Open Finder on a Mac running macOS Catalina so the next part of the process is easier to complete without backtracking. Then open iTunes on a Mac running macOS Mojave or earlier, or on a PC. It gives you finer control when only one moment should stay slow and the rest of the recording should play normally.
- Close iTunes if it's already open, then open it again so the next part of the process is easier to complete without backtracking. This is useful when the speed change should affect only one section instead of forcing the whole clip to slow down.
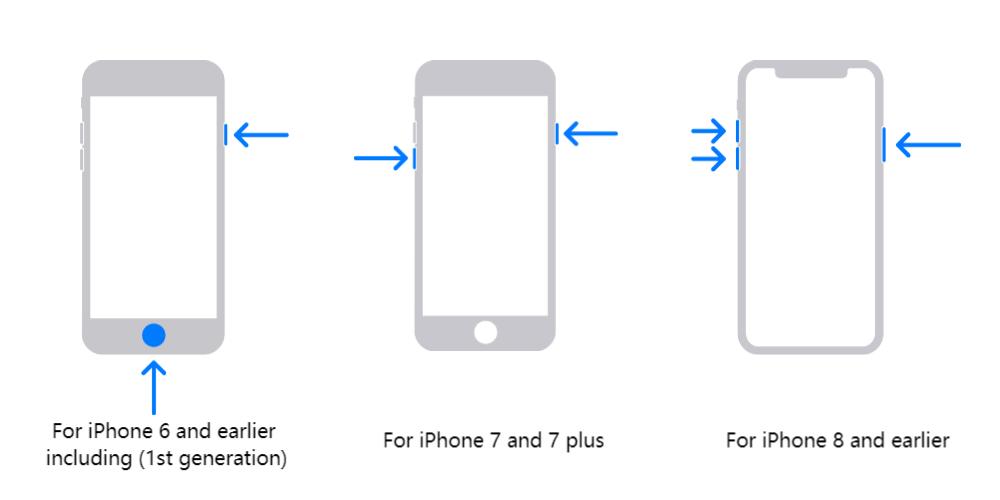
- Continue to connect your device and have it enter the recovery mode.
- For iPhone 8 and earlier
First, the volume up button should be pressed and rapidly released. The volume down button should be pressed and swiftly released. Then, hold down the side button until the recovery mode screen appears.
- For iPhone 7 and 7 plus
At the same moment, press and hold the top (or side) and volume down buttons. Hold them in place until the recovery mode screen appears.
- For iPhone 6 and earlier including (1st generation)
At the same moment, press and hold the Home and top (or side) buttons. Hold them in place until the recovery mode screen appears.

different iPhone models enter recovery mode
- Locate your iPhone device on your computer.
- When the option to Restore or Update appears, select Update. Your computer is attempting to reinstall the software without wiping your data.
- Allow time for your computer to download the appropriate update packages for your device. Now allow the download to finish. If it takes more than 15 minutes and your device exits the recovery mode screen, repeat step 4.
- Set up your device after the Update or Restore is finished.
6. Fix your iPhone with iTunes with DFU mode
The deepest type of restore you can perform on an iOS device is a “DFU restore”. DFU stands for Device Firmware Update. When you restore your iPhone via the DFU mode, your computer erases and reboots all of the code that controls the hardware and software.
Here are the step-by-step instructions:
You can enter DFU mode by connecting your iPhone to your computer. It makes no difference whether your iPhone is turned on or off.
For iPhone 8 and later models
- To begin with, press the volume up button. Then, press the volume down button. Keep pressing the side button until the screen becomes black.
- Hold the volume and side buttons down for another 5 seconds.
- Hold the volume down button for around 10 seconds while releasing the side button.
For iPhone 7 and 7 plus
- To begin, simultaneously press and hold the volume down and side buttons.
- Wait until the screen goes black.
- For around 10 seconds, keep holding the volume down button.
For iPhone 6 and earlier models
First, hold down the side and home buttons at the same time until a black screen appears, then remember to press and hold the home button for roughly ten seconds.
After the steps above, click Restore in the iTunes windows on your PC.
Note:If you’ve entered DFU mode successfully, the iPhone screen will be completely black. If it doesn’t work, start over and restore your iPhone with iTunes.
Extra Tips for Emergency SOS Mode on iPhone
If none of the above methods are working and your iPhone is not recovering in any way, then you should contact Apple Support to initiate a repair. A quick check of the device model, software version, and account state usually explains why the same menu looks different on another device.
Use Apple support app
If your other iOS device is working or your friend is also an iPhone user, you can use the Apple support app. Log in with your Apple ID. You’ll see a support portal for each device associated with your Apple ID.

Apple support app
Go to Apple Store
If your Mac, iPhone, iPad, or Apple Watch has a complicated hardware or software problem, you may need to take it to an Apple Store for diagnostics and possible repairs. If a step looks different on your device, the app version is usually the first thing to compare before assuming the feature is missing. If the watch still will not open normally, check whether Activation Lock or the paired iPhone is part of the remaining setup path. When a reset works but setup still fails, the next check is usually the Apple ID tied to the watch.
FAQ
How to disable the automatic Emergency SOS?
To disable emergency SOS on the iPhone
- First, navigate to the settings menu.
- Then navigate to emergency SOS
- Now toggle off the call with the side button and auto call.
This article provides different solutions to fix your iPhone when it’s stuck on emergency SOS. iTunes is effective but not easy. Not everyone has the time and tech knowledge to proceed with it. By comparison, Mobitrix Perfix is the safest method if you want to fix your iPhone in a few clicks and in 30 minutes.