
Are you listening to audio on your AirPods and wondering, 'Why is my left or right AirPod louder?' Unfortunately, it can be hard to tell whether the cause is the earbuds, your device, or even the track you are playing.
You can still solve it by trying the right checks in order. In this article, I will introduce four faults that cause this problem and 15 ways to fix them, so you can narrow down the issue step by step.
1. Reset the AirPods
This is the easiest and ideal first step when you experience this problem. Resetting the AirPods lets them run afresh and have a new start. This is often enough to resolve the issue of one AirPod being louder.
Steps:
- Put your AirPods inside the charging case, close it, and wait 30 seconds before opening it.
- Wear your AirPods and connect them to your iPhone, iPad, or iPod Touch.
- Go to Settings > Bluetooth or Settings > [your AirPods], and tap on the circled “i” button next to your AirPods.
- Press Forget This Device, then tap it again to confirm.
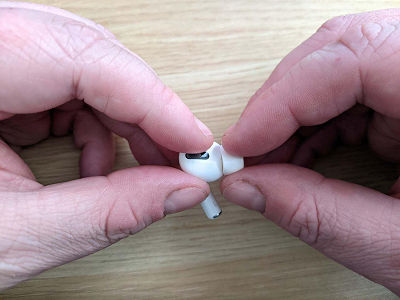
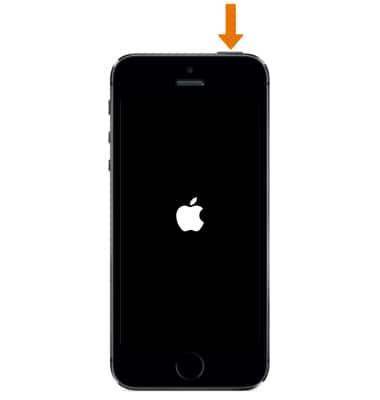
- Open the AirPods charging case's lid, then press and hold the setup button at the back for about 15 seconds. Wait until the status light changes from flashing amber to white.
- Reconnect your AirPods and check to see if the issue is gone.
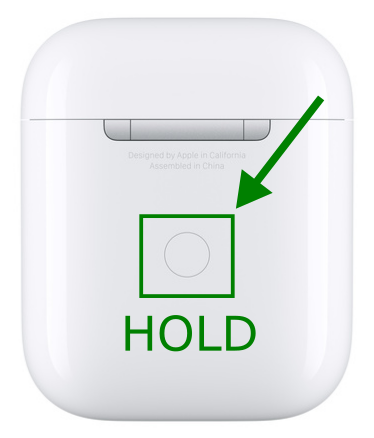
Hold the Setup Button to Reset Your AirPods
2. Update Your AirPods' Firmware
Apple regularly releases firmware updates for AirPods. These updates often include fixes for bugs and other software errors that can cause one AirPod to be quieter. There is still no manual update button, but Apple says firmware updates are delivered automatically while your AirPods are charging and within Bluetooth range of an iPhone, iPad, or Mac connected to Wi-Fi.
To give the update the best chance to install, put your AirPods in the charging case, keep them near your Apple device, and leave them alone for about 30 minutes before testing again.
Steps to update the Airpods
- You can go to Settings > Bluetooth > AirPods after confirming your device is online.
- Tap the circled “i” icon, then scroll to About to check the firmware version and see if your AirPods are up to date.

Update Your AirPods’ Firmware
3. Try Your AirPods With Another Device
The issue may also come from your device or the audio file and not necessarily your AirPods. So, before trying more repairs, check whether your AirPods are actually at fault.
To do this, simply connect them to a different device and play a familiar video, voice memo, or song.
If they work correctly on the second device, keep troubleshooting your original device or media file. If the imbalance stays the same, continue trying to fix the AirPods.
Connect Your AirPods to a Different Device
4. Check Issues With Your Audio File
It is easy to overlook the possibility that the audio file you are playing has an uneven sound profile. This can make one AirPod sound quieter even when nothing is wrong with the earbuds. Most audio tracks use left and right channels, but that does not always mean both sides will sound identical.
Music producers can also use software to make instruments or vocals louder on one speaker than the other. This is called audio panning. To check whether your audio sounds panned or unstable, switch your AirPods to mono mode.
Steps
- Open Settings > Accessibility.
- Go to Hearing and tap Audio/Visual.
- Tap the button next to Mono Audio to toggle it on. Turning on mono audio sends the same mixed signal to both speakers, which helps you tell whether the problem is the recording or the AirPods.
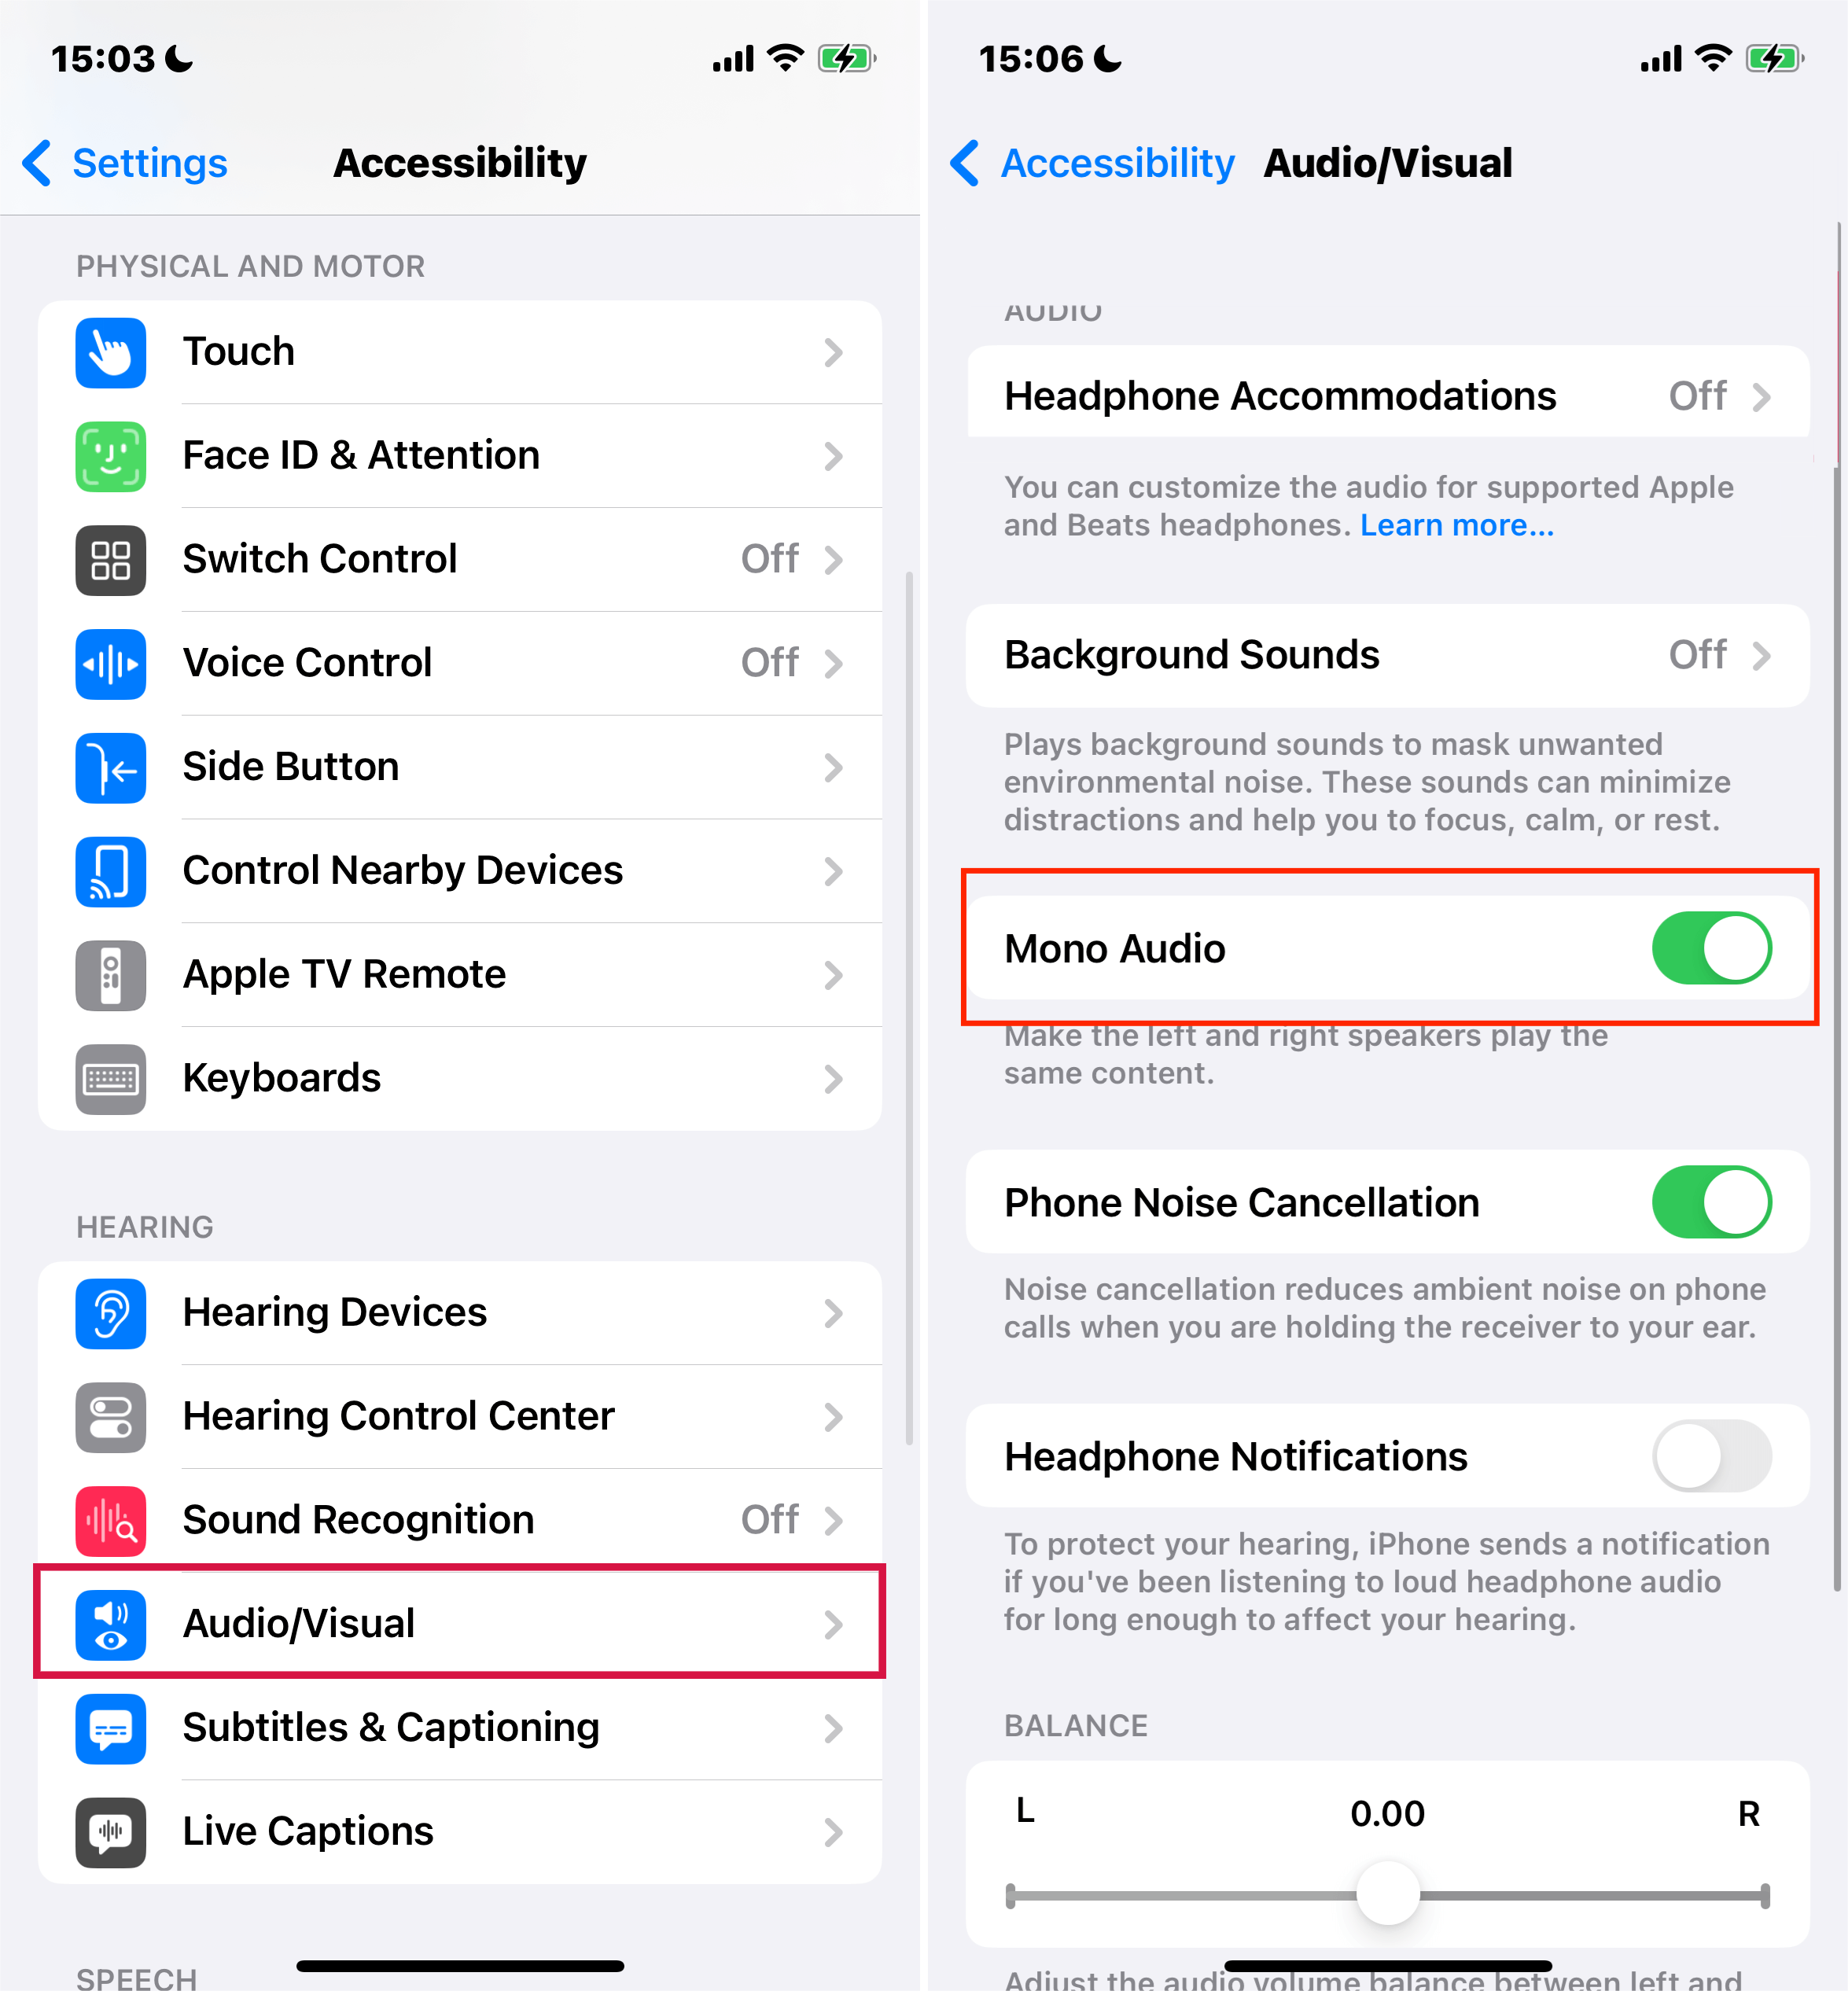
Enable Mono Audio.
If the audio becomes even in both speakers after you enable mono audio, then the audio file is likely causing the issue. But if the sound is still uneven, continue trying the other methods in this guide.
5. Check Audio Source Setting
Another possible cause is an error originating from the audio source. Your iPhone, iPad, computer, or another audio source may have a bug affecting the sound output. Alternatively, an EQ, audio enhancement, or accessibility setting on your device may be set incorrectly.
To see if this is the cause, try connecting another pair of AirPods or wireless headphones to your audio source. If the uneven sound persists on the new AirPods or headphones, the audio source is likely the origin of your predicament.
Connect A Different set of AirPods to Your Audio Source
6. Adjust the Sound Balance
You can tweak the sound balance on your iPhone or iPad and shift sound toward the right or left AirPod. There is a chance you changed this unknowingly, which would make one of your AirPods sound louder. Fortunately, this is easy to fix.
Steps:
- Open Settings > Accessibility > Audio/Visual.
- Adjust the slider under Balance to equally redistribute the sound. Set it exactly in the middle to equalize the volume between the two AirPods.
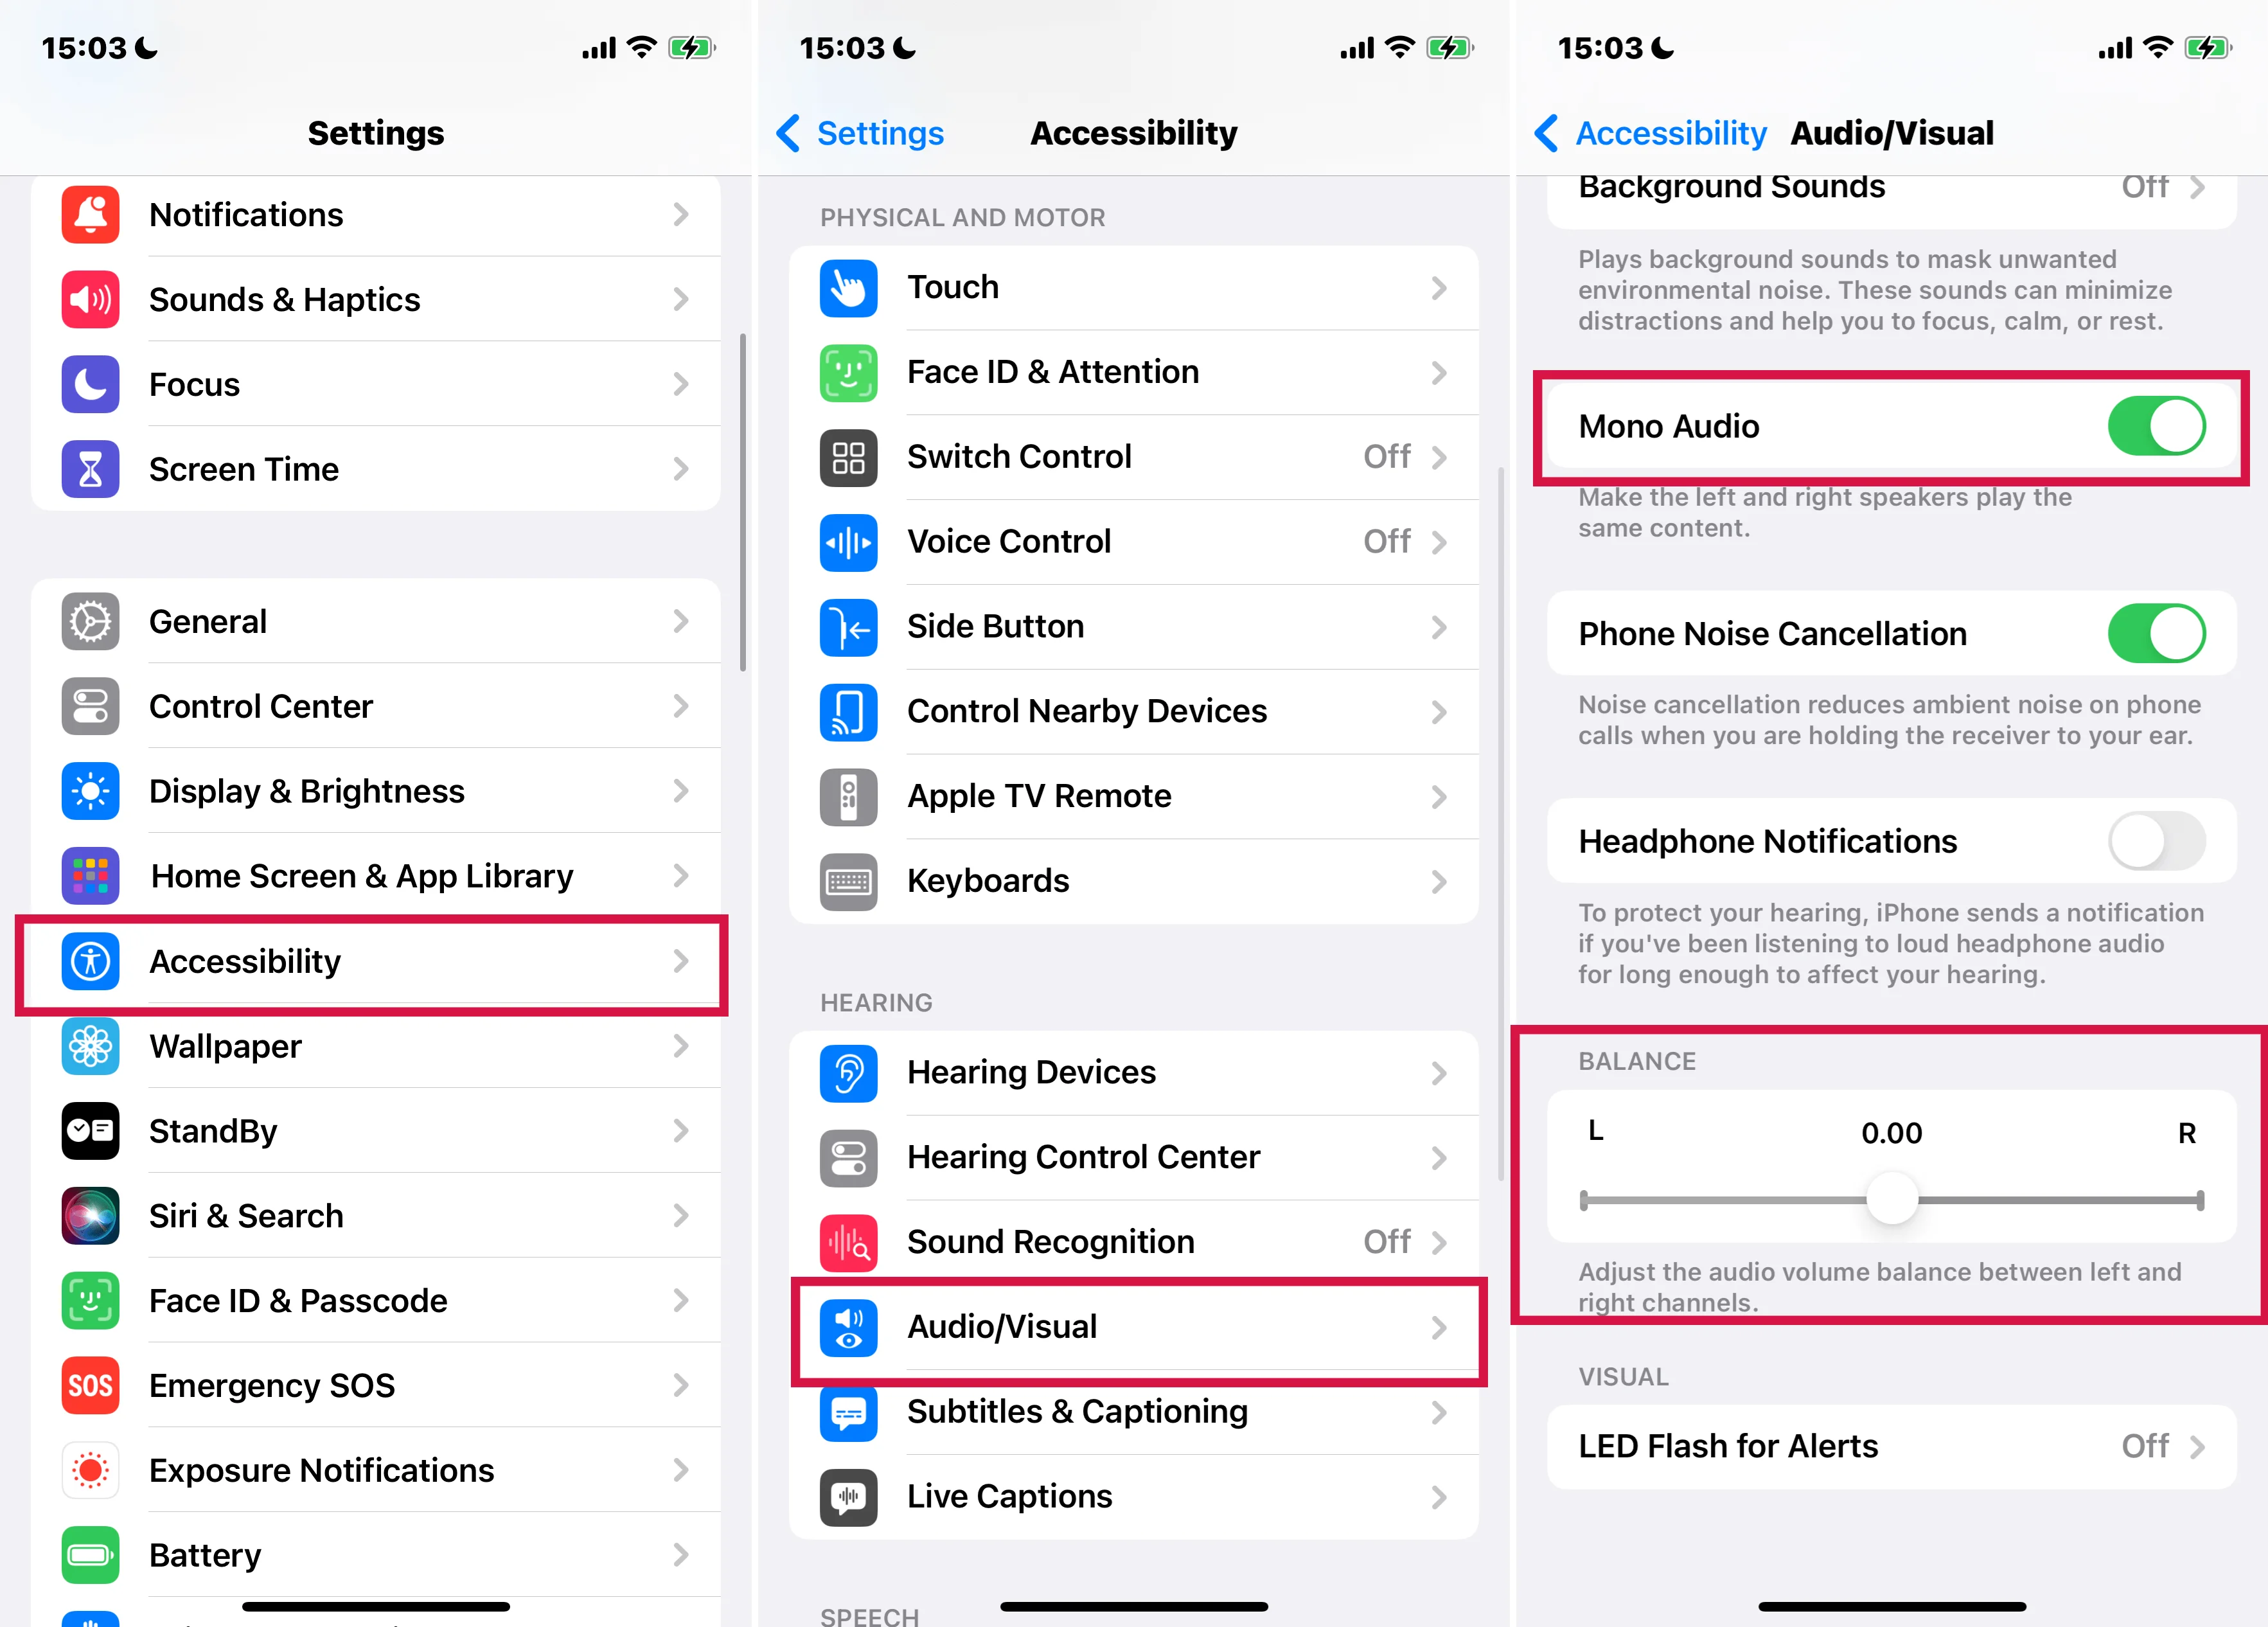
Equalize the Sound Balance
7. Calibrate the AirPods' Volume
AirPods can also sound uneven because they are out of sync with the audio source device. This prevents them from using full volume control correctly. You need to recalibrate the AirPods with your iOS device to fix this.
Steps:
- Connect your AirPods to your iPhone/iPad and start playing music.
- Press the Volume Down button and reduce the volume till it's mute.
- Open the Control Panel and tap the Bluetooth icon to disable Bluetooth and disconnect your AirPods.
- Exit the Control Center and resume playing your music from the device speaker.
- Press the Volume Down button again and reduce the volume till you mute the music.
- Launch the Control Panel and tap the Bluetooth icon to enable Bluetooth.
- Tap the Bluetooth symbol again and hold it until your device displays a list of nearby Bluetooth devices. Select your AirPods to reconnect them.
- Recalibration is done, and your AirPods can now use full audio and volume controls again. Press play and listen to see if this resolves the issue.
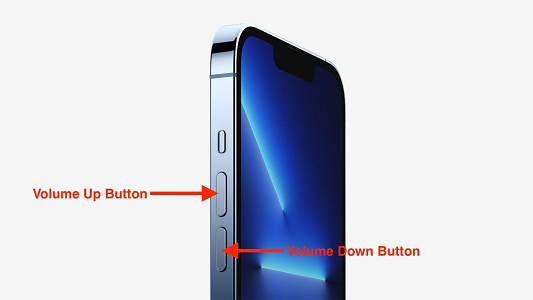
Recalibrate Your AirPods
8. Clean Your AirPods
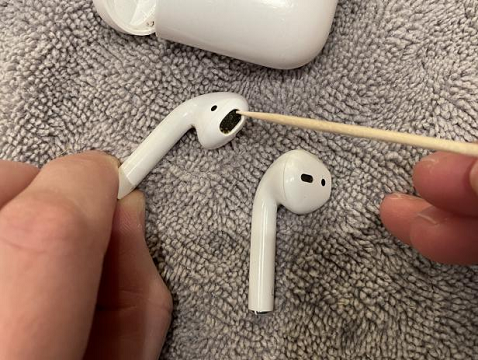
Cleaning your AirPods helps remove dirt and other foreign bodies that could be clogging the speaker mesh and affecting the audio output. After cleaning them, your AirPods may sound even again, and regular cleaning is also more hygienic.
Steps to Clean the dirt
You will need a soft toothbrush, cotton swabs/q-tips, and a soft, dry, lint-free cloth. If the outer surface is still dirty, lightly dampen the cloth instead of getting liquid into the openings.
- Gently apply the alcohol solution to the lint-free cloth and a cotton swab/q-tip. Use the swab to lightly loosen any debris and dirt on the sides of the AirPod and the speaker grill.
- Gently lift any dirt on the outer edges of your AirPods, but avoid pressing into the speaker mesh.
- Use the toothbrush to gently brush over the AirPods' speaker mesh and other tiny crevices to loosen smaller, finer debris.
- Use the lint-free cloth to wipe away any dirt left, then let the AirPods dry fully before using them again.
Clean Out Your AirPods With a Toothpick
Suck out the wax
Unfortunately, cleaning your AirPods doesn't entirely remove the wax stuck inside. Cleaning out this wax is not easy, but there's a hack around it. It entails using your mouth to suck out the wax.
To do this:
- Place a clean cloth over the AirPods speaker grill, then suck it into your AirPod through the fabric.
- Pause periodically to wipe the AirPod each time you suck. Do this until you feel the airflow through your AirPods. This indicates that the inside of the mesh is clear.

9. Your Ear Tips May Not Fit You If You Use AirPods Pro
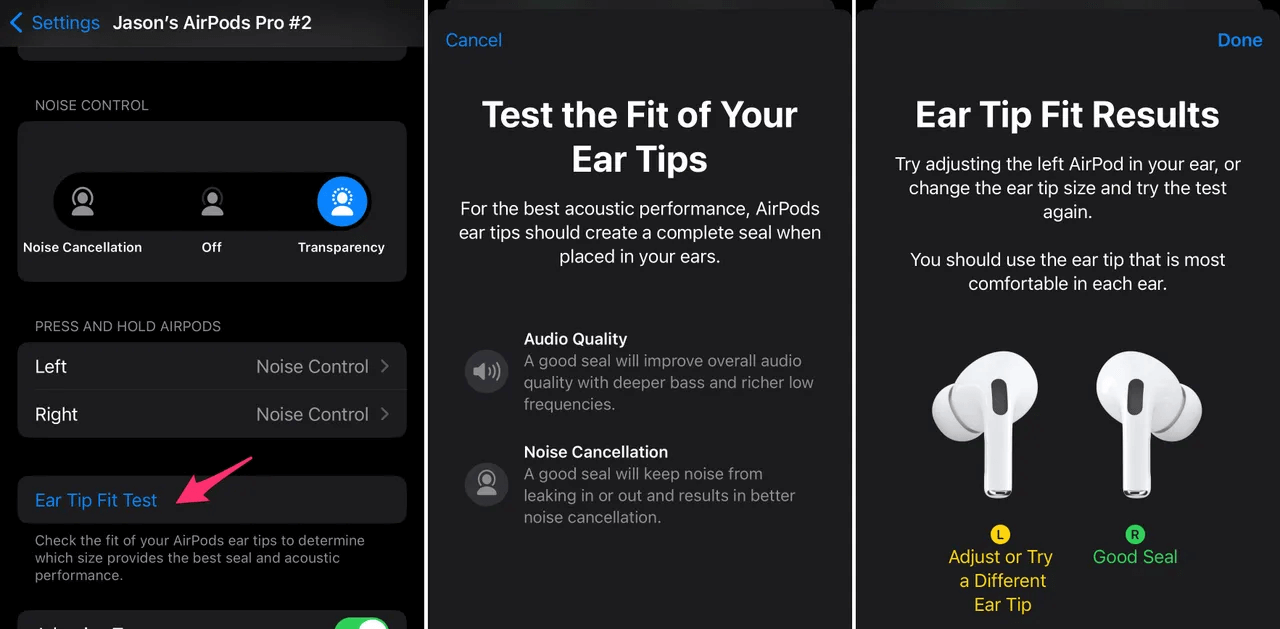
If you are an AirPods Pro user, you can use the Ear Tip Fit Test if you experience one quieter AirPod. This test helps you check the seal, which directly affects volume, bass, and noise control, and it is easy to run.
Steps:
- Wear your AirPods Pro, connect to your iPhone/iPad, and then go to Settings > Bluetooth.
- Check the list of devices, identify your AirPods, and tap the button next to them.
- Press Ear Tip Fit Test. If you cannot see this test, look for Test Acoustic Seal, which is the name Apple uses in some newer menus.
- Tap Continue, then press the play button.
Ear Tip Fit Test
If the test suggests you adjust or try a different ear tip, adjust your AirPods and try again, then try a different size. You may need a different size for each ear, so do not assume both sides should match.
How to Remove and Attach Ear Tips
- To remove the ear tip, use your fingers to pull firmly at the base of the ear tip. It's where the ear-tip's attachment to the AirPod is.
- To attach the ear tip, align the tip with AirPods' oval-shaped connector. Put your fingers at the base of the ear tip and push the ear tip into the connector until it clicks.
Remove an AirPod Ear Tip
10. Repair Hardware
Some hardware problems can be hard to identify and fix by yourself. For example, if a hardware component inside your AirPods is broken or dysfunctional, you likely won't be able to know or repair it.
Such problems require professional technical testing to identify the root of the problem. Hence you need to go offline and head to a repair shop or seek Apple Support.
11. Restart the Audio Source
Whether your music is playing from a mobile device, on Mac, a PC, or a different audio source, rebooting the audio source can resolve the issue. By restarting and running afresh, the music source can eliminate simple bugs that could be the problem.
However, the steps you take to reboot your music player are dependent on which device it is. In some cases, just disconnect the device from the power source and plug it back in again.
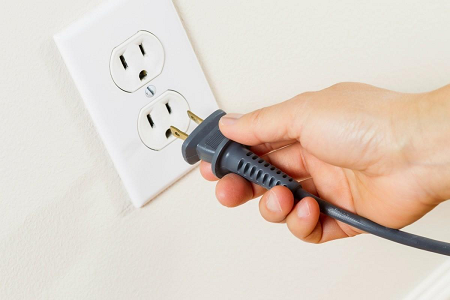
Reboot Your Audio Source
12. Restart Your iPhone
Restarting your iPhone is a classic solution if you have trouble using it or connected devices. This easy solution can be the key to your predicament. How you restart your iPhone depends on the model.
Steps For iPhone X and iPhone 11, 12, 13, 14, or 15:
- Press and hold one volume button and the power button together until you see the power-off slider.
- Pull the slider to switch off your iPhone, then wait 30 seconds to ensure it shuts down entirely.
- To restart your iPhone, press the side button and hold it until you see the Apple logo.
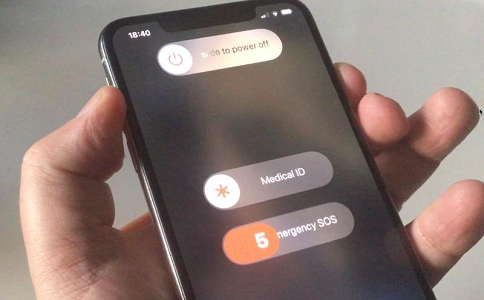
Restart iPhone X and Later
For iPhone 6, 7, 8, or iPhone SE(2nd and 3rd gen):
- Press the side button and hold it until you see the power-off slider.
- Pull the slider to switch off your iPhone, then wait 30 seconds to ensure it shuts down entirely.
- To restart your iPhone, press the side button and hold it until you see the Apple logo.
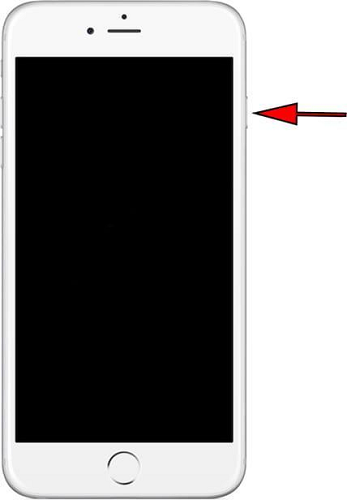
Restart iPhone 6, 7, 8, or iPhone SE(2nd and 3rd gen)
For iPhone SE(1st gen) and iPhone 5 or earlier:
- Press the top button and hold it until you see the power-off slider.
- Pull the slider to switch off your iPhone, then wait 30 seconds to ensure it shuts down entirely.
- To restart your iPhone, press the top button and hold it until you see the Apple logo.
Reboot iPhone 5 and Older Models
However, if your iPhone's power button is broken, you may be unable to use the method above. Fortunately, you can shut down your iOS device via settings.
Steps via Settings:
- Go to Settings > General.
- Scroll to the bottom and hit Shut Down.
- Push the red power icon to the right of the slider to turn off your iPhone.
- To restart, connect the iPhone to a charger. It will power on automatically.

Reboot Your iPhone via Settings
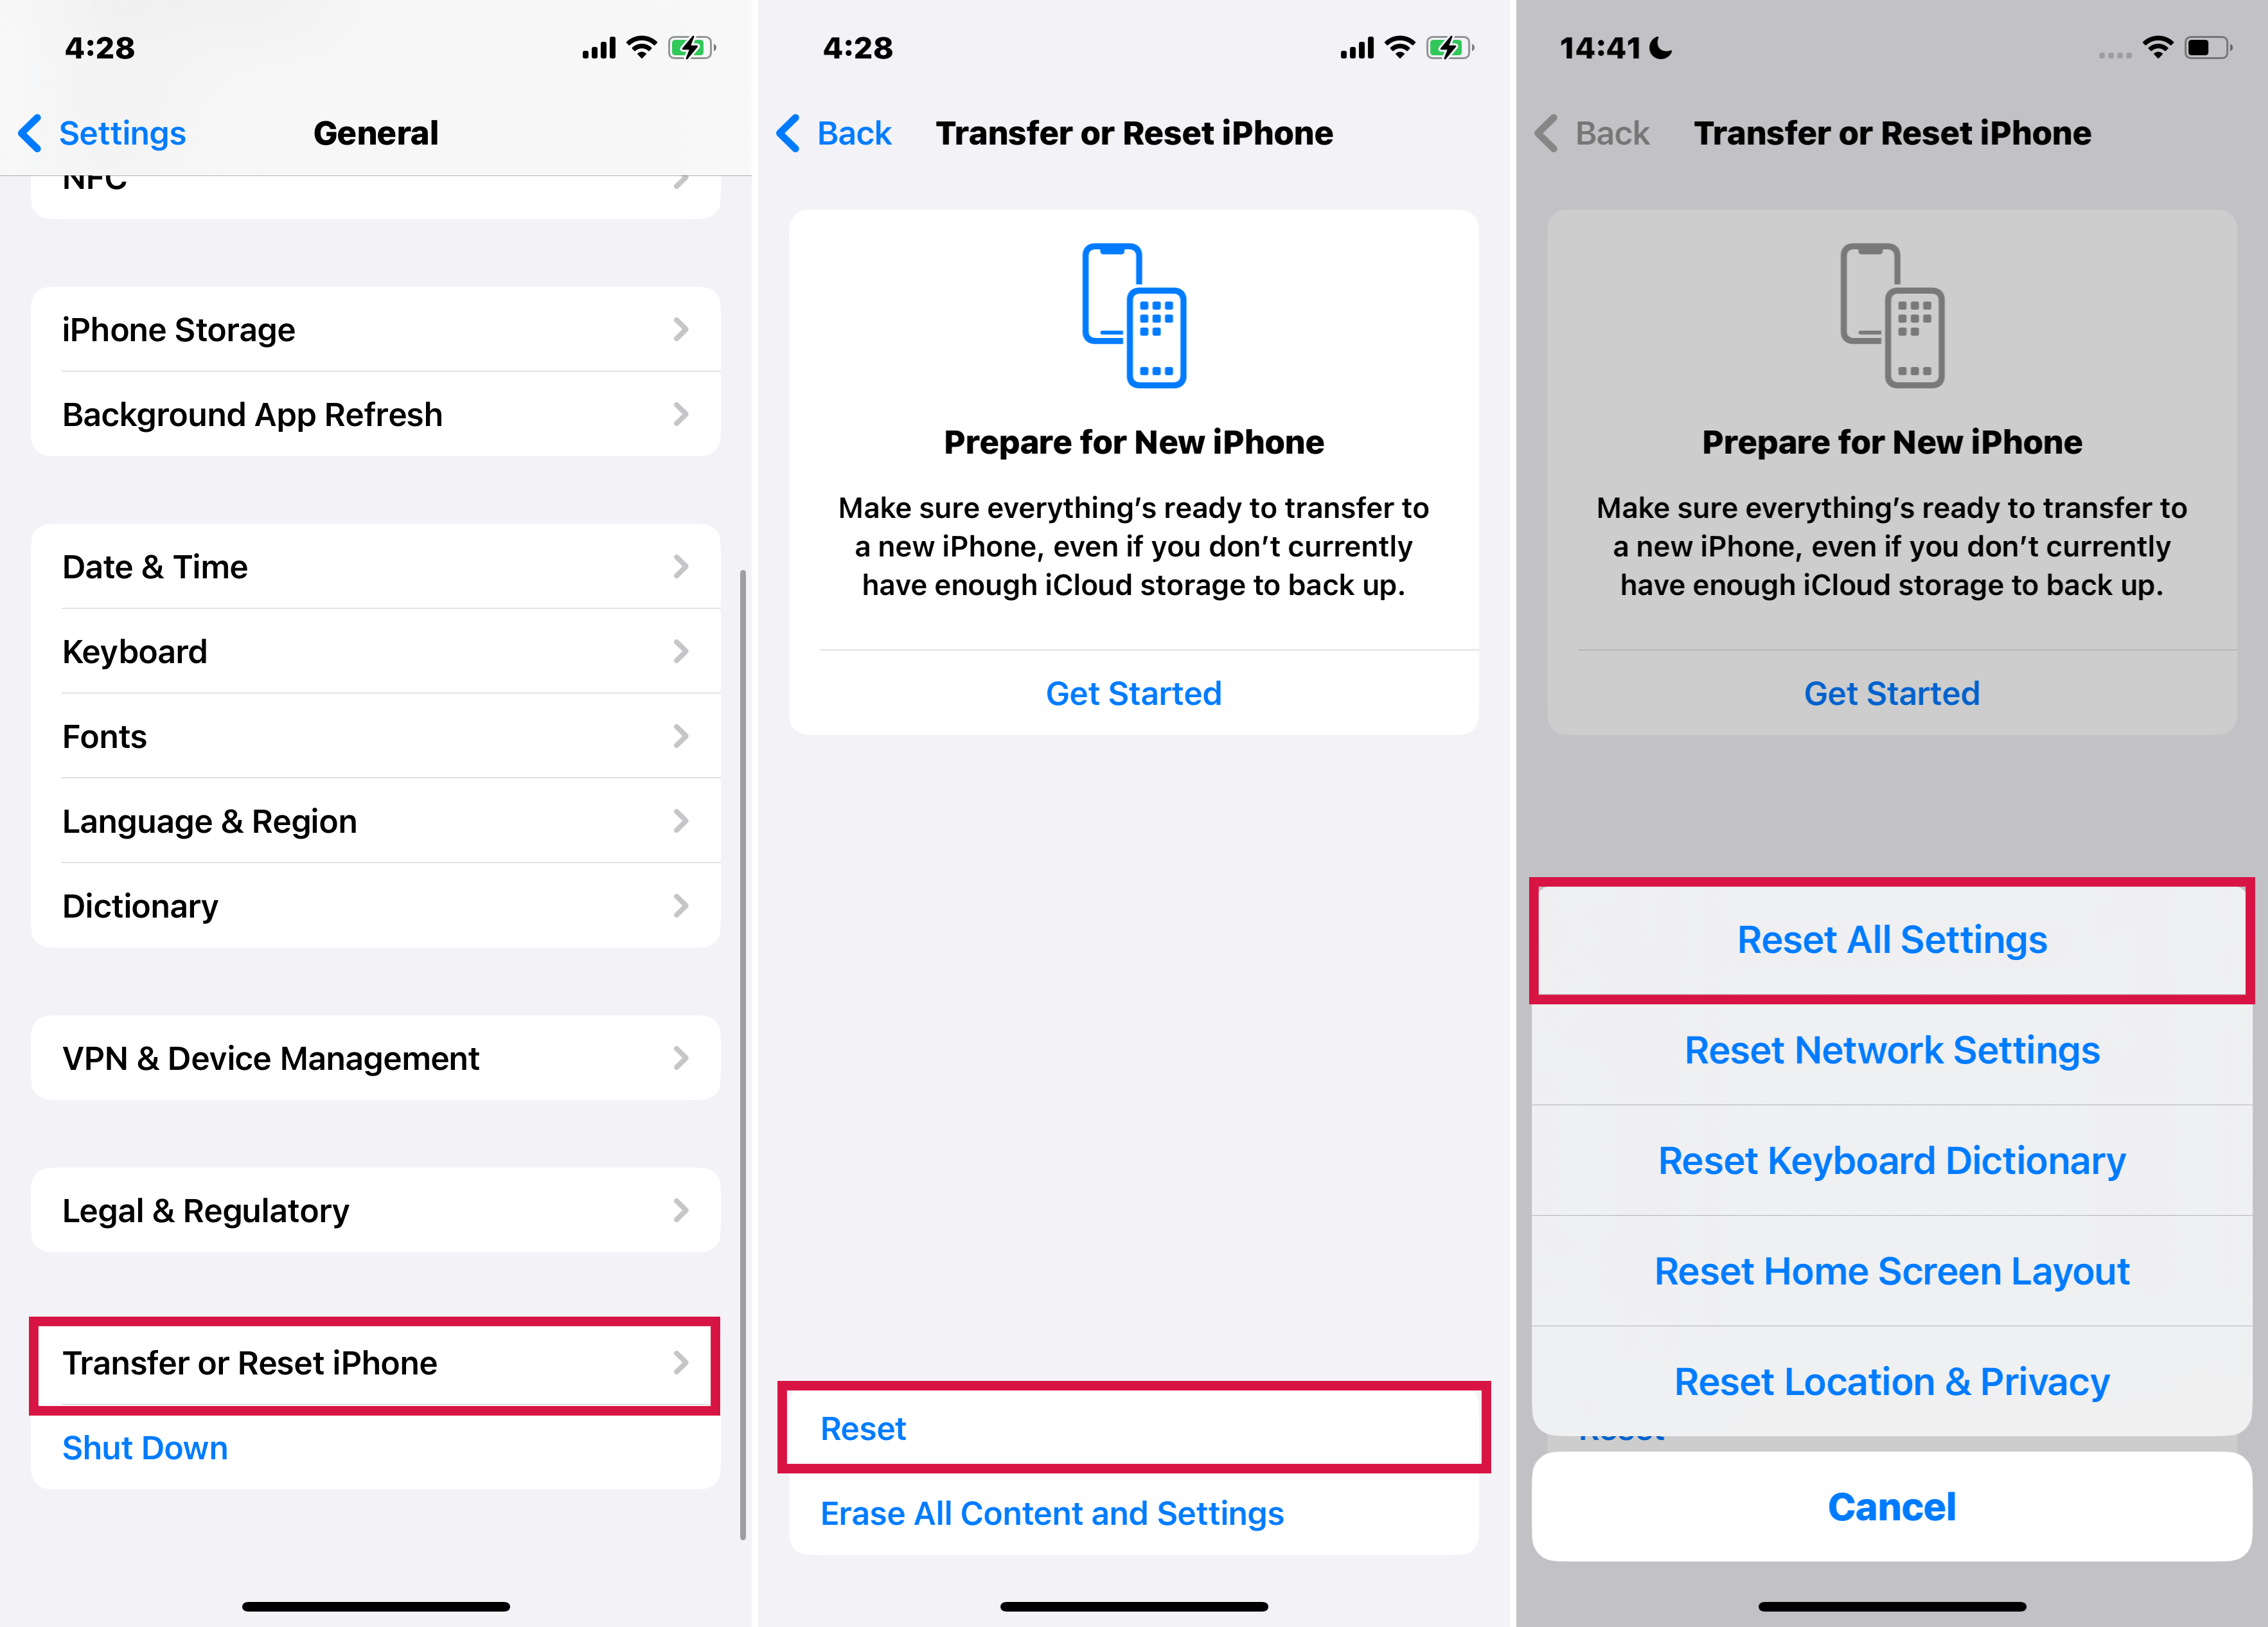
13. Reset Your Device Settings
An incorrect setting can make one AirPod quieter than the other. But it is difficult to identify the exact setting so that you can correct it. Hence, you must reset all your iPhone settings back to default.
Steps:
- Go to Settings > General > Transfer or Reset iPhone > Reset. Alternatively, go to Settings > General > Reset; the step depends on your iPhone model.
- Tap Reset All Settings.
- Enter your iPhone passcode if required, then tap Reset All Settings again.
- Your iPhone will show you a progress bar as it resets your settings. Connect the AirPods to test if the issue is resolved.
Reset iPhone Settings
14. Check Your Hearing
This method may seem extreme, but it is also possible that your devices are okay and you have a hearing problem. You can check your hearing through third-party apps that help you assess your hearing.
However, the easiest way is by asking a friend to wear your AirPods and see if they hear the imbalance. If they don't hear anything unusual, you may have a hearing issue and should consult a medical professional.
Check Your Hearing
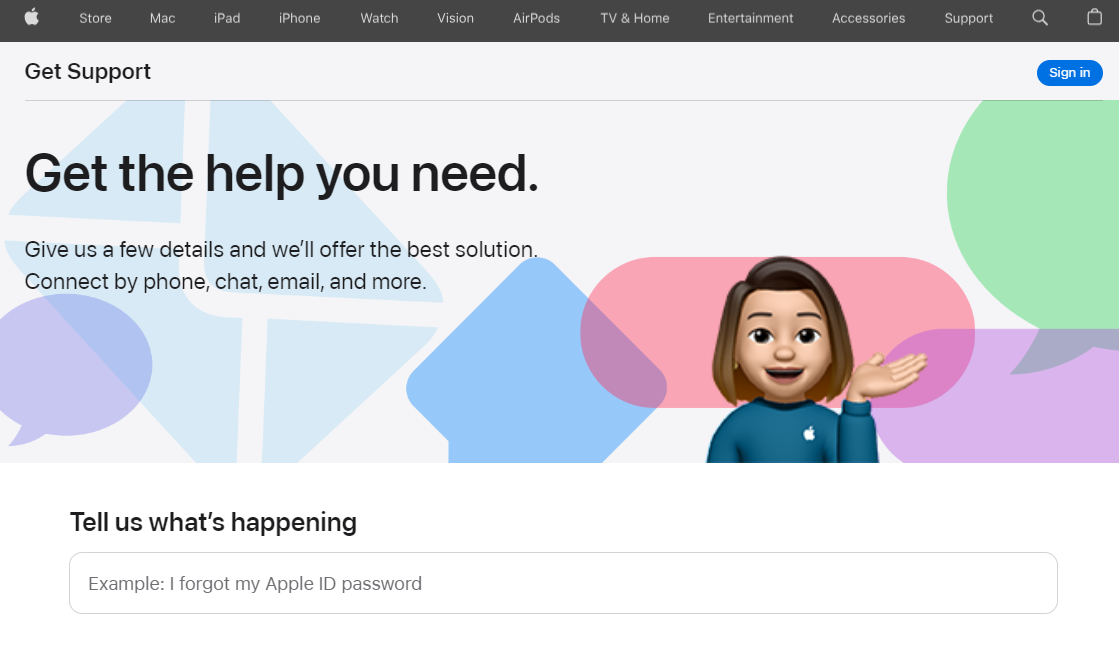
15. Contact Apple Support
At this point, the most practical next step is to contact Apple Support. They may ask you to mail in your AirPods for repair or replacement, or they may direct you to a Genius Bar or an Apple Authorized Service Provider.
Steps:
- Go to the Apple Support webpage (https://getsupport.apple.com/) and tap See all products.
- You will see a list of Apple devices. Select AirPods > Audio & Sound.
- Tap Continue to view the available options. If you don't see any support article relating to your problem, you can start an online chat or call technical support.
Contact Apple Support
You now have a clearer answer to the “why is one Airpod louder than the other?” question. Start with the fast checks above, then move to cleaning, ear-tip fit, and support only if the imbalance remains.
That said, it is time to say goodbye to the problem to continue enjoying your Airpods! You can also visit Mobitrix for more Airpods or iPhone-related guides.