
Are you missing phone calls because, for some reason, you didn't hear your iPhone ring? You are sure to have set your iPhone to ring, and the volume isn't set to the lowest either. So how did all this happen? What could have prevented your iPhone from ringing when it should make a sound for incoming calls?
If you are in this situation, buckle up! I’ll guide you to guaranteed solutions to fix your iPhone ringer that is not working. Let’s dive right in.
iPhone ringer not working
Basic Fixes
An iPhone doesn’t ring properly, probably because it’s experiencing software bugs, misconfigured settings, or hardware issues. Before sending your iPhone for repairs, you should first check the basics.
Switch off Do Not Disturb (DND) or Focus mode
Do Not Disturb is a separate feature in iOS 14 and earlier versions, but is part of the different Focus modes or profiles in iOS 16. DND silences your iPhone, whereas Focus suspends all notifications.
Switching off DND or Focus mode enables your iPhone to make a sound for call alerts and text notifications. You can know whether your iPhone is in these modes, by checking if there is a crescent moon icon on your lock screen. To turn it off, check the steps below.
For iOS 14, supported by iPhone 12, SE, 11, Xs, Xr, X, 8, 7, and 6.
Switch it off from the Control Center:
- Swipe up to open your control center.
- Tap the crescent moon icon to switch off Do Not Disturb, or hold it down to turn it on for a desired time frame. DND is on when the moon icon is purple and off when the icon is white.
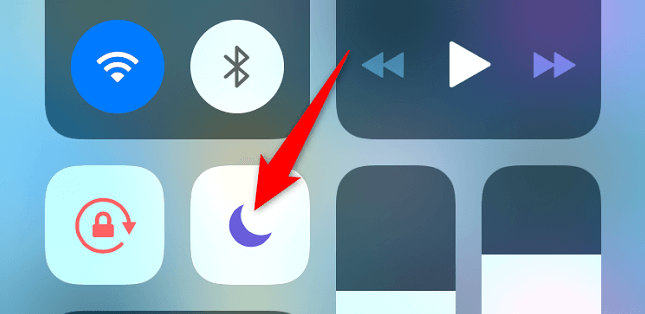
Do Not Disturb turned on from the Control Center
Alternatively, you can enable or disable DND from your Settings App:
- Simply open Settings and select Do Not Disturb.
- Use the Do Not Disturb toggle to turn it off.
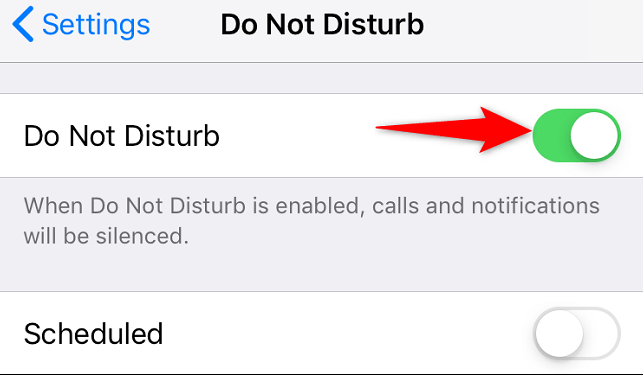
Enable or disable Do Not Disturb from Settings.
For iOS 16, compatible with iPhone 13, 12, 11, Xs, Xr, X, 8, 7, 6, and SE.
Enable or disable Focus mode from the Control Center on your iPhone.
- Swipe down to open the Control Center.
- Tap Focus with the crescent moon icon to turn it off. Focus mode is on when the moon icon is purple and off when the icon is white.
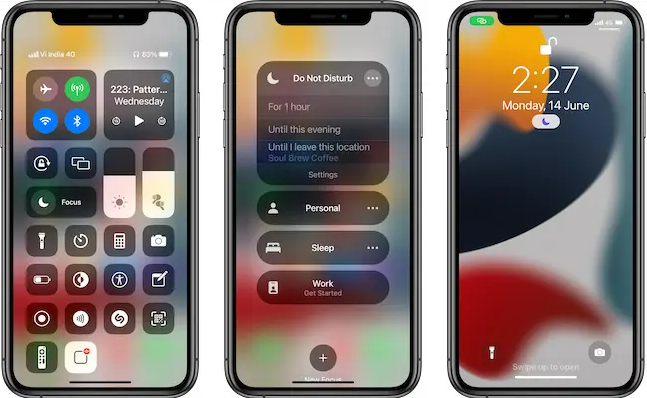
Turn on/off Focus mode via the Control Center.
Alternatively, you can use Settings to enable or disable Focus.
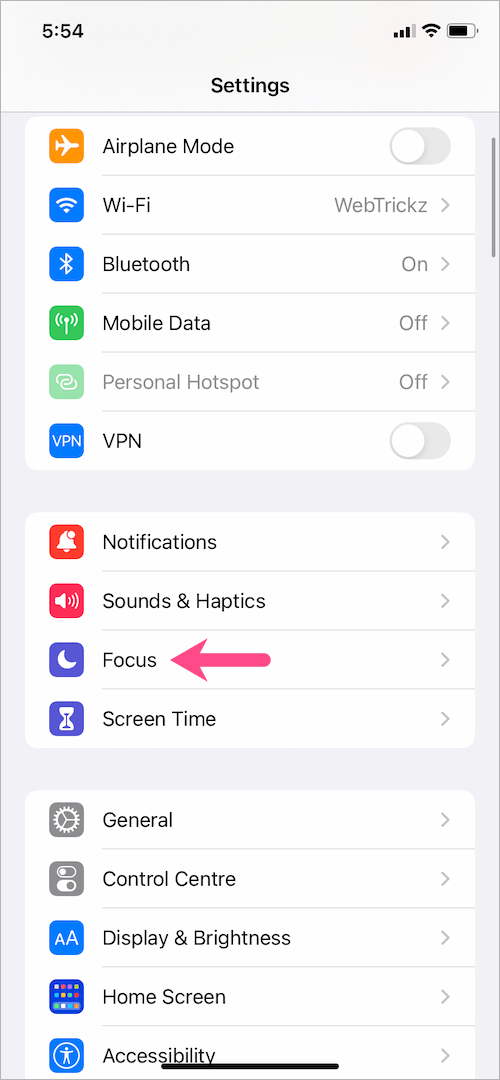
- Open Settings and tap Focus.
- You will see a list of the different Focus profiles. Tap Do Not Disturb with a crescent moon icon.
- Tab the Do Not Disturb toggle to turn it off. A gray toggle button means DND is off and a green one means it is turned on.
Enable/disable Focus mode in iOS 16 using Settings App.
Check the speakers on your iPhone
All iPhone sounds come from the speakers, and you better test them to be sure. You can play music or watch a YouTube video to see if any sound comes out. But first, ensure your screen protector, film, or case isn’t blocking the speaker opening, and then proceed.
Steps
- Open Settings and go to Sounds & Haptics.
- Slide the RINGER AND ALERT button back and forth several times while listening for any sound.
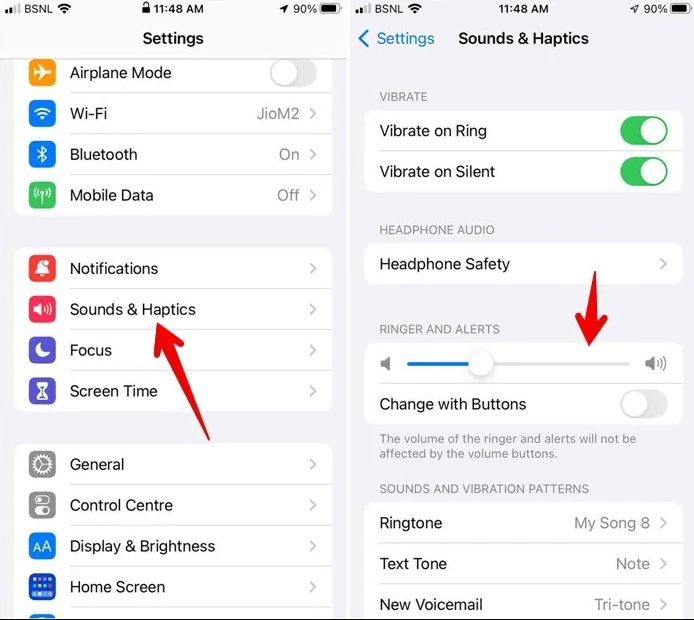
Turn up the Ringer and Alert volume from Settings.
Note: If there is no sound, or you see a dimmed speaker button on the Ringer and Alert slider, your speaker needs to be serviced. Refer to the hardware fixes part.
Make a call or increase your iPhone's volume
Another quick fix for the iPhone ringer problem is to make a phone call. Once you check your iPhone speaker and hear it make a sound, you’d know the speaker isn’t the issue. You can also turn up the volume to see if it rings.
Here are the steps:
- Try to make a phone call and put your iPhone on the loudspeaker.
- Press the volume up button to set an appropriate volume level and listen. If no sound comes out, or you hear crackling or static, your network reception has a problem. You can try again later or find a different location.
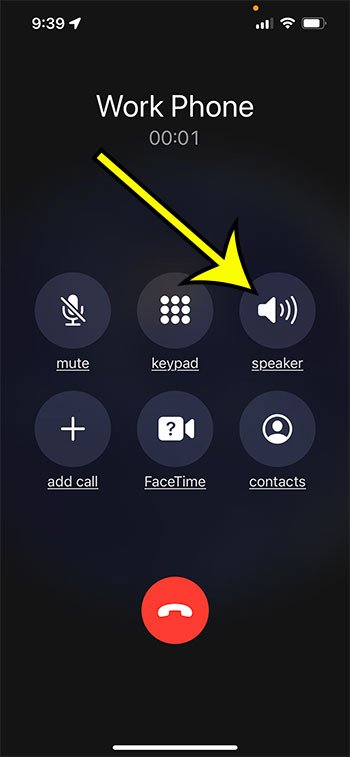
Make a call from the Phone App and put it in the loudspeaker.
Disconnect From Bluetooth devices
If your iPhone is connected to a Bluetooth device, your calls and texts will ring on the Bluetooth device instead of your iPhone. Therefore, disconnecting the iPhone from the Bluetooth device can help return it to normalcy.
Steps
- Swipe up to open the Control Center.
- Tap the Bluetooth icon to turn off Bluetooth and disconnect all wireless devices.
Alternatively, you can open your Settings app and switch off the Bluetooth button. Here you have the option to disconnect individual devices. After disconnecting Bluetooth, any incoming call or text should make a sound via your iPhone speakers.
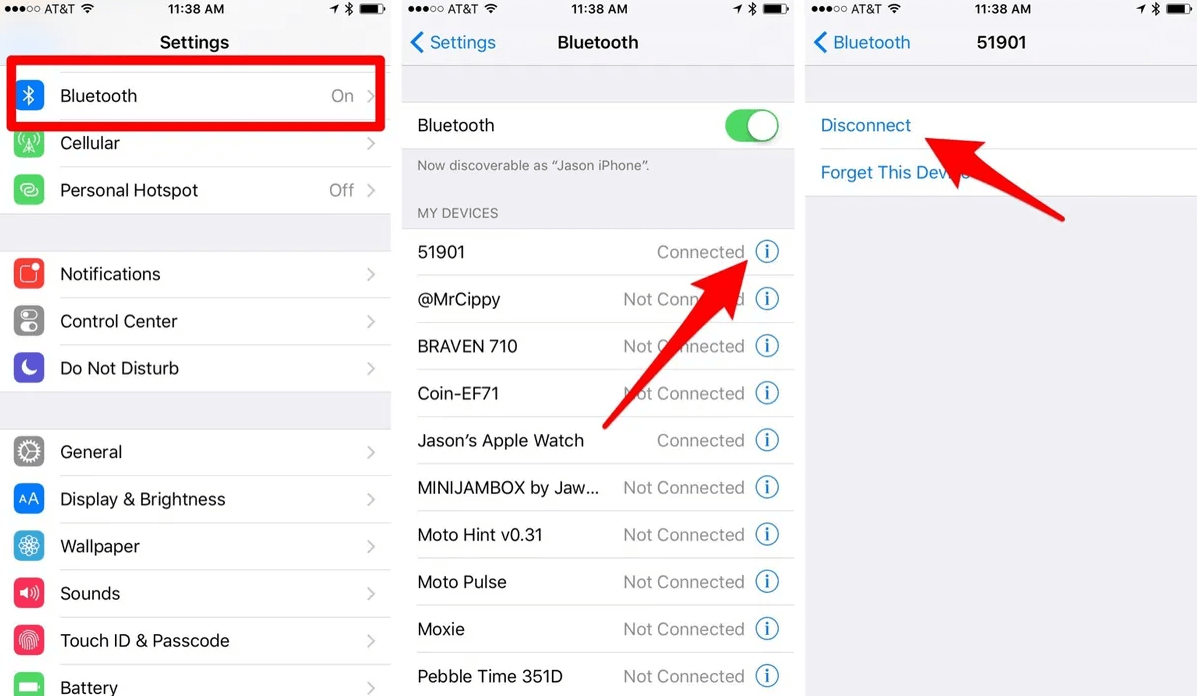
Using Settings to turn off Bluetooth and disconnect any wireless devices.
Enable and disable Airplane Mode
If you enable Airplane mode on your iPhone, it will turn off all wireless signals, including WiFi, Bluetooth, and mobile network. You won’t receive or make calls, send texts, or use the internet. You can know if your iPhone is in Flight mode by checking for an airplane icon at the upper-right corner of your screen - usually where the mobile network bar is.
Steps
- Swipe up or down to open the Control Center.
- Tap on the airplane icon. If it is gray and white, it is turned off, and if it is yellow and white, it is on.
You can also open Settings and tap the Airplane Mode toggle to enable or disable flight mode.

Turn off Airplane mode from the control center.
Disable Silence Unknown Callers
When this feature is enabled, all calls from unknown phone numbers are automatically silenced and will be redirected to voicemail. If your iPhone runs on iOS 13 or higher, disable the Silence Unknown Callers feature to see if your device will ring again.
Steps
- Go to your Settings app.
- Scroll down and open Phone.
- Turn off the Silence Unknown Caller toggle.
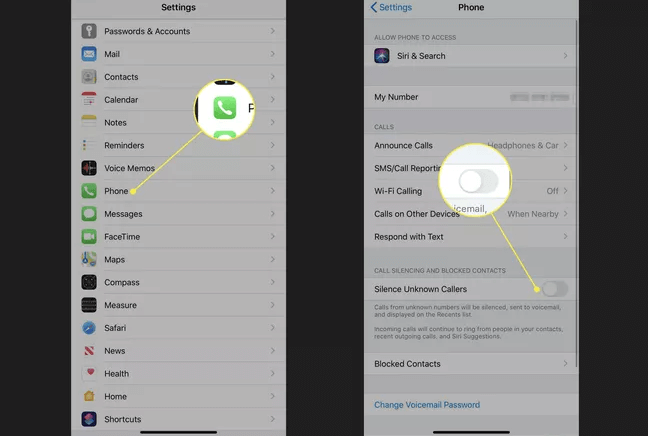
Silence Unknown Callers from Settings.
Note: You can add specific phone numbers to your contacts app to allow them to call you even while Silence Unknown Callers is enabled.
Check and change custom ringtones
It could be that your iPhone isn't ringing because the tone or song you set as a ringtone has been deleted or is corrupted. You can also change customized ringtones for individual contacts to see if it fixes the ringing problem.
Steps
- Open Settings proceed to Sounds & Haptics, then Ringtone. Change your default ringtone, and the issue should be resolved. But if not, advance to step 2.
- Go to the Phone or Contacts app and tap the person's name of whom their calls aren't ringing.
- If there is a Ringtone section, then you have a customized ringtone for that contact. Tap Ringtone and assign them a different tone, then tap Done.
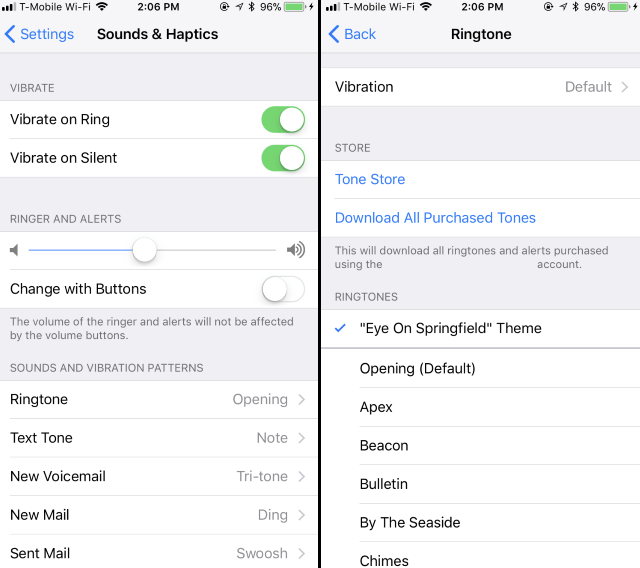
Remove the default ringtone and use a different one.
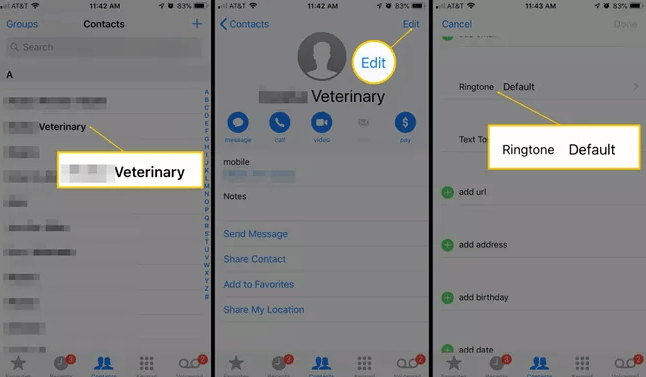
Assign a different custom ringtone to a contact.
Double-Check if You've Blocked the Caller
Blocking a phone number prevents it from calling, texting, and even face-timing you. If you can't get someone's phone calls, check if you may have unknowingly blocked their contacts.
Steps
- Open Phone on your Settings App.
- Go to Blocked Contacts, and you will see a list of all blocked numbers.
-
Find the number you want to unblock, swipe it to the left and tap Unblock.
Alternatively, click Edit on the upper-right corner of your screen, scroll to the desired contact, tap the Red Minus button and Unblock.
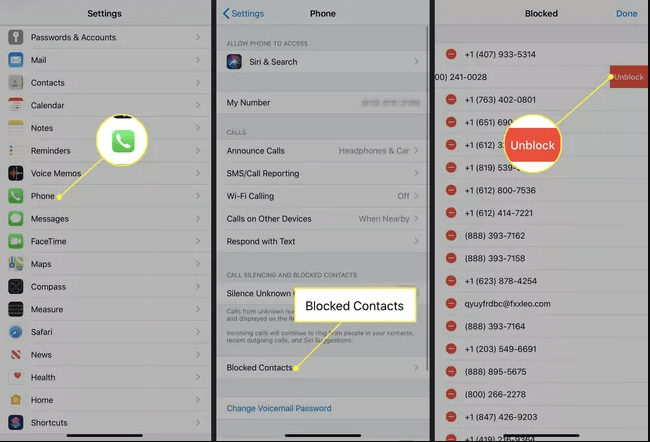
Unblock any blocked caller from Settings App.
Try Turning Off Calls on Other Devices
You may need to turn off this feature if you own multiple Apple devices like a Mac and have opted to get calls there instead of your iPhone.
Steps
- Go to Phone on your iPhone’s Settings App.
- Select Calls on Other Devices.
- Tap the Allow Calls on Other Devices toggle to turn it off.
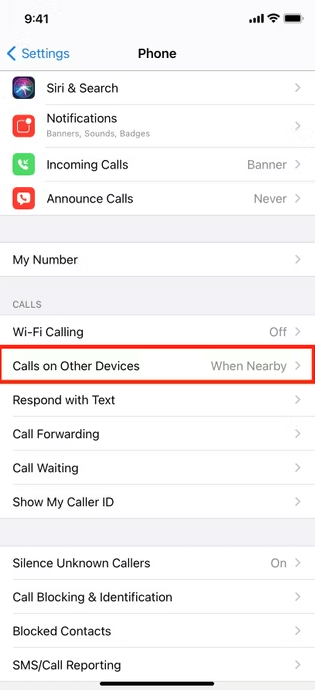
Turn off Calls on Other Devices from Settings.
Turn Off Call Forwarding
Enabling Call Forwarding on your iPhone diverts incoming calls to a different number. Your iPhone won’t ring or show notifications whenever someone calls you. This is how to switch it off:
Steps
- From your Settings App, tap Phone.
- Select Call Forwarding and wait a moment to load.
- Click on the Call Forwarding toggle to disable it, and you should receive calls as usual.
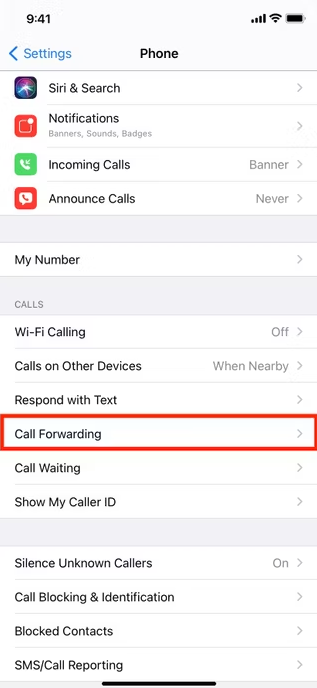
Turn off Calls Forwarding from Settings.
Software Fixes
Usually, software bugs are the most common culprits for iPhones not ringing, and the following methods should help fix it.
Restart Your iPhone
Restarting your iPhone may look simple, but it is an effective troubleshooting method to fix common software glitches.
Steps
-
If your iPhone has a Face ID, press and hold the side button and one of the volume buttons simultaneously until you see the slide to power off option on your screen.
If your iPhone has no Face ID, press the power button and hold it down until the slide to power off toggle appears.
- Slide the white and red power icon to the right to turn off the iPhone.
- Wait for about 30 to 60 seconds. Press your iPhone's power or side button until you see the Apple icon on your screen.
Your iPhone will restart, and the ringer not working issue should be resolved. However, you can try a force restart if the problem is still there.
Fix your iPhone with Mobitrix Perfix
If you want an easy and fast way to fix your iPhone ringer not working problem, then Mobitrix Perfix is your best bet. Mobitrix Perfix is a professional tool to repair various iOS system and software problems in the comfort of your home. It fully supports iPhone 5s to iPhone 16 and iOS 18 and earlier versions.
Plus, it doesn’t cause any data loss!

Steps
- Install Mobitrix Perfix on a computer.
- Plug your iPhone into the computer with a USB lighting cable.
- Run Mobitrix Perfix and click Start.
- Go to Device Bug and hit the Fix Now button, then wait for it to complete the process.
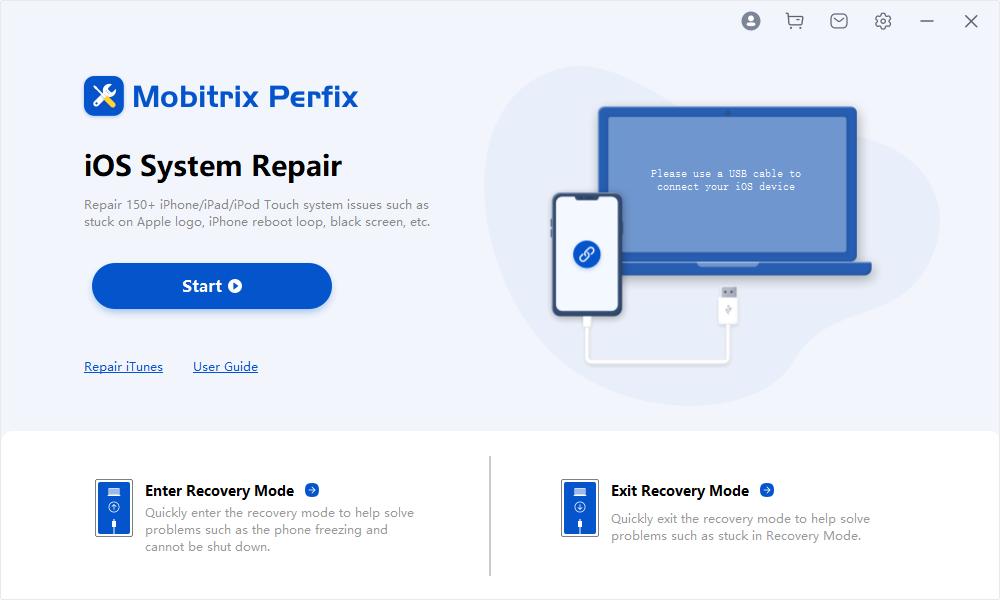
Mobitrix Perfix iOS system repair
Note: Mobitrix Perfix is a paid tool that costs only 30 dollars, and you will quickly resolve the iPhone with no sound problem. Alternatively, you can use iTunes to fix your iPhone ringer issue via recovery mode or DFU mode. However, iTunes can be very complicated, and you may encounter many errors. And the process can take several hours, while Mobitrix Perfix only takes 30 minutes. That is why I recommend Mobitrix Perfix.
Update Your iPhone
Updating your iPhone to the latest iOS version is another troubleshooting trick that you can use to fix the iPhone not ringing error. An updated iOS can fix software bugs and sometimes add exciting new features for your iPhone to operate efficiently.
Steps
- Open your iPhone Settings and go to General.
- Tap Software Update to check if there is a newer iOS version.
- Tap Install Now or Download and Install if you find a newly updated iOS.
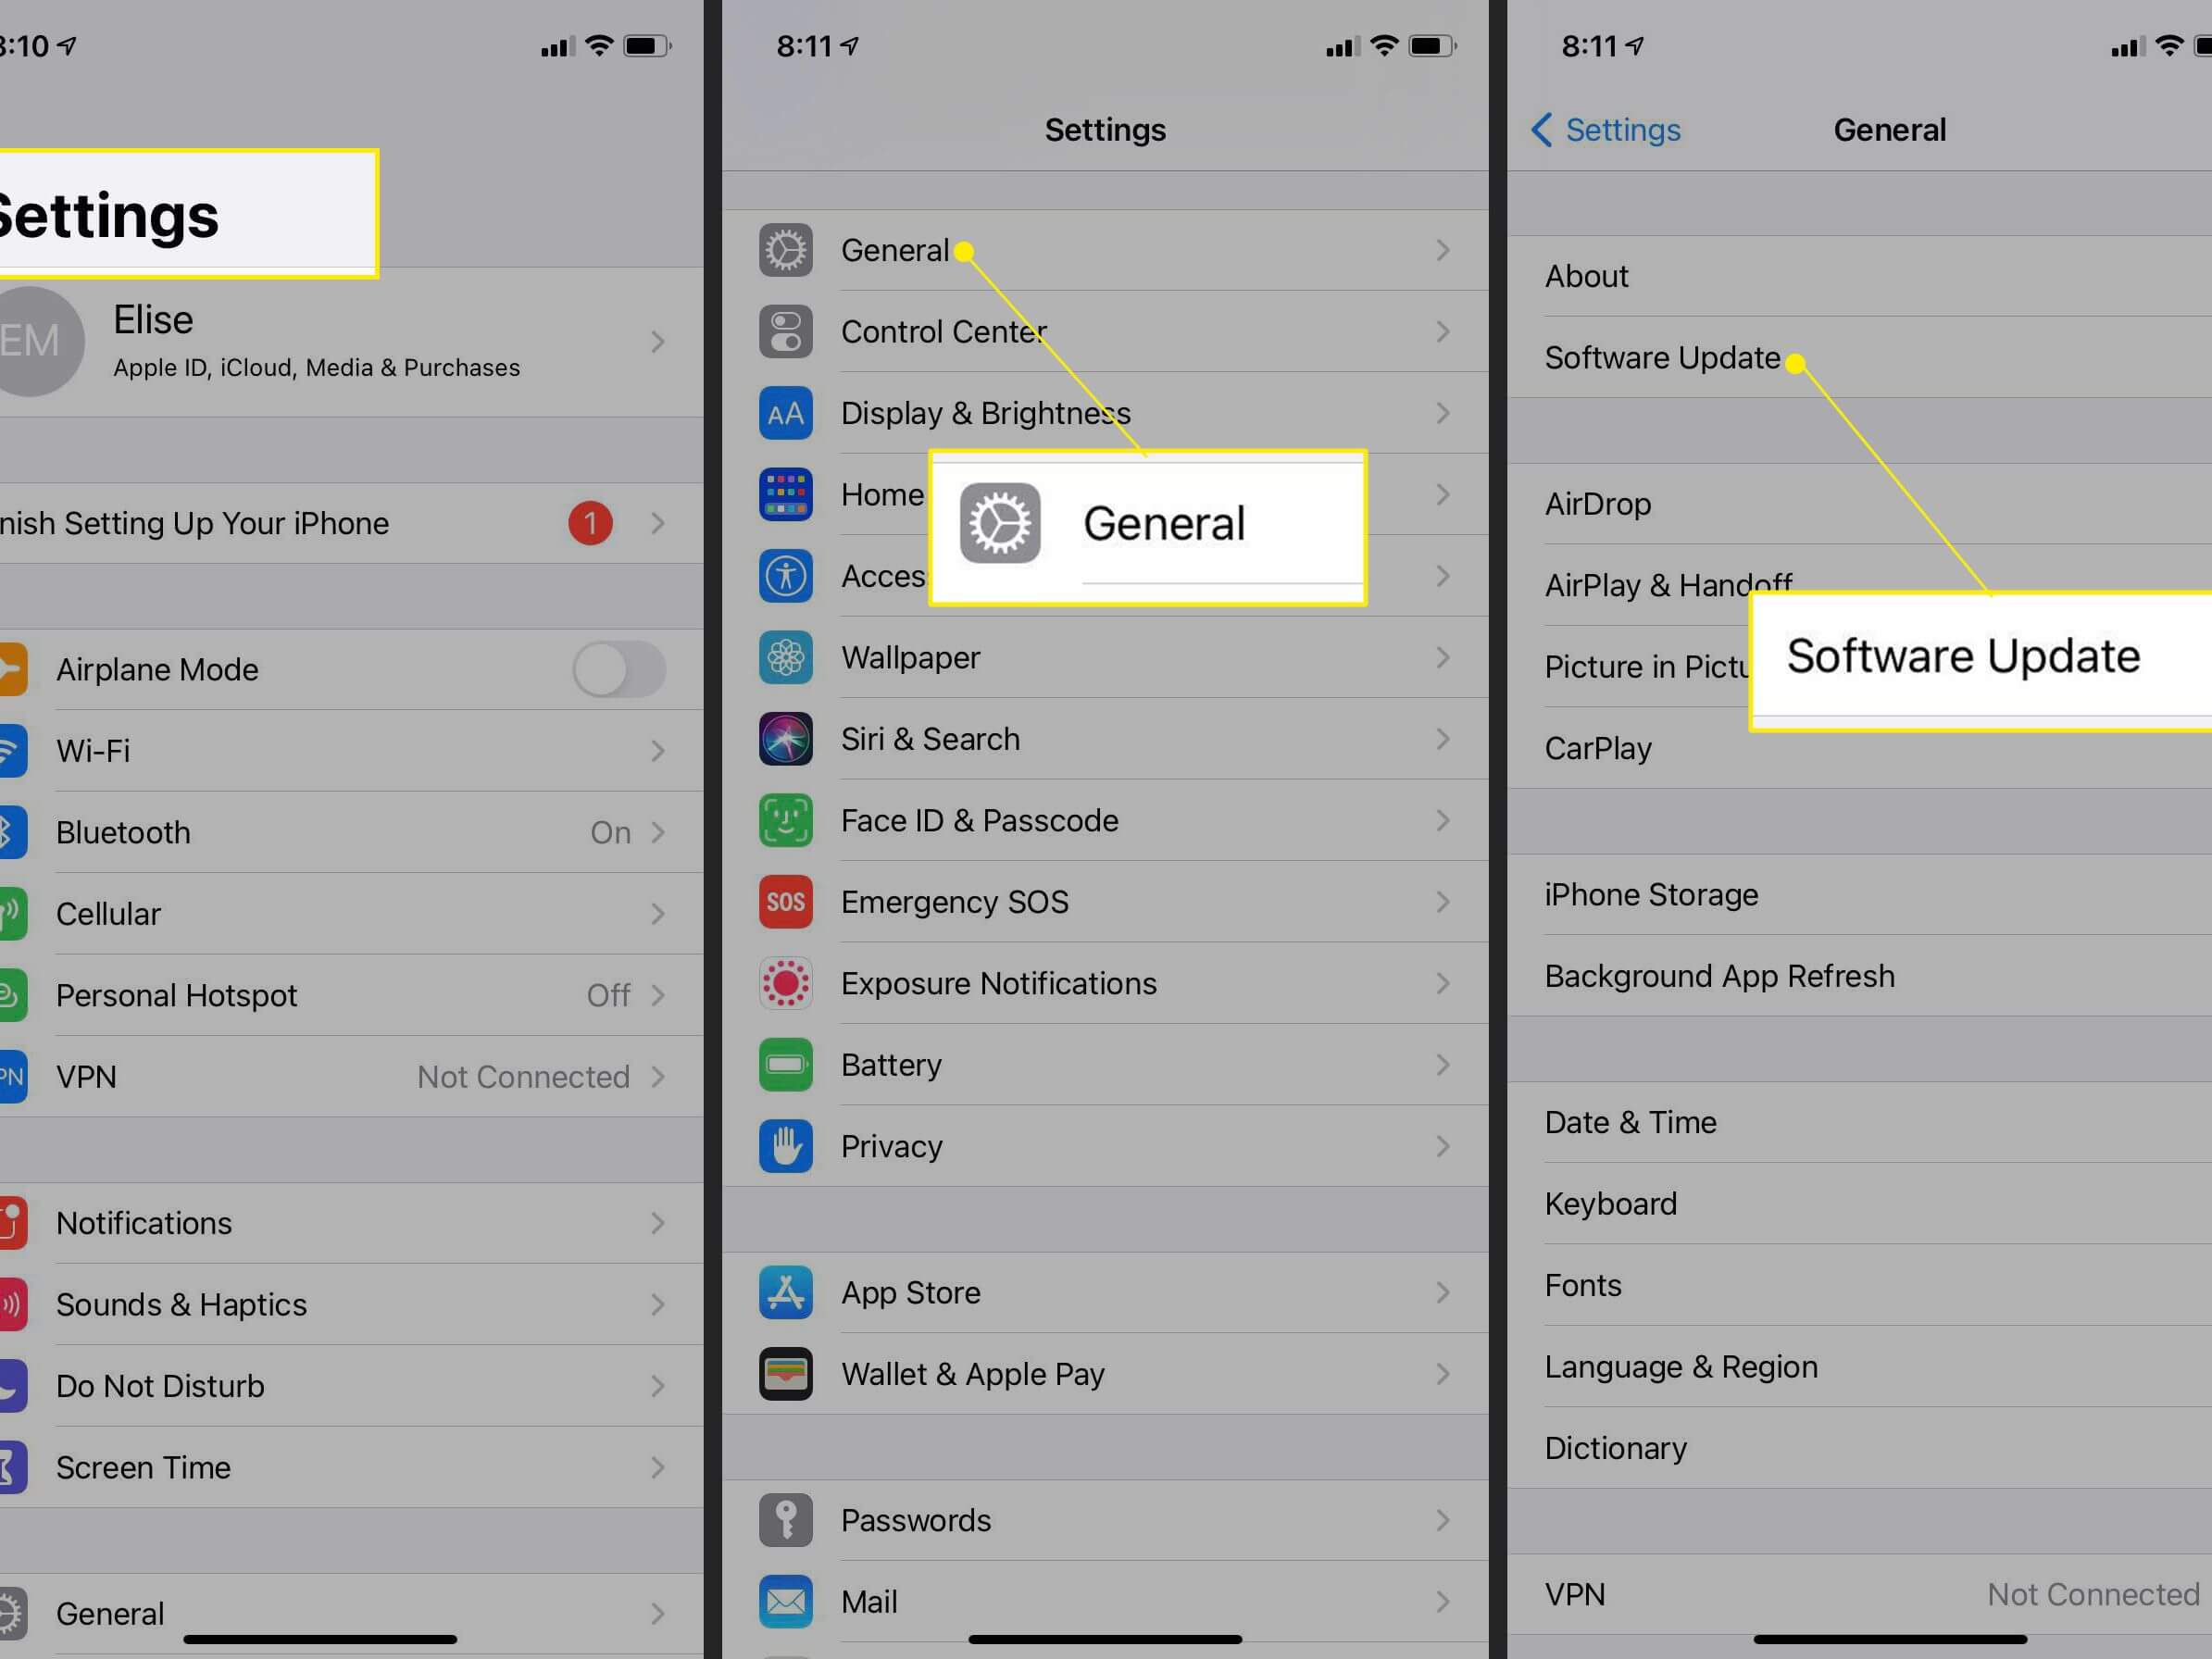
Update your iPhone.
Reset All Settings
At times, all you should do for your iPhone to start ringing correctly again is to reset all settings back to default; it fixes many software glitches.
Steps
- Open Settings and tap General.
- Scroll down to Transfer or Reset iPhone.
- Tap Reset, then Reset All Settings.
Wait for the iPhone to finish resetting and the no-ringer sound problem should be gone. If it persists, you can factory reset your iPhone to work as new. But all your data will be lost.
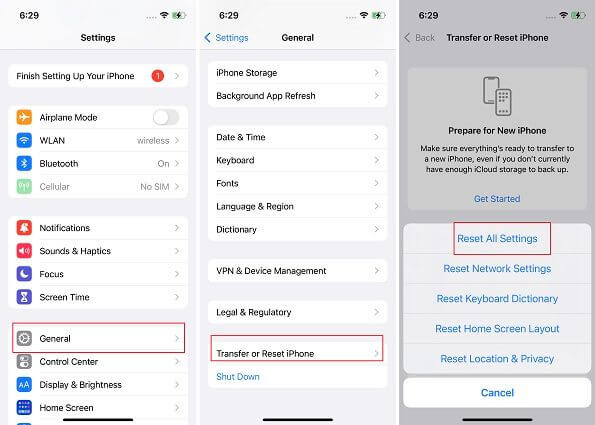
Reset all settings on your iPhone.
Hardware fixes
If there is physical damage or your iPhone has suffered a hard fall, then it is likely experiencing a hardware failure causing the ringer not to work as required. Here is what you should do:
Clean your receivers and speakers
It is good to confirm that your iPhone’s receivers and speakers are in good condition. Check their openings and make sure they are clean with no debris, dirt, or lint blocking sound. Use a microfiber cloth or an anti-static brush to clean up the openings.
But what if you can’t hear a sound after cleaning the iPhone and increasing the volume to a reasonable level? It means the speakers are broken, or your iPhone has other hardware issues and needs to be repaired.
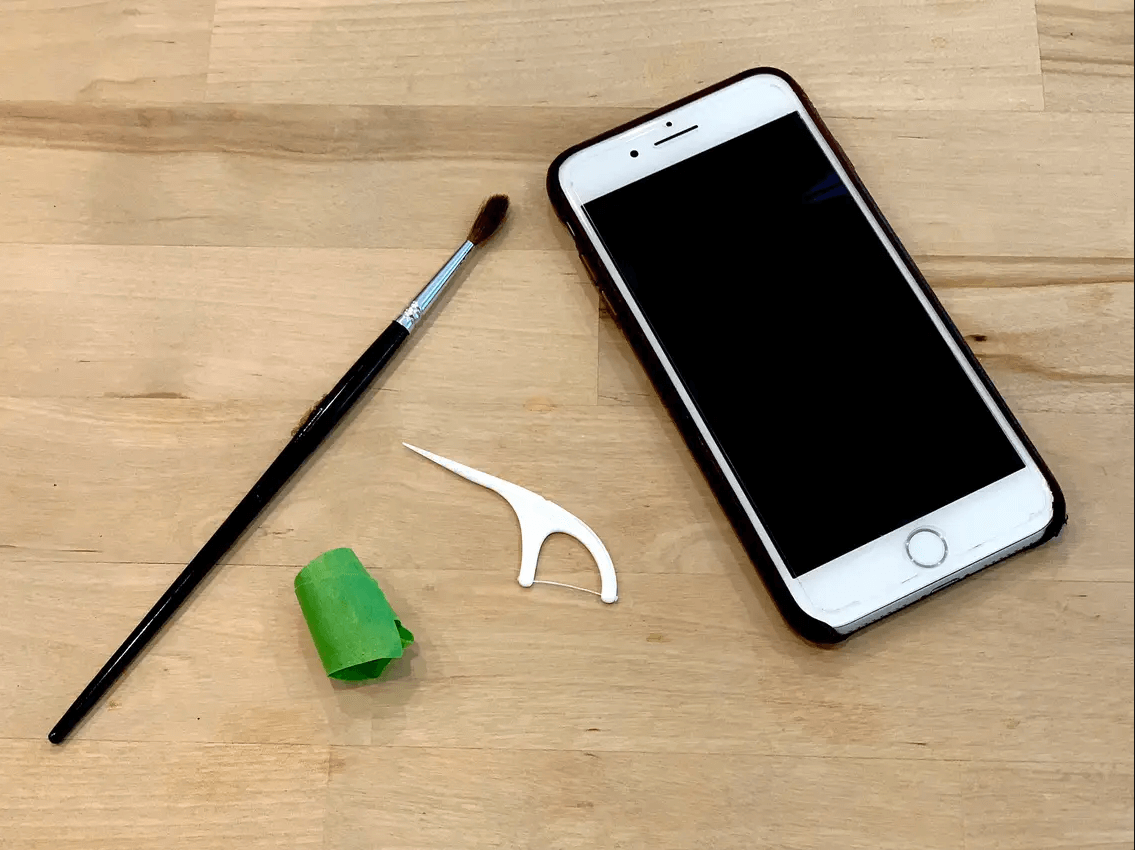
Clean your receivers and speakers
Contact Apple for repairs
If your iPhone speakers or receiver are broken, you have a fried port, or your volume buttons are not responsive, you should contact Apple for repairs. All Apple-certified repairs use genuine Apple parts, are backed by Apple, and are performed by trusted experts. You can contact them online, over the phone, or make a reservation with a genius at your nearest Apple store to help with hardware repairs.
What if my iPhone is stuck in headphones mode?
You may not hear your iPhone ring for an incoming call or text message alert because it could be stuck in headphones mode. If that is the case, you miss calls because your iPhone isn’t ringing through its speakers. Instead, the iPhone is detecting another audio source, such as headphones, and is trying to ring there. Check for more tips on how to fix the iPhone stuck in headphones mode.
Hopefully, you have fixed your iPhone ringer not working issue and been able to avoid missing important calls, texts, and app notifications in the future. You can confirm if the ringer is in proper working order by asking someone to call your number or send you a message. If all is well and your iPhone ringer is functioning again, set your favorite ringtone to spice up your experience!