
Are you experiencing problems with iPhone refusing to turn on or charge? Well, don't worry anymore because this article will introduce you to methods to solve this problem. Troubleshooting usually works best when you move from the simplest checks to the more disruptive fixes. A small settings or account difference is often what explains why the same steps look different on another device.
The article has gathered the several methods for you and provided clear steps that will help you to fix this problem. Let's get started! Starting with the built-in option first usually makes it easier to tell whether you really need an extra app. Checking the surrounding conditions first usually saves more time than repeating the same action without any new information.
Part 1 Check Accessories
The first thing to check is if you are using the right accessories. It is advisable to use the charging cable that comes with your iPhone. The following steps will guide you while trying this method:
- On the charging port that is at the bottom of your iPhone, remove the debris.
- Look closely at the charger or the cable and confirm that there are no visible damages.
- If there are damages, it's advisable to try another charger or charging cable.
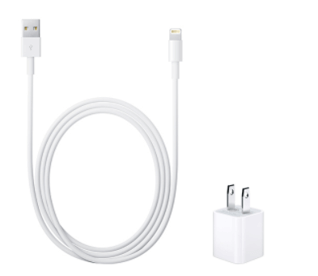
iphone has discharged and does not turn on via checking charging accessories
Part 2 Restart iPhone
Method 1. Soft restart
To perform a soft restart, follow the steps below:
- Use a cable to Make sure your iPhone is connected to your computer so the device has a cleaner chance to reconnect on the next attempt.
- Depending on your iPhone model restart as shown below:
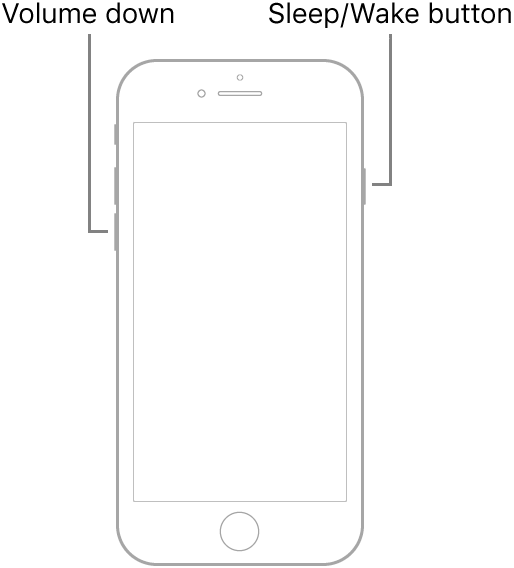
iPhone 8 or later; Go to the Volume up button and press it shortly, then release it. Perform the same operation on the Volume down button, then lastly, long-press the side button until you see the logo. If one step does not change the behavior, move on instead of repeating it several times. If the first method does not work, compare software version, device compatibility, and account status before repeating the same step.

iphone has discharged and does not turn on - iPhone8
iPhone 7 or 7 plus; Find the side or Top button, then press it with the Volume down button at the same time until the logo appears. A quick check of the device model, software version, and account state usually explains why the same menu looks different on another device. That often makes the next troubleshooting choice clearer than guessing and retrying the same path.
iphone has discharged and does not turn on- iPhone7s
iPhone 6 or earlier versions; press the Home button and Top or side button at the same time until you can observe the logo on the screen. If a step looks different on your device, the app version is usually the first thing to compare before assuming the feature is missing. A quick settings check usually saves more time than repeating the same action without changing the surrounding conditions.
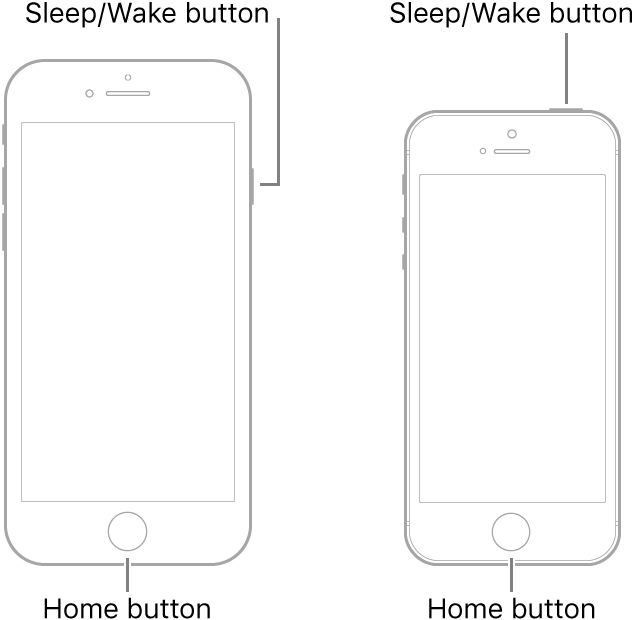
iphone has discharged and does not turn on- iPhone6 and earlier versions
Method 2. Force restart
To perform a force restart, follow the steps below:
iPhone 12, iPhone XR, iPhone 11, iPhone XS, or iPhone X
- Starting with the Volume up button, press it for a while, then release it, find the Volume down button and do the same. Finally, press the Side button till the logo pops up.
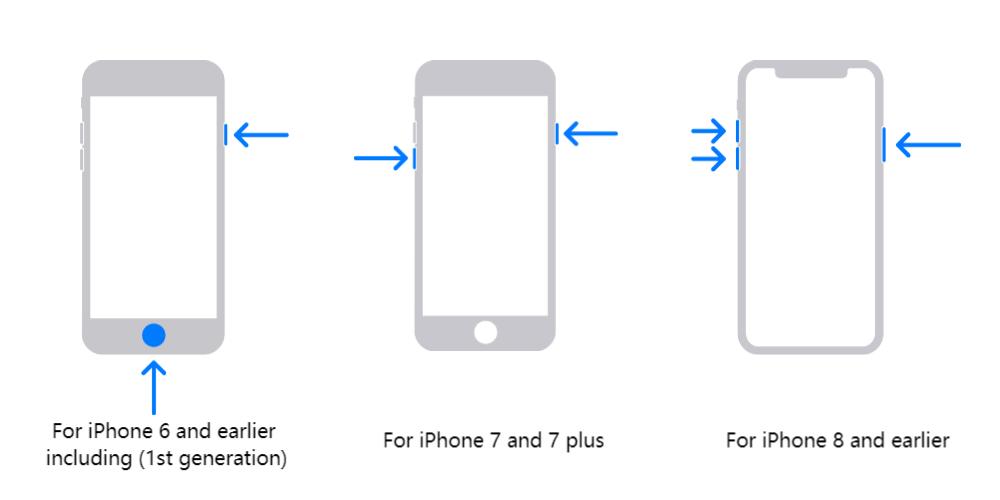
iphone has discharged and does not turn on for different iphone models
iPhone 8 or iPhone SE (2nd Generation)
- Go the button for Volume up and shortly press it, do the same for the Volume down button, then finally press the Side button long enough to see the Apple's logo. Release the button after seeing the logo.
iPhone 7
- Please find the Volume down and the Sleep or Wake button, then press both of them simultaneously. Release the buttons only when you see the logo.
iPhone 6s or iPhone SE (1st Generation)
- Look for the Sleep or Wake button and the Home button, then press them simultaneously. Release them when the logo pops up.
Part 3. Solve the problem with Perfix
Perfix is a powerful software designed to specifically deal with most of the problems you may encounter on your iOS or Android phone. It fully supports iPhone 5s to iPhone 17 and iOS 26 and earlier versions.
The advantage of using Perfix is that you can quickly fix the iPhone that won't charge or turn on without losing any of your data, even without performing a backup of your data.
With Perfix, all iOS related issues can be solved with a simple click.
The following are the steps for using this method;
- Visit the official website and install Perfix on your computer.
- Once you see the Standard Mode click to select it.
- Connect the iPhone that needs to be fixed to a computer, then hit "Next." If your iPhone is not detected, follow the steps on the screen, then continue with the following steps.
- Select the suitable firmware to install, then tap "Download." so the next part of the process is easier to complete without backtracking. It gives you finer control when only one moment should stay slow and the rest of the recording should play normally.
- Select the Start option, and your iPhone will be fixed instantly so the next part of the process is easier to complete without backtracking. That matters when you only want one part of the video to play back slower while the rest keeps its normal speed. If the result still looks off, compare a built-in method with one app-based method so you can see which handles your clip more cleanly.

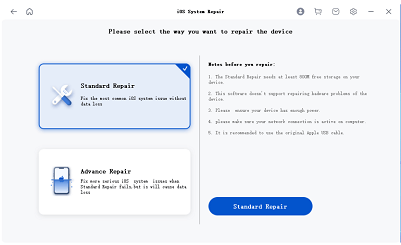
iphone has discharged and does not turn on via standard-repair
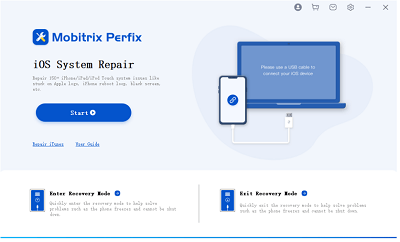
iphone has discharged and does not turn on via perfix start
Advantages of using Perfix
- Make sure the safety of your data. No data will leak out during the process of repairing your iPhone.
- It does not require you to use iTunes while using Perfix.
- It is user-friendly, with a few straightforward steps that you can follow without asking assistance from another person.
- Perfix recognizes your device easily without requiring you to enter any information.
Part 4. Solve the problem with iTunes
Method 1. Update IOS
Having a pending update can also make your iPhone refuse to charge or turn on. You can update the software by following the steps below:
- Make sure that your computer has iTunes, then connect the iPhone to the computer.
- You will get noted that 'There is a problem with the iPhone that requires to be restored or updated.'
- Hit the "Update" option.
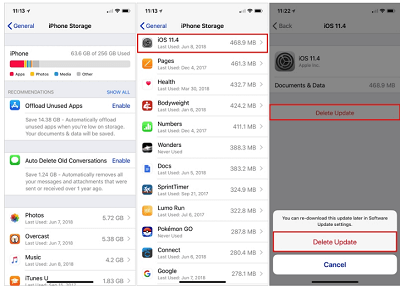
iphone has discharged and does not turn on verifying update redownload ios update
You need to have the latest iTunes version to complete the update and Make sure that your iPhone is connected throughout the update process. If using a Mac, Make sure the configurator is closed.
This method is free for users, and no data is lost during the process, but it has many drawbacks, as explained below:
- You must have the latest iTunes version.
- iTunes may not recognize your device.
- It consumes a lot of time to install iOS.
- It may install a new iOS that may be different from the one you are used to.
Method 2. Put your iPhone into recovery mode and update
If no method described above works for you, you can put your iPhone to recovery mode then update it. The steps are as follows:
1. On a computer that has iTunes or Finder, connect your iPhone to it.
2. According to your iPhone model, put it to recovery mode as shown below;

iphone has discharged and does not turn on itnes
iPhone 8 or iPhone SE (2nd Generation)
- Go to the button for Volume up and shortly press it, do the same for the Volume down button, then finally press the Side button until your iPhone goes to recovery mode.
iPhone 7, 7plus (7th Generation)
- Please find the Volume down and the Sleep or Wake button, then press both of them simultaneously. Release the buttons only when you enter recovery mode.
iPhone 6s or iPhone SE (1st Generation)
- Look for the Sleep or Wake button and the Home button, then press them simultaneously. Release them upon your iPhone entering recovery mode.
3. Hit the "Update" option.
iphone has discharged and does not turn on verifying update iphone via itunes
The advantage of this method is that it solves the issue without losing any of your data; But it has the following disadvantages:
- Your iPhone may not be recognized by iTunes.
- The steps are a little complicated, and you may fail to follow them as indicated.
- It may take a long time to solve the issue.
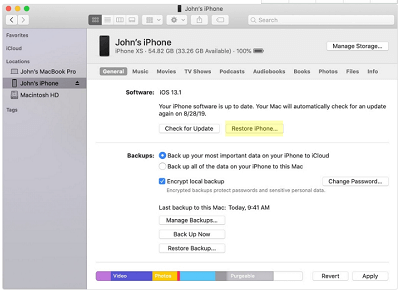
Method 3. Restore iPhone from a backup
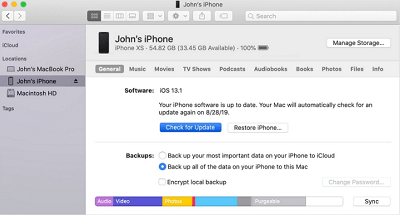
Step 1: On a computer that has iTunes, launch iTunes, then make it connected to your iPhone.
Step 2: On the top of the screen, select your iPhone' icon.
Step 3:tap "Summary" then on "Restore Backup." If asked password of the encrypted backup, provide it and allow the restoration to complete. Running the job while the device is charging and on stable Wi-Fi often prevents having to restart the same backup later.
Step 4:Make sure that your iPhone is connected after it restarts to sync with the computer.
This method is recommended by Apple support, and it solves the issue without losing any of your data.
Disadvantages:
- You can use it only when you have a backup on iTunes.
- It takes a lot of time to restore and backup data.
- iTunes may fail to discover your device.
- It isn't straightforward to use iTunes, and sometimes you may not see your iPhone on iTunes screen.
Method 4. Put your iPhone into recovery mode and restore (DATA LOSS)
This method will cause your data loss, and if you don't have any backup, you may lose all your memories. The steps are as follows:
1. On a computer that has iTunes or Finder, connect your iPhone to it.
2. Put your iPhone to recovery mode as shown below;
iPhone 8 or iPhone SE (2nd Generation)
- Go to the button for Volume up and shortly press it, do the same for the Volume down button, then finally press the Side button until your iPhone goes to recovery mode.
iPhone 7, 7plus (7th Generation)
- Please find the Volume down and the Sleep or Wake button, then press both of them simultaneously. Release the buttons only when you enter recovery mode.
iPhone 6s or iPhone SE (1st Generation)
- Look for the Sleep or Wake button and the home button, then press them simultaneously. Release them upon your iPhone entering recovery mode.
3. Select the option for "Restore." so the next part of the process is easier to complete without backtracking. This is useful when the speed change should affect only one section instead of forcing the whole clip to slow down. If the process stalls, storage space, Wi-Fi stability, and available battery are usually the first three checks worth repeating.
iTunes may fail to recognize your device, and it has complicated steps that may consume a lot of time. iTunes may also take a lot of time to restore your iPhone. If you want another alternative that is user-friendly and fast, then Perfix is the recommended one.
Method 5. Put your iPhone into DFU mode and restore (DATA LOSS)
Step 1: Install iTunes or update it to the latest version on your computer, then connect your iPhone to it.
Step 2: Follow the step below to put it to DFU mode.
- iPhone 8 or later; quickly press Volume up, press shortly the Volume down as well, then press the Power button until your screen turns black. While pressing the button for power, press the Volume down. Also, let go of the power button, hold onto the Volume down button until iTunes notifies you that your iPhone is detected.
- iPhone 6s or earlier; Simultaneously press the Power and Home buttons. After 8 seconds, release the Power button but continue holding the other button till you are notified that your iPhone is detected in iTunes.
- iPhone 7 or 7 Plus; Follow the steps for iPhone 6 above but instead of the Home button, press the Volume down one.
Step 3:tap Restore and select OK in iTunes
Step 4:click "Restore iPhone"
iphone has discharged and does not turn on via restore with itunes
Disadvantages:
- It takes a lot of time to restore your iPhone.
- iTunes does not always recognize your iPhone.
- It is not friendly due to complicated steps.
- Your data will not be saved.
Part 5 Turn to professional help
After trying all the methods above, if your phone still discharges, it is recommended to seek professional assistance.
Method 1. Contact Apple Support
If none of the methods discussed above solves your problem, you can contact Apple support based on your location and seek assistance. Click here to access the list of numbers for various regions.
Method 2. Discuss in Apple Support Communities
You can also seek online assistance by joining their community platforms and sharing your problem with them. However, we do not recommend this method because it may take a long to get feedback. You should book an appointment in the nearby store and get assistance. https://getsupport.apple.com/GetSASO?locale=en_KE
As discussed in this article, there are several ways of fixing an iPhone that discharges and doesn't turn on. But trying each one of them may take a lot of your time.
If you want a guaranteed method that will instantly solve the issue of your iPhone, go for Perfix, and your problem will be solved in a short time.